Post Transactions
Post Transactions
Through this function, you post transactions—either all those that have yet to be posted, or those that you choose based upon limit options, code filters, etc.
- From the menu bar, select Posting>Post Transactions. The Post Transactions dialog box displays.
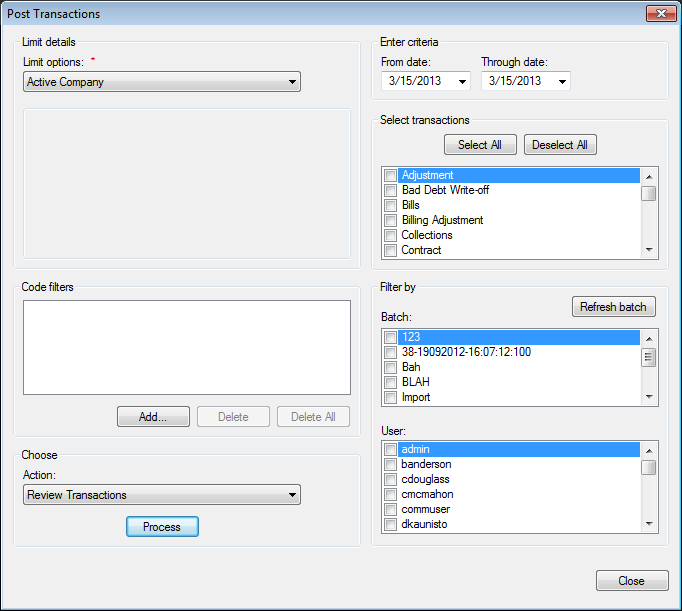
Figure 564: Posting Transactions
Limit options. Select the desired limit options. Refer to Getting Started: Common Functions—Limit Options
Location/Customer. Click Browse and Search for the desired location. Refer to Getting Started: Searching for instructions on searching. To remove the selections in the Location and Customer fields, click Clear
Search bill group. Applies to Click the Browse button and Search for the desired bill group. Refer to Getting Started: Searching for instructions on searching. To remove the billing group selected, click Clear
Code filters. Select the desired code filters. Refer to Getting Started: Common Functions: Code Filters for details on this function
Action. Click the drop-down list arrow and select the desired processing action
From date/Through date. Specifies the date range for which to post transactions. The dates selected in each field, and all dates in between, are included in the processing. Refer to Getting Started: Dates
Select Transactions. Indicates which transactions are to be posted. Click in the selection box next to each desired item. Use the up/down scroll bar along the right side of the field to move through the list
Filter By—Batch. Specifies how to filter the results for posting. Select the desired batch (es). Only payment transactions for the selected batch(es) are posted
Filter By—User. Specifies how to filter the results for posting. Select the desired user names. Only transactions entered by the selected user(s) are posted
Process. Click Process. The processing takes place in the background and the screen refreshes
- If Pre-Posting Report is selected, the Pre-Posting Report dialog box displays.
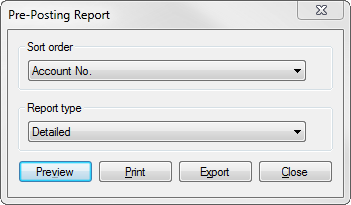
Figure 565: Pre-Posting Report
- Sort order. Click the drop-down list arrow and select how you
want to sort the report—e.g., by account number, customer name, transaction date, etc.
- Report type. Click the drop-down list arrow and select the type
of information the report contains—detailed, condensed, or summary
- Preview. To preview the report prior to printing, click
Preview
Print. To print the report, click Print
- Export. To save the report so it can be viewed in another program
(such as MS Excel, Adobe PDF, or Crystal Reports), click Export. Then in the Save As dialog box, select the location for the file, and the file type, click Save
Close. When you are done with these options, click Close
Select another limit option to work with, or click Close to exit the dialog box