Deposits
UMS Deposit functions are versatile tools that allow you to apply deposits to any Customers, Locations, and/or Accounts. Deposits are also transferrable between Accounts. UMS also provides the ability to calculate and apply compound interest to deposits, and allows multiple options for the return of unused deposits under specified conditions.
Deposit Setup
Adding deposits to accounts requires some initial set up. You can configure the way your system handles deposit creation and receipt through Setup > Company > Deposit Options. Before you can create deposits, you will need to set up specific deposit codes. This is done through Setup > Deposit.
Deposit Options Tab
A new tab has been added for deposits under company setup. To access the tab go to Setup>Company and select the Deposit Options tab.
Figure 201: Deposit Options Tab
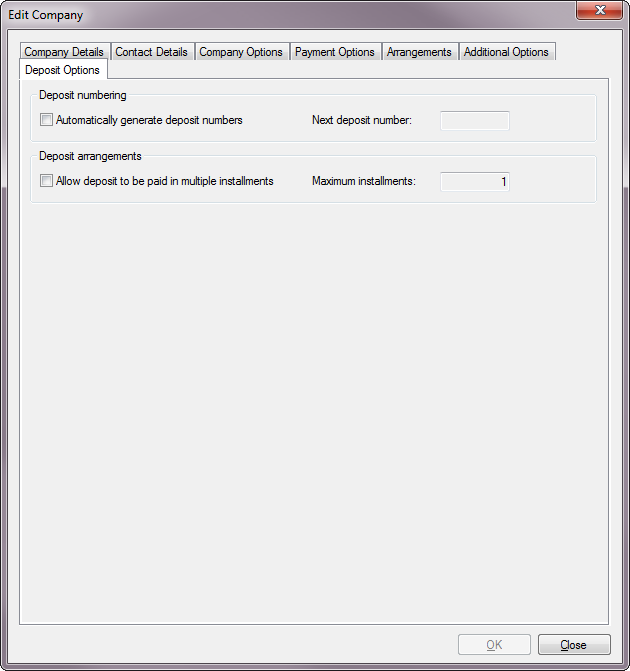
Deposit numbering:
Automatically generate deposit numbers: Check this box if you want the system to create numbers for your deposits as you enter them. It is unchecked by default.
Warning: Once you click OK, checking the box cannot be undone! You will not receive a confirmation box or notice.
Next deposit number: This box will only be active if you checked the Automatically generate deposit numbers box. You can specify where the numbering will begin. If you do not enter a number, UMS will assign a starting number when you click OK.
Deposit arrangements:
Allow deposit to be paid in multiple installments: Check this box if you want to allow payment of deposits over time. It is unchecked by default. You will be able to change this selection later.
Maximum installment number: This field is only active if you checked the Allow deposit to be paid in multiple installments box. A non-zero number must be entered.
Max Deposit Holding Per Customer:
Max Deposit Holding Per Customer: Setting this to a positive dollar amount will prevent the creation of new deposit charges that, if collected, would cause the holding amount to exceed it. This setting can be overriden at the community level.
Setup Deposit Codes
The new deposit enhancements has streamlined the process of adding deposit codes. Much of the methods used to setup codes previously are still used for the enhancement, however there are now three types of accounts rather than the two previously used. The enhancement here is to allow easier transfer of deposits. To reach this area go to Setup>Deposit. This will bring up the Setup Deposit Code screen.
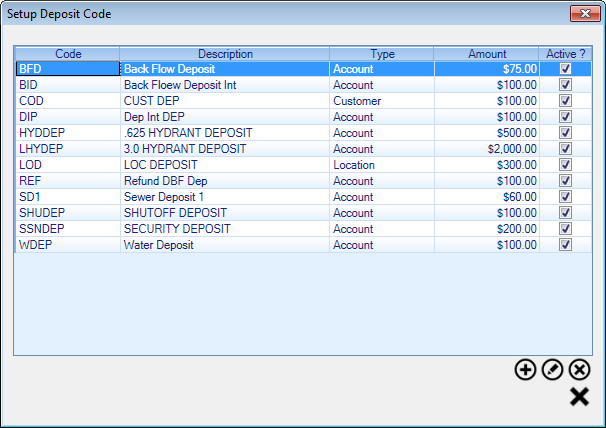
Figure 202: Setup Deposit Code
The list in this window will contain all previously defined deposit codes, summarized with descriptions, types (Customer, Location, or Account), the deposit amounts, and whether or not they are currently active. Use the Add, Edit, and Delete buttons to manage the deposit codes.
Note: Any edits to existing Deposit Codes will apply to all deposits to which the code is applied. This includes past uses. Therefore, all edits are retroactive.
Managing Deposit Codes
Click Add
to create new Deposit Code, or select an existing code and click Edit
to make changes. The New Deposit Code or Edit Deposit Code window will open. Depending on how the code is set up one code can now cover multiple items. Also, a service is no longer required to be selected.
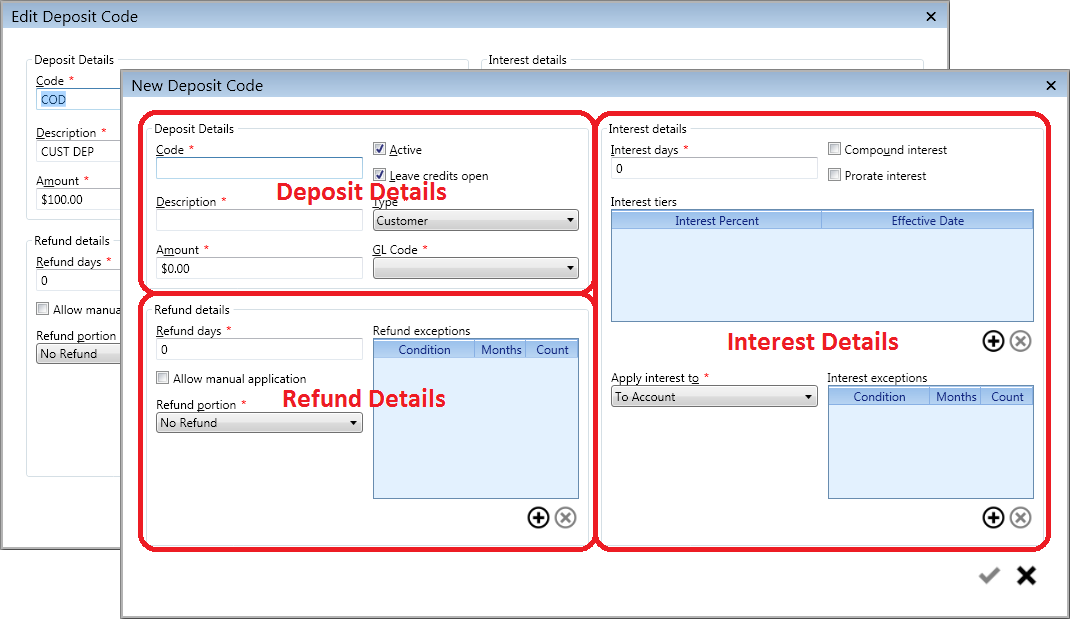
Figure 203: New Deposit Code and Edit Deposit Code
These are essentially the same window, except that the Edit Deposit Code window will be pre-populated, and some fields will not be editable.
The window has three main sections: Deposit Details, Refund Details, and Interest Details. Each section is discussed separately, below.
Deposit Details
Figure 204: New/Edit Deposit Code – Deposit Details
This section contains items related to creating the deposit.
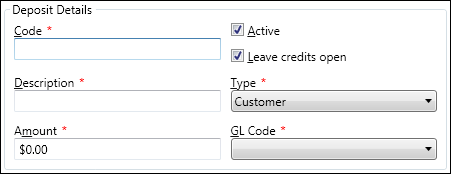
Code: Enter a code designation, up to six characters (including spaces). This code should be descriptive enough to indicate its terms. This is the item you will see in the deposit management screens.
Active checkbox: The box is checked by default for a new code. If it is checked, it will be available for use. If it is unchecked, the code will be inactive and cannot be used.
Leave credits open checkbox: If this box is checked, an overpayment can be applied to another charge. The box is checked by default, but can be unchecked.
Description: Enter a brief descriptive identifier for the code. You can use up to 25 characters, including spaces. This is the item that will appear in the code menu when you create new deposits.
Type: Select Account, Customer, or Location from the drop-down menu.
Note: This field can only be changed for a new code, and is not editable for existing codes.
Account: The code will apply only to a deposit for an Account, which is a specific Customer at a specific Location.
Location: The code will apply to a deposit for a particular Location, which will follow the Location regardless of the current Customer at that Location.
Customer: The code will apply to a deposit for an individual Customer, which will follow the Customer regardless of the current Location of that Customer.
Amount: Enter the standard charge for the type of deposit in question. This value will be entered by default when you select this code, but you will be able to change it as needed.
GL Code: Select the applicable General Ledger code or code group that applies to this type of deposit.
Refund Details
Figure 205: New/Edit Deposit Code – Refund Details
This section contains items related to refunding the deposit.
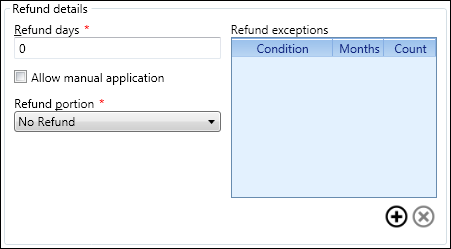
Refund days: This is the number of days that must pass before the deposit can be released for refund or for application to other charges. The default value is 0, which means the deposit can be processed art any time. Leave unchanged or enter a number of days applicable to your processes.
Allow manual application: Check this box to allow the deposit to be applied manually rather than automatically. This means that you can choose to apply some or all of the deposit prior to finalizing the Account.
Note: This box controls whether or not you will be able to manually apply the deposit from the Deposit Master > Apply/Refund Deposit function Refund portion. Select from the drop-down menu how you want refunds for this type of deposit to be handled.
No Refund: Money will not be refunded but held.
Refund All: All deposit money will be refunded.
Refund Fixed: A portion of the deposit will be refunded during a set period of time. If this option is selected, a Refund fixed amount field will open. Enter the fixed amount to be refunded for this particular type of deposit.
Refund Percent: A fixed percentage of the deposit will be refunded after a set amount of time. If this option is selected, a Refund percentage field will open. Enter the percentage to be refunded for this particular type of deposit.
Condition: This is the type of delinquency that will trigger the refund exception. Click once in the cell to select it, and again to open the drop-down menu. Select a delinquency type (Penalties, Late Interest, NSFs, Shutoffs, On Lien, or Broken Arrangement) from the list.
Months: This is the window of past history for which the number of delinquencies will be counted. Click once in the cell to select it and again to activate the cursor. Enter the applicable number of months.
Count: This is the number instances of a given type of delinquency within the specified time that will trigger the refund exception. Click once in the cell to select it and again to activate the cursor. Enter the applicable number of instances.
Add more exceptions as applicable.
Interest Details
Figure 206: New/Edit Deposit Code – Interest Details
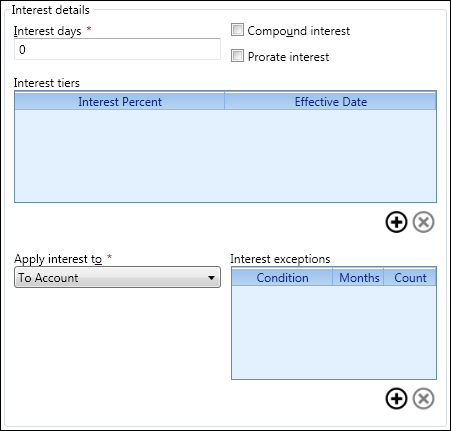
Interest days: This is the number of days that must pass before any interest is paid on the balance of the deposit. Default is 0, which indicates that interest will be paid immediately. Leave unchanged or enter a number of days appropriate for your processes.
Compound interest: Check this box to apply the compound formula to the interest for this type of deposit. If this box is unchecked, simple interest will apply.
Prorate interest: Check this box to prorate the interest paid on this type of deposit. If this box is unchecked, the interest is calculated only based on the set effective date.
Interest tiers: This function allows you to set up interest tiers so that different interest percentages can be paid, according to the set effective date. To add an interest tier, click the Add button just below this field. A new line will open in the grid. This option is not required.
Interest percent: This is the interest level for the tier you are creating. Click in the cell to select, then again to activate the cursor. Enter the applicable interest percentage.
Effective date: This is the date when the paid interest for the tier begins. Click in the cell to select, then again to activate. Either type the date or select it from the drop-down calendar.
Add more interest tiers, as applicable.
Apply interest to: This function allows deposit interest to be applied directly to whichever function is selected. Select an application option from the drop-down menu.
To Account: Any accrued interest will be applied to the Account with the deposit. Payoff order will apply.
To Deposit: Any accrued interest will be added to the deposit principal, and interest will be compounded.
Refund: Any accrued interest will be paid out directly or refunded through another form of payment.
Apply to service: Any accrued interest will be applied to charges for specific service(s). When this option is selected, an additional selection box will appear. The box contains all available services. Choose the applicable service(s) by clicking the checkboxes on or off to select or deselect.
Interest exceptions: This function allows you to defer or deny deposit interest payments based on delinquency history. To add an interest exception, click the Add button just below this field. A new line will open in the grid. This option is not required.
Condition. This is the type of delinquency that will trigger the interest exception. Click once in the cell to select it, and again to open the drop-down menu. Select a delinquency type (Penalties, Late Interest, NSFs, Shutoffs, On Lien, or Broken Arrangement) from the list.
Months. This is the window of past history for which the number of delinquencies will be counted. Click once in the cell to select it and again to activate the cursor. Enter the applicable number of months.
Count. This is the number instances of a given type of delinquency within the specified time that will trigger the interest exception. Click once in the cell to select it and again to activate the cursor. Enter the applicable number of instances.
Add more exceptions as applicable.
When information in all sections is complete, click Save (
 ). You will be returned to the Setup Deposit Code
window, and the new (or modified) code will appear in the code list.
). You will be returned to the Setup Deposit Code
window, and the new (or modified) code will appear in the code list.
Delete Deposit Codes
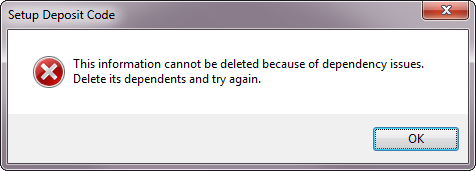
Use the Delete button to delete an existing code that is no longer needed. You will not be able to delete any codes that are already associated with any Deposits in UMS. If you try to delete a code that has been used, the warning below will appear, and you will not be able to continue with the deletion.
Figure 207: Unable to Delete Deposit Code
Managing Deposits
Once deposit setup tasks are completed, you are ready to create and manage deposits. Another area that has benefited from the enhancement is the Deposits tab on the ACP. This is accessed through Account Control Panel > Location > Deposits.
Note: The Account Wizard will have the same options so that you can create deposits as part of a new Account setup process.
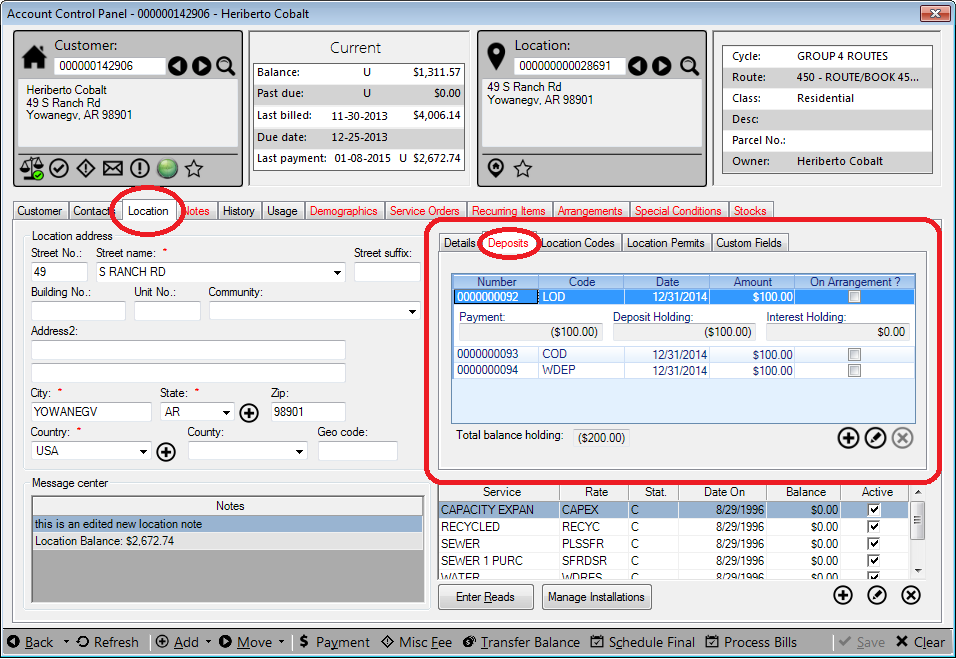
Figure 208: Deposit Management from Account Control Panel
From this tab, all deposits for a given account can be managed. Information about each deposit can be reviewed or edited from this tab, as well. Click on the deposit number to view basic details for that deposit.
Reviewing Deposits
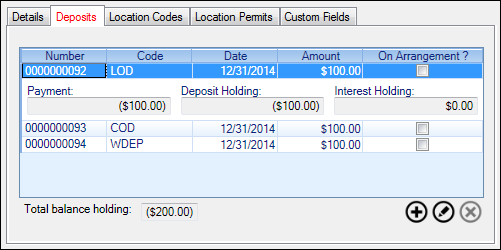
Figure 209: Deposit Review Example
Once a deposit is created, it appears in summary in the deposits tab grid, identified by its unique deposit number, the deposit code that applies to the particular type of deposit, the date the deposit was charged, and the amount of the deposit. There is also a checkbox for each item, indicating whether the payment of the charge is on arrangement.
When a line is selected (the first line, in the above example), the payment, balance, and interest information is shown just below for that particular deposit. The total deposit held for the Account in question will be shown just below the grid, labeled Total balance holding. In the above example, the total of the three deposits is $300, but only $200 has been paid. Expanding the other two deposit line items shows (figure below) that the COD deposit has been paid, and the WDEP deposit has not.
Figure 210: Example Deposit Payment Details
Adding Deposits
Add a new deposit by clicking the Add
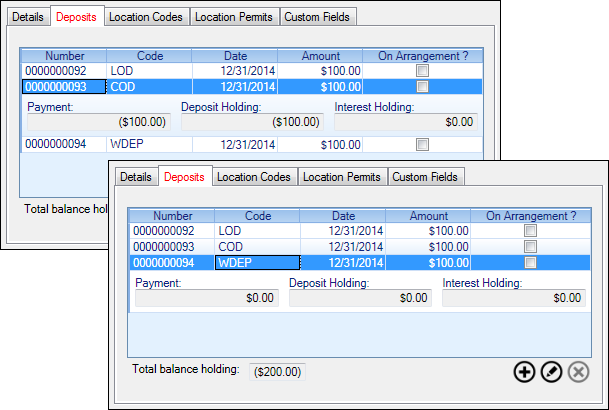
Figure 211: Create Deposit Master
This screen contains basic deposit information. Many of the properties of the deposit are contained within the deposit code, which is selected from this window.
Account No. and Location No.: These fields are automatically filled in based on the Account you currently have open in the Account Control Panel. You cannot edit these. If this is not the correct Account, close the window and select a different Account in the Account Control Panel before proceeding.
Type: Select Account, Customer, or Location from the drop-down menu.
Account: The deposit will apply only to the current Account, which is a specific Customer at a specific Location.
Location: The deposit will apply only to the Location attached to the Account, and will follow the Location regardless of the current Customer.
Customer: The deposit will apply only to the Customer attached to the Account, and will follow the Customer regardless of any Location changes.
Code: Select the code description for this deposit from the drop-down box. Only the active codes that apply to the type selected (Account, Location, or Customer) will appear in the list.
Deposit No.: Enter a unique identifier here. You will not be allowed to save the record if the number you enter has been previously used. This field is required, but may be automatically generated if your company options are configured for this. (Refer to Deposit Options for details.)
Note: You may use up to 25 alphanumeric characters (including spaces), but realize that the display fields you encounter may not be large enough to display extremely long numbers.
Deposit date: This is the effective date of the deposit. Enter a date by typing in the field or by selecting one from the drop-down calendar.
Amount: Enter a non-zero dollar amount for the deposit. If a standard charge has been defined for the particular deposit code you selected, that charge will appear by default. You can edit this number as needed.
On arrangement: This checkbox will only be visible if your Company options are set to allow arrangement payments for deposits. (Refer to Deposit Options for details.) If this item is available, checking the box will cause additional fields to appear.

Figure 212: Deposit Payment Arrangements
There are four additional fields, some of which will not always be available:
Installments. Enter the number of payments that will be made toward the deposit. This number cannot be zero or exceed the number specified in Deposit Options.
Is due with regular bill? If this box is checked, the deposit installments will be included in regular billing.
Note: Only Account Deposits will have this option. This option will not be present for Customer or Location deposits because Locations do not receive bills, and Customers must be associated with Locations (which constitute Accounts) in order to be billed.
Frequency. Select the payment frequency (Weekly, Bi-Weekly, or Monthly) from the drop-down menu.
Note: This selection is not applicable if installments are due with regular billing, because the billing cycle will determine frequency. Therefore, if the regular billing option is chosen, this item will not appear.
Start date. This is the date when the first installment is due. It defaults to the current date, but may be edited as needed. Enter a date by typing it or by selecting one from the drop-down calendar.
Note: This selection is not applicable if installments are due with regular billing, because the next bill will determine the next payment date. Therefore, if the regular billing option is chosen, this item will not appear.
When all information in the Create Deposit Master window is complete, click Save (
). This will save the new
deposit and return you to the Account Control Panel Deposit section.
The newly-created deposit will now appear in the grid.Note: For deposit transactions to be billed or paid, they must first be posted. See Posting Transactions for more information.
Editing Deposits
Modifying a deposit before the transaction is posted will be different from modifying it after it has been posted.
Editing an Unposted Deposit
Prior to posting, an existing deposit will be modified through a Modify Deposit Master window. You will be able to update or correct errors through this window only until the item is posted. This is opened by selecting the unposted item and either double-clicking the deposit or clicking Edit
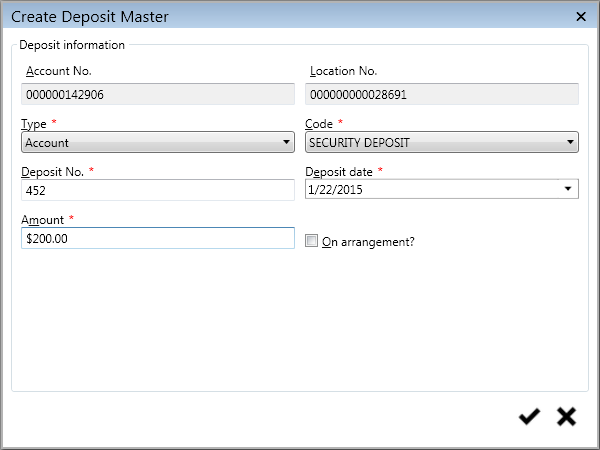
Figure 213: Modify Deposit Master (Customer, Location, Account)
The Modify Deposit Master window will show all previously entered information, but only part of it will be editable.
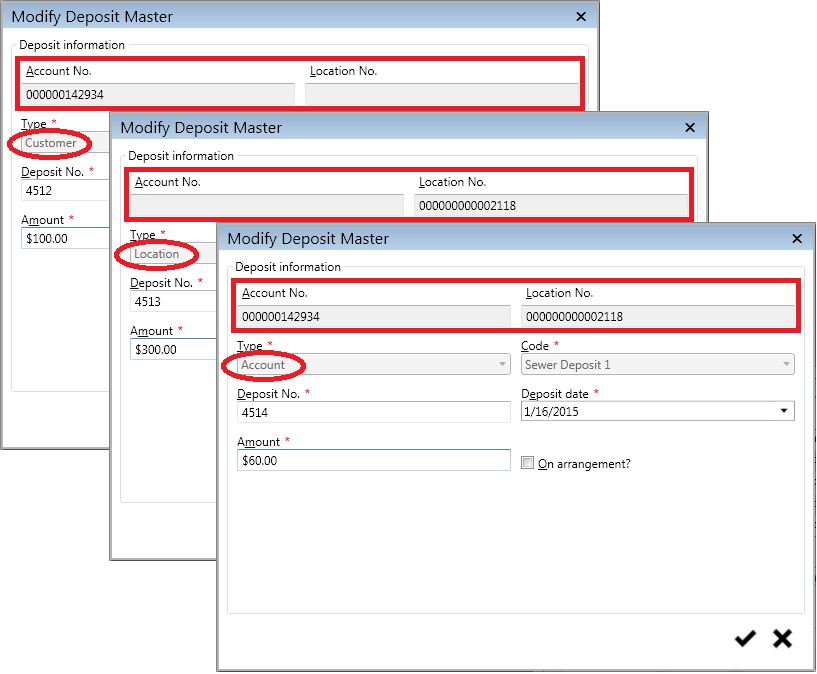
Account No. and Location No. These fields show the Customer/Location information associated with the deposit, and as when the deposit was created, they cannot be edited. However, note that for a saved Customer Deposit, the Location information is not applicable and does not appear. Likewise, for a saved Location Deposit, the Customer information is not applicable and does not appear. Both fields are filled in for Account deposits.
Type and Code. The deposit type and code cannot be edited. If these were selected in error, you will need to delete the deposit and re-create it with the correct selections.
Deposit No. This can be modified only if it was manually entered. Edit as needed.
Deposit Date. This can be edited as needed. Enter a date by typing or by selecting from the drop-down calendar.
On Arrangement. This selection can be changed, and its sub-fields (Installments, Frequency, and Start Date) can be edited as needed.
Amount. The deposit amount can be edited as needed.
Editing a Posted Deposit
Once a deposit transaction has been posted, it can no longer be edited through the Modify Deposit Master window. When you select a posted deposit and double-click or click Edit
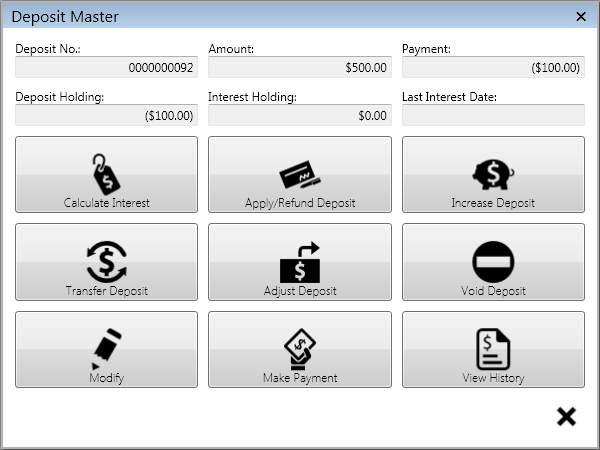
Figure 214: Deposit Master
The upper part of the window contains summary deposit information, including the deposit number, amount, payment applied, deposit and interest holding, and the last interest date. These fields are populated automatically by the system, based on entries elsewhere, and cannot be manually modified. These six items will remain in the screen headers for all of the Deposit Master functions.
The lower part of the screen contains nine function buttons. These are used to manage the deposit and related functions. The options include:
Calculate Interest |
Transfer Deposit |
Modify |
|---|---|---|
Apply Refund Deposit |
Adjust Deposit |
Make Payment |
Increase Deposit |
Void Deposit |
View History |
Calculate Interest
This selection will only be available if the deposit in question has interest tiers attached to it. (Refer to Deposit Codes for further information.)
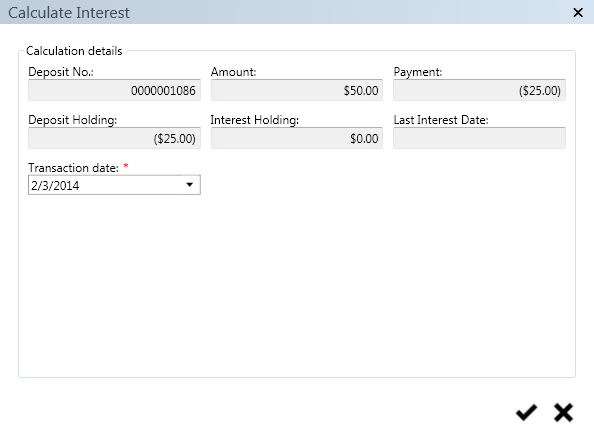
The function of this button is to calculate any interest due on the deposit being held, and to apply it. Application of the interest will depend on how the deposit code attached to the deposit was set up. When you click this selection, the Calculate Interest window will open.
Figure 215: Calculate Interest in Deposit tab
Transaction date is the only editable field on this screen. This is the date when the earned interest will be applied. The field will default to the current date, but can be edited as needed. Type a date or select it from the drop-down calendar.
Apply/Refund Deposit
This selection will only be available if the deposit in question has already been paid.
This function provides a way to apply or refund a deposit prior to final billing. The application details will depend on how the deposit code attached to the deposit was set up. The code details which affect this function are the Refund Details, which include allowing/disallowing manual application of deposits and determining how much of the deposit can be refunded prior to finalization. See Deposit Codes > Refund Details for additional information.
When Apply/Refund Deposit is selected in the Deposit Master, the window that opens will have two radio buttons, Apply and Refund. The options that follow will change, depending on which is selected.
Apply Deposit
The fields available for Apply Deposit will depend on whether Allow manual application was selected in the deposit code setup.
If the Allow manual application box is checked off, the only applicable field will be Transaction date.
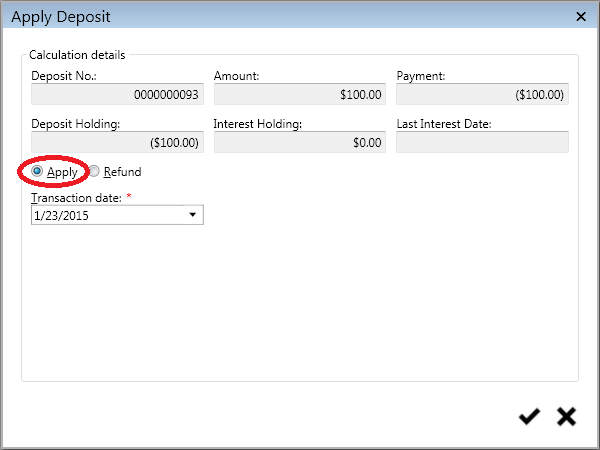
Figure 216: Apply Deposit – Manual Application Disallowed
The transaction date is the date when the deposit application is effective. No option is provided for selecting the amount to be applied because manual application (that is, determining how much is applied) has been disabled. The entire deposit balance will therefore be applied.
Transaction date defaults to the current date, but can be edited as needed. Type in a new date or select one from the drop-down calendar.
If the Allow manual application box is checked on, you will have the additional option of selecting an application amount.
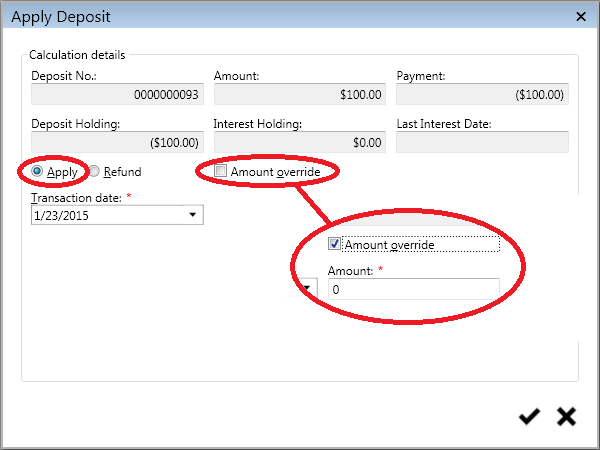
Figure 217: Apply Deposit – Manual Application Allowed
Transaction date. As above, this is the date when the deposit application will be effective. This field defaults to the current date, but can be edited as needed. Type in a new date or select one from the drop-down calendar.
Amount override. When this box is checked on, a new field (Amount) will appear. You can then enter the amount of the deposit to be applied.
The amount available for application is controlled by the selection made in the deposit code Refund detail section, unless an override is entered.
No Refund. You will not be able to apply any amount
Refund All. The full Deposit Holding amount will be applied.
Refund Fixed. Only the fixed amount specified in the deposit code setup will be available for application.
Refund Percent. Only the percentage of the deposit specified in the code setup will be available for application.
The dollar amount entered will supersede the amount (none, all, fixed amount, or percentage) prescribed in the deposit code setup. The number entered in the Amount field cannot be zero and cannot exceed the Deposit Holding amount (which is displayed in the header for reference).
Refund Deposit
When the Refund option is selected, the same two fields will be available, regardless of the refund portion selected in the deposit code setup.
Figure 218: Refund Deposit
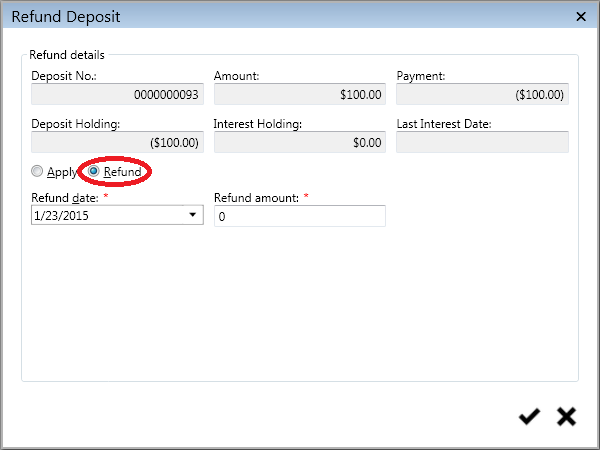
Transaction date. This is the date when the refund transaction will be effective. This field defaults to the current date, but can be edited as needed. Type in a new date or select one from the drop-down calendar.
Refund Amount. Enter the amount of the deposit to be refunded. The number entered in the Amount field cannot be zero and cannot exceed the Deposit Holding amount (which is displayed in the header for reference).
Increase Deposit
This selection will only be available if the deposit in question has already been paid, in part or in full.
This function allows a deposit to be increased without the creating a new deposit. The increase may be created with a new deposit number, if applicable to your Company’s processes, but it will always be associated in UMS with the original deposit.
Note : Only increases can be processed this way, not decreases. This is because the original deposit has been paid (in part or in full), and lowering the amount could result in an overpayment. Creating full/partial refunds of paid deposits is a separate function.
Click the Increase Deposit button to open the Increase Deposit Window.
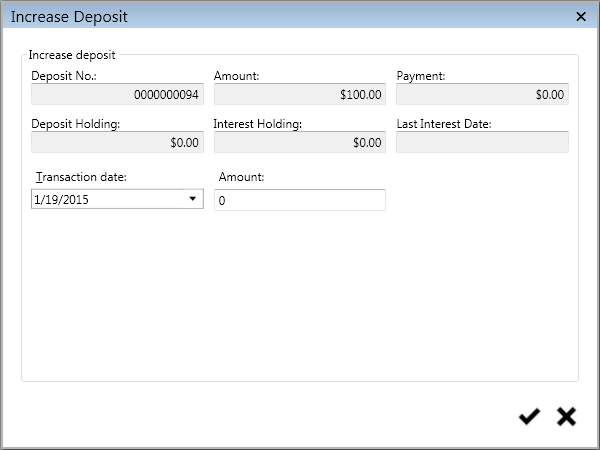
Figure 219: Increase Deposit
Transaction date. This is the date when the increased deposit applies. This field defaults to the current date, but can be edited as needed.
Amount. Enter the new, higher deposit amount. This is the full amount, not the increase over the previous amount.
Click Save to create the additional deposit transaction. This will close the window and save the new charge. You will not receive a confirmation.
Once the deposit increase has been created and saved, it must be posted before it can be finalized and paid. Refer to Post Transactions for further details on posting deposit increases.
Transfer Deposit
This function allows the deposit to be transferred from one Location, Customer, or Account to another. Click the Transfer Deposit button to open the Transfer Deposit window.
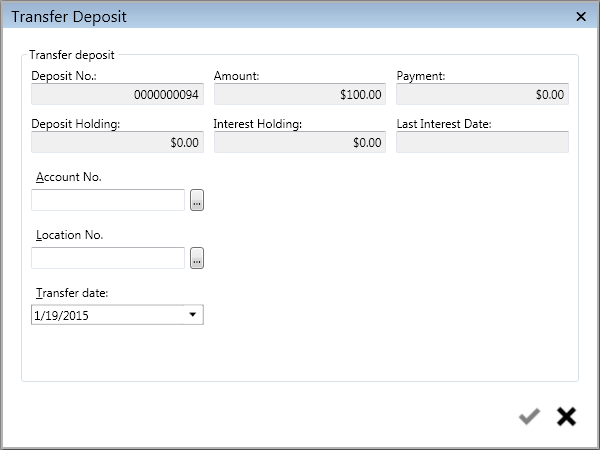
Figure 220: Transfer Deposit –Account Deposit
Account or Location. Select either an Account or Location, and the other field will populate automatically. Use the search window to find the applicable number by any searchable field. If you search for a Customer who is associated with more than one Location, you will be able to select which one applies.
Note that the type of deposit (Location, Customer, or Account) must remain the same in the transfer. Therefore, the transfer form will vary slightly depending on the type of deposit you are transferring.
The above example is a transfer form for an Account deposit, and therefore both Account and Location fields are present. For Customer deposits (which are independent of Location) and Location deposits (which are independent of Customer), only the applicable filed will be listed.
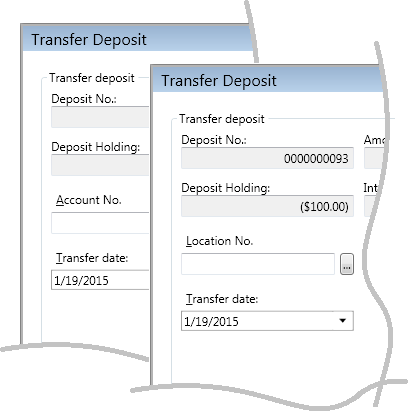
Figure 221: Transfer Deposit – Customer and Location Deposits
Transfer date. This is the date when the transfer transaction applies. This defaults to the current date, but can be edited as needed. Enter a date by typing or by selecting from the drop-down calendar.
Adjust Deposit
This selection will only be available if the deposit in question has not yet been paid.
This function is similar to Increase Deposit, except that deposit amounts can be either raised or lowered from Adjust Deposit.
Click the Adjust Deposit button to open the Adjust Deposit window.

Figure 222: Adjust Deposit
Void Deposit
This option allows voiding a deposit transaction. It is only available when no payments have yet been made for the deposit in question.
Click the Void Deposit button to open the Void Deposit window.
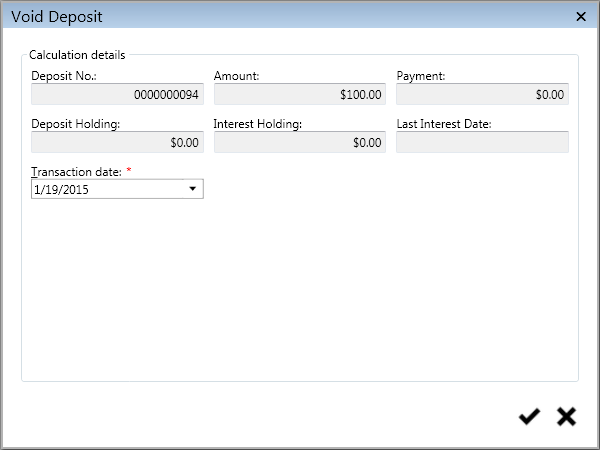
Figure 223: Void Deposit
The only editable field is Transaction date. This is the date when the void will be applied. The field will default to the current date, but can be edited as needed. Enter a date by typing or by selecting from the drop-down calendar.
Modify
This screen allows you to change the deposit master. It will open the Modify Deposit Master screen.
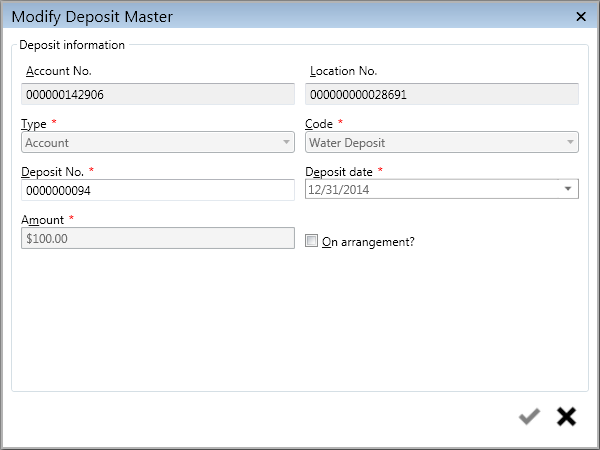
Figure 224: Modify
This is the same Modify Deposit Master screen that opens when you edit an unposted deposit, except that some fields cannot be changed. This is because the deposit has been posted at this point.
Deposit No. This is the only editable data field on the main screen. It can be changed if required. However, note that the new number will always be associated in UMS with the original number. This is not a new deposit.
On arrangement. This checkbox provides the same options as previously discussed, and all fields are active. This can be useful if a Customer needs to set up a payment arrangement after a deposit was created without one.
Make Payment
This option opens the New Payment window, so that you can enter deposit payment(s) without having to exit the deposit management function. Refer to Payment Management for further details on entering payments in to UMS.
View History
This option will generate a Deposit Details History report for the selected Account. The report can then be printed or exported to another program.
Deleting Deposits
Deposits can only be before the charge transactions are posted. If you select a deposit line item that has been posted, the delete button will be grayed out (
).
If a posted deposit charge no longer applies or was added (and posted) in error, you can remove the charge by voiding the deposit (refer to Void Deposit, above). This only applies if no payments have been made on the deposit. Once a deposit has been posted and paid, it cannot be removed.
Mass Add Deposit Wizard
Deposits can be created or increased en masse using the Mass Add Deposit Wizard. The wizard will create a new deposit master if one does not already exists with a matching code, otherwise it will increase the deposit by the chosen amount.
The wizard only works when the "Auto Generate Deposit Numbers" setting is turned on.
On the "Preview" screen of the wizard the deposits can be reviewed prior to their creation. If desired, records can be deleted to remove them from the process. Clicking next on the preview screen will cause the unposted transactions to be created.
The "Review" screen will show all the transactions that the wizard has made. They are unposted and can selectively be deleted. The transactions can be posted using the "Post Transactions" button.
Deposit Process
The ability to Calculate Interest for Account, Location, or Customer is the enhancement for this section. All other functions under the deposit process should be the same as earlier versions. As mentioned in other deposit changes, the term Account has been added to provide a link of that deposit to a specific account. Customer has been redefined to allow a deposit to be tied to an individual rather than a location.
From the Main Menu, select Billing > Calculations > Process Deposits. The Deposit Process window will open.
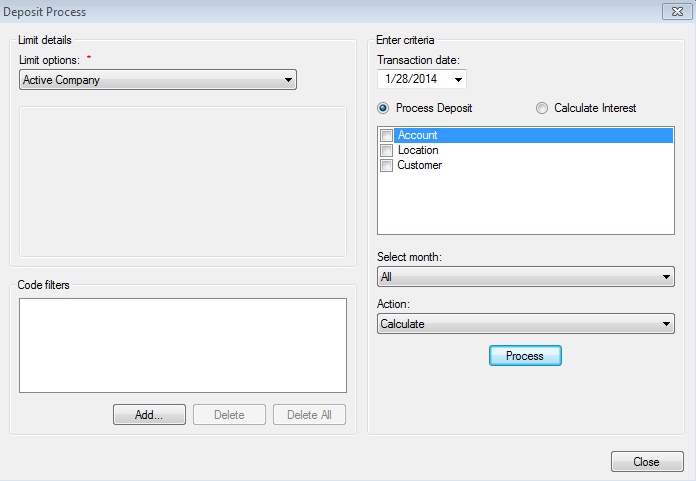
Figure 225: Deposit Process
Limit Options. Select the applicable limit options. Refer to Limit Options for details on using limits.
Code Filters. Select any applicable code filters. Refer to Code Filters for details on using filters.
Transaction Date. This is the date when the deposit transaction will apply. Enter the date by typing or by selecting it from the drop-down calendar.
Action options:
You will only be able to do one of these actions at a time. If you need to perform both tasks, do first one and then the other in two separate steps.
Process Deposit. Selecting this button tells the system to apply the deposit to any outstanding balance according to the pre-defined payoff order.
Calculate Interest. Selecting this button will calculate interest on the deposit, if applicable to your Company.
Deposit type. Select which deposit type(s) you want to process, by checking the box(es) next to Account, Location, and Customer on or off.
Select Month. Select the applicable month from the drop-down list.
If All is selected, the system looks at all deposit dates to determine when a deposit should be applied/refunded. The date is based on the conditions set up with the Deposit Code attached to a give n deposit.
If a specific months is selected, the deposit dates are limited to the month selected.
Action. Select the desired processing action (Calculate, Review Calculations, Unposted Deposits Refund Condensed, Unposted Deposits Refund Summary, or Post) from the drop-down list.
Process. Click the Process button to initiate the action selected above. The processing takes place in the background and the screen refreshes. A green progress bar at the bottom of the screen will indicate that the selected action is taking place.
If a report is chosen as the action, the report window will open as soon as the report is generated.
Once your selected tasks are finished, click Close to exit the function. Refer to Process Bills and Post Transactions for further details of the processes performed in this function.
Deposit Register
Information supplied to the Deposit Register has altered the view of the register itself when displaying or printing the register. Totals are now given by deposit code rather than by service. This means that the summary will no longer display deposit by sewer, water, gas (etc.), but rather by service code.
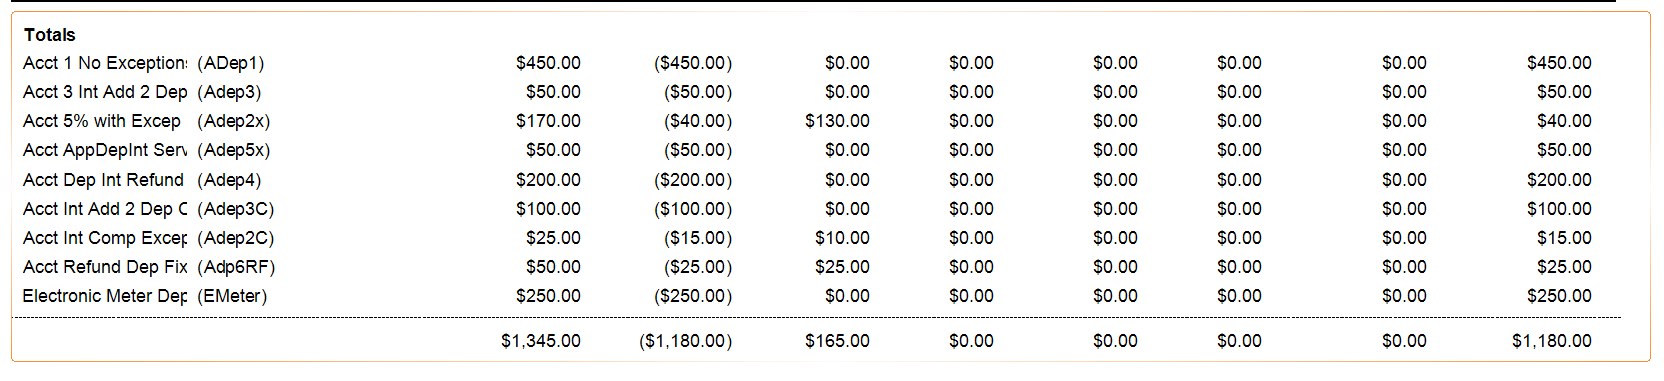
Figure 226: New Deposit Register Summary