Meter Readings
Through this function users may enter, review, and edit meter readings to be used in the billing process.
Prepare for Meter Reads
Through this function, prepare to collect meter readings using route sheets or AMR devices and enter or edit those readings manually. The readings from the AMR Devices are pulled into the system through the Import Meter Reads feature.
Report-Route Sheets-Create printed route sheets for one or more routes to manually collect meter readings.
Select the AMR Device - Create a file of one or more routes to be loaded into the handheld for meter collections.
From the menu bar, select Billing>Meter Reads>Prepare for Meter Reads. The Prepare for Meter Reads dialog box displays
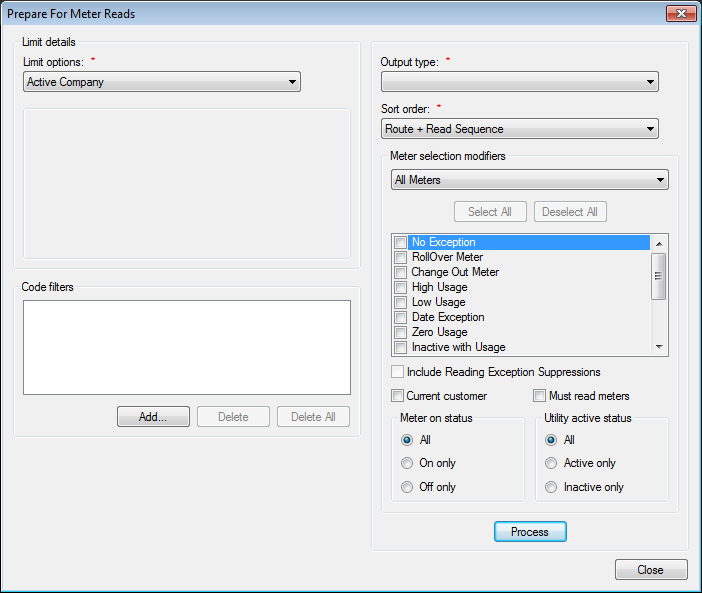
Figure 525: Prepare for Meter Reads
Limit options. Select the desired limit options
Active CompanyProcess for all locations in the currently open company*
CyclesClick Select Cycles. In the Select Cycles dialog box, select one or more cycles. Then click OK. To remove all cycles selected, click Clear
RoutesClick Select Routes. In the Select Routes dialog box, select one or more routes. Then click OK. To remove all routes selected, click Clear
CommunitiesClick Select Communities. In the Select Communities dialog box, select one or more communities. Then click OK. To remove all selected communities, click Clear
Location/Customer Click Browse and, from Search enter the criteria for the desired location. To remove the selections in the Location and Customer fields, click Clear
Bill groupClick Browse and, from Search for the desired bill group
Code Filters. Click Add and add the desired code filter(s)
Output type. Click the drop-down list arrow and select the desired service from those shown
Manual Reading. Open the Enter Meter Reads window to review, enter, or edit meter reads for the selected locations
AMR-(Name of the AMR). Create a file to be loaded into the AMR device
Report – Route Sheet. Print a route sheet for manually collecting the meter reads
Report – Meter Exceptions. Create a printable report of meter read exceptions. Read exceptions uncover read situations that could cause incorrect billings
Sort order. Select the order in which the report or file should list the meters, by Route + Read Sequence or by Service Address
Meter selection modifiers.
All Meters. Includes all meters that meet the limit option and code filter criteria
Specific Meters. Allows the user to limit the report or file to only meters identified as having at least one of the selected exceptions
Current customer. Limits the report or file to only current occupied locations
Must read meters. Limits the report or file to only meters that have exceeded their maximum number of consecutive estimates
Meter on Status. Limits the report or file based on meter on/off status
Utility Active Status. Limits the report or file based on the utility status. (Active or Inactive)
Read Type. Limits the report or file based on the read type.
Create Route Sheet
- From the menu bar, select Billing>Meter Reads>Prepare for Meter
Reads. The Prepare for Meter Reads dialog box displays
Set the Limit Options and Code Filters
Under Output type select Report – Route Sheet
Set the Sort order
Select the Meter Selection Modifiers
Click Process. The Meter Reading Route Sheet report opens to a preview window, from which it can be saved or printed
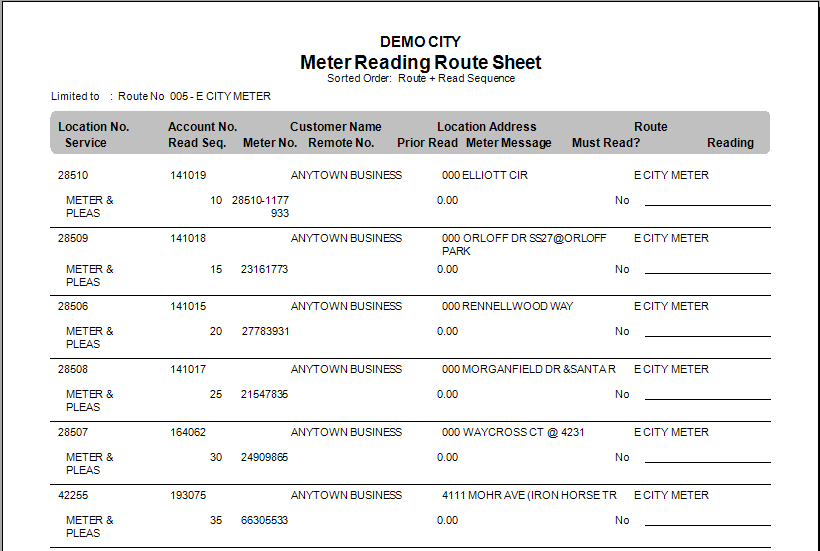
Figure 526: Meter Reading Route Sheet
Create File for AMR Device
- From the menu bar, select Billing>Meter Reads>Prepare for Meter
Reads. The Prepare for Meter Reads dialog box displays
Set the Limit Options and Code Filters
Under Output type select AMR-(Name of AMR)
Set the Sort order
Select the Meter Selection Modifiers
Click Process. The Save As dialog box opens
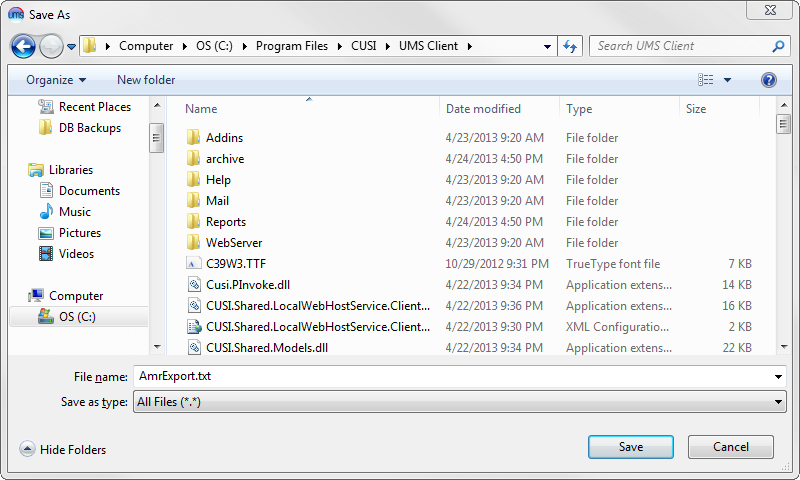
Figure 527: Select AMR File Location
Browse to a location, enter a name for the file, and click Save. A message will appear that the file has been saved successfully

Figure 528: Meter Reading Export Completion Message
Click OK to clear the message
Manually Enter Reads
- From the menu bar, select Billing>Meter Reads>Prepare for Meter
Reads. The Prepare for Meter Reads dialog box displays
Set the Limit Options and Code Filters
Under Output type select Manual Reading
Set the Sort order
Set the Meter selection modifiers
Click Process. The Enter Meter Readings screen opens, displaying the meter and read information in a grid for review or editing
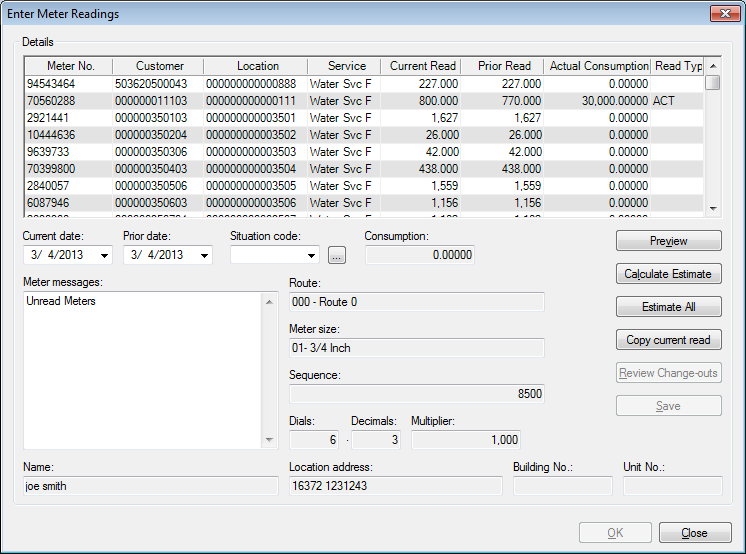
Figure 529: Enter Meter Readings
Set the Current Date to the day the readings were captured
Click into the grid in the Current Read column and type the new read
Press the Enter key; the cursor will move to the next current read in the grid. Continue typing the reads and pressing enter to move through the list. Each read will be set to the Current Date entered on the first read as the Enter key is pressed
Note: Manually re-entering the same read or read date will result in the meter being marked as read, but with zero usage. Skipping the row altogether however (by using the arrow keys), will result in the meter being unread.
When all reads have been entered, click Save
Along the right side of the screen are buttons for accessing additional functions
Preview. Preview the Meter Readings report, an edit list of the reads that have been entered or captured
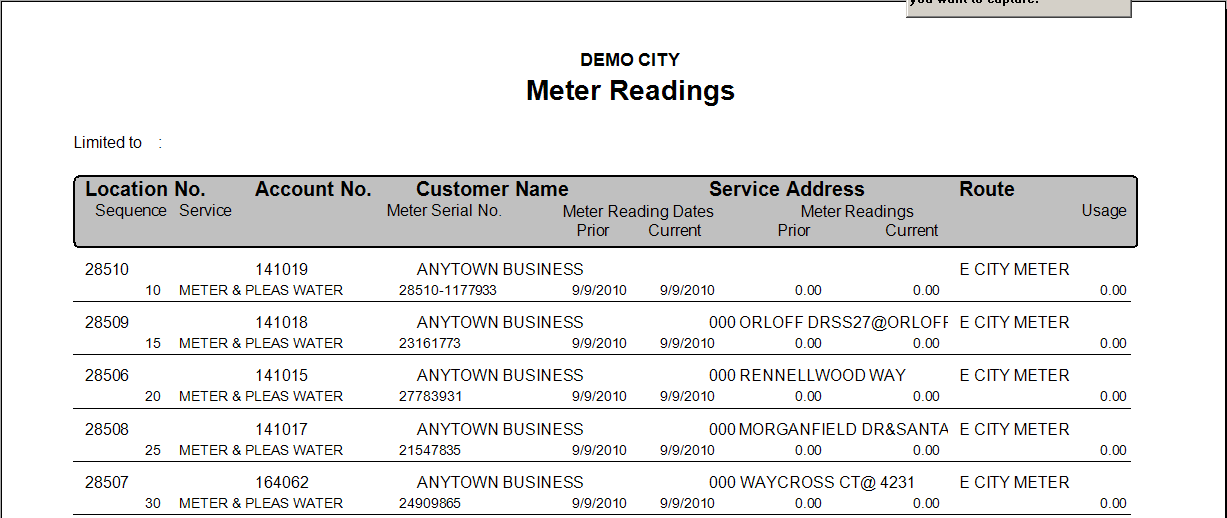
Figure 530: Meter Reading Sheet
Calculate Estimate. Calculate an estimated read for the selected meter
Estimate All. Calculated estimated reads for all meters to which the list has been limited
Copy Current Read. Contact a UMS technical representative before using this option. This option will copy the Current Read to the Prior Read, and is normally only used during conversion
Review Change-outs. A changed out meter will only display the current meter information in the grid; use this button to review the readings and date information from the removed meter
Save. Save changes to the meter read information
Estimate Meter Reads
From the menu bar, select Billing>Meter Reads>Prepare for Meter Reads. The Prepare for Meter Reads dialog box displays
Set the Limit Options and Code Filters
Under Output type select Manual Reading
Set the Sort order
Set the Meter selection modifiers
Click Process. The Enter Meter Readings screen opens, displaying the meter and read information in a grid for review or editing
For a single meter:
Select the meter to be estimated from the list in the grid
Click Calculate Estimate. The Estimate a Meter Reading dialog box opens
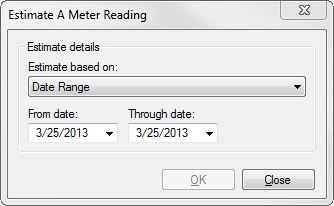
Figure 531: Estimate a Single Meter Reading
Choose whether to base the estimate on Date Range, Manual, or Minimum
- Date Range. Enter a From date and To date. The system
will find the average usage for the date range and calculate the estimated read by average usage
- Manual. Enter an estimated consumption amount for the
location
- Minimum. The system will estimate a new read with consumption
equal to the minimum allowance for the location’s rate code
Click OK
Click Save
For a group of meters:
Click Estimate All. The Estimate All Meter Reads dialog box opens
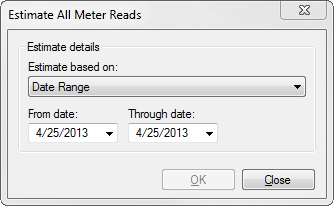
Figure 532: Estimate All Meter Readings
Choose whether to base the estimate on Date Range, Manual, or Minimum
- Date Range. Enter a From date and To date. The system
will find the average usage for the date range and calculate the estimated read by average usage
- Manual. Enter an estimated consumption amount for the
location
- Minimum. The system will estimate a new read with consumption
equal to the minimum allowance for the location’s rate code
Click OK
Click Save
Review Read Exceptions
From the menu bar, select Billing>Meter Reads>Prepare for Meter Reads. The Prepare for Meter Reads dialog box displays
Set the Limit Options and Code Filters
Under Output type select Manual Reading
Set the Sort order
Set the Meter selection modifiers
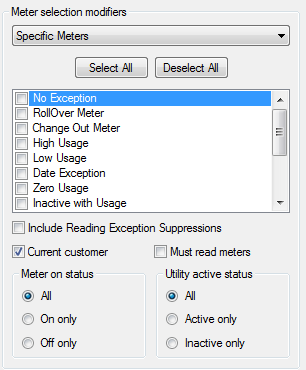
Figure 533: Reading Exceptions
- No Exception. Include meter readings that did not generate an
exception
- Rollover Meter. Rollover exceptions are created when the
current meter read is smaller than the prior meter read. This makes it appear that the meter counter has reached the maximum recordable number and started again from zero
- Change Out Meter. Meters changed out during the current
billing period
- High Usage. Meters with usage that falls above the set
variance amount. UMS allows the variance to be set based on service and revenue class
- Low Usage. Meters with usage that falls below the set variance
amount
- Date Exception. Reads with dates that fall outside the Minimum
and Maximum number of days for the billing period
- Zero Usage. Reads that have a new current date, but the recorded
reading is the same as the prior reading
- Inactive with Usage. Readings for meters associated with inactive
services
Estimated Reads. Readings flagged as estimates
- Unread Meters. Meters that do not have a current read or current
read date
- Meters with Situation Codes. If the company has been
configured to use Situation codes, this option will include any such meters
- Meter off With Usage. Meters turned off in the billing system
those have current recorded usage
- High-Off Season Usage. For seasonal rates, this option
identifies meters that are showing High usage for the off season
- Negative usage. Identifies meters that are reporting a
negative usage.
Note: If the current read is smaller than the prior read, and the amount of difference between the two reads is one-half or less of the maximum usage for the meter’s number of dials, the usage will be treated as negative. If the difference is more than one-half of the maximum usage available to the meter, it will be treated as a rollover read
Click Process. The Enter Meter Readings screen opens, displaying the meter and read information in a grid for review or editing
Print Meter Exceptions Report
- From the menu bar, select Billing> Meter Reads>Prepare for Meter
Reads. The Prepare for Meter Reads dialog box displays
Set the Limit Options and Code Filters
Under Output type select Report – Meter Exceptions
Set the Sort order
Set the Meter selection modifiers
Click Process. The Meter Exceptions – Detailed screen opens to be reviewed, saved, or printed
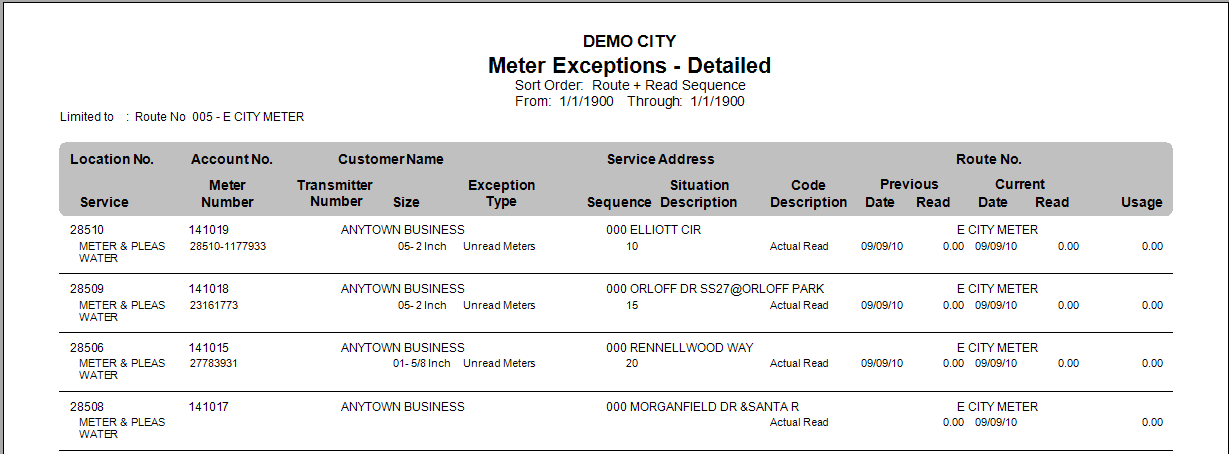
Figure 534: Example of Meter Exceptions Report
Import Meter Reads
This function allows the user to import a file of meter reads into UMS.
Navigate to Billing>Meter Reads>Import Meter Reads
Select the Device Type from the options in the list
Click Browse to find the location of the import file
Set a Read Date. This acts as a default date for import records that do not have a read date.
Select the Resequence option
No Resequence. Do not resequence the route on import
AMR Route Sequence. Resequence the route to match the sequence held by the AMR software
Meter Read Date + Time. Resequence the route into the order in which reads were entered to the AMR
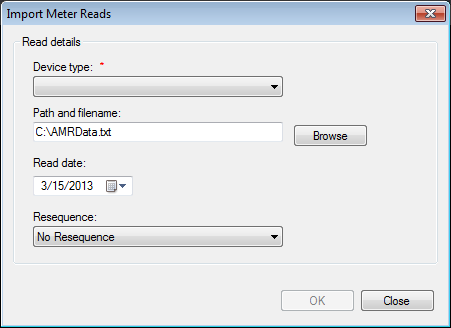
Figure 535: Import Meter Reads
When the file finishes processing, a message will display the number of reads that imported successfully
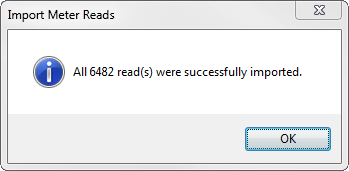
Figure 536: Imported Meter Reads Are Successful Message
Click OK to clear the imported records message. The Import error list will open in a preview window. Some of the most common errors are This Meter ID does not exist, Read will not be updated; newer read may exist in database, and Invalid File or Format
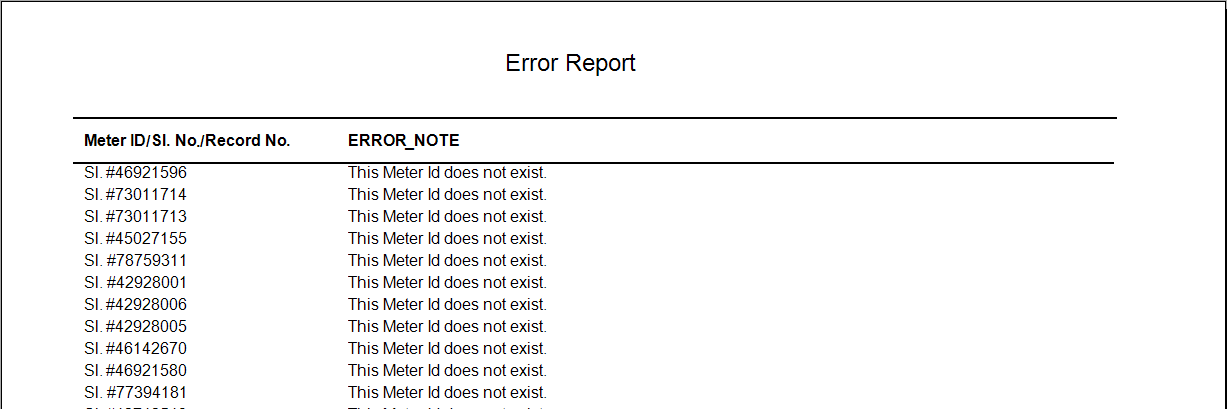
Figure 537: Imported Meter Reads Error Report
This Meter ID does not exist. The listed meter ID appeared in the import file but could not be matched to a meter serial number in the billing system
Read not updated; newer read may exist in database. The meter read in the file has an older date than the current read already listed in the database
Invalid File or Format. The indicated record within the import file did not match what UMS expected based on the configuration file
Review Meter Read Exceptions to view and edit potentially invalid reads
Unread meters should include any records that generated an Invalid File or Format or Meter ID does not exist error
To re-read meters, select Create a Route Sheet or Create a File for AMR Device that is limited to the Specific Meter exception types that require a new read
Make Corrections to Reading Dates
Use this option to correct meter reading dates according to company, customer/location, routes, cycles, and/or bill groups. Please note that this option changes the date for all reads within the selected limit option and code filter criteria, and it cannot be reversed once processed.
From the menu bar, select Billing>Meter Reads>Make Corrections to Reading Dates. The Make Correction to Meter Reading Dates dialog box displays
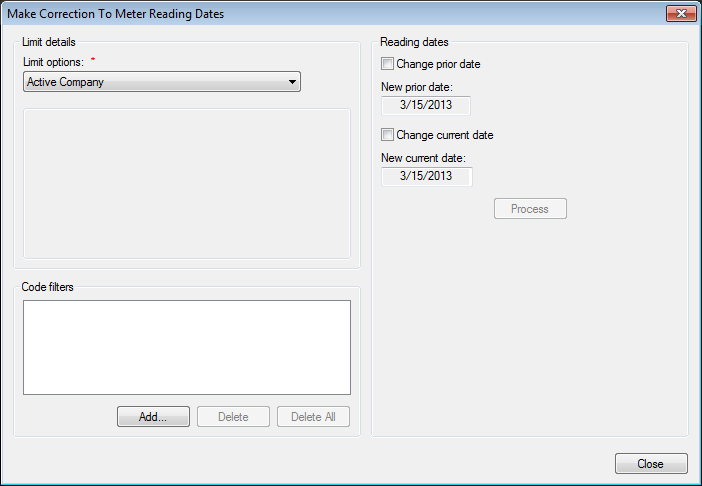
Figure 538: Make Correction to Meter Reading Dates
Limit options. Select the desired limit options
Active Company. Process for all locations in the currently open company
Cycles*. **Click the **Select Cycles button. In the Select Cycles dialog box, select one or more cycles. Click OK. To remove all cycles selected, click Clear
Routes*. Click Select Routes. In the Select Routes dialog box, select one or more routes. Click OK. To remove all routes selected, click Clear
Communities. Click Select Communities. In the Select Communities dialog box, select one or more communities. Click OK. To remove all selected communities, click Clear
Location/Customer. Click Browse and, from Search enter the criteria for the desired location. To remove the selections in the Location and Customer fields, click Clear
Bill group*. Click Browse. From Search, locate the desired bill group
Code Filters. Click Add and add the desired code filter(s)
Change prior date. Click in the checkbox to select this option, and then indicate a date in the New prior date field
Change current date. To change the current meter reading date, click in this box. Then indicate a date in the New current date field
Click Process. The processing takes place in the background and the screen refreshes
When the necessary dates have been changed, click Close to exit
Resequence Route
Use the Resequence Route functionality to reorder the locations along a route to match the order in which they are normally read.
From the menu bar, select Billing>Meter Reads>Resequence Route. The Choose a Route to Resequence dialog box displays
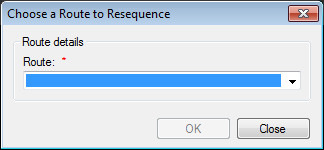
Figure 539: Choose A Route to Resequence
In the Route field, click the drop-down list arrow and select the route to resequence.
Click OK. The Resequence Route dialog box displays.
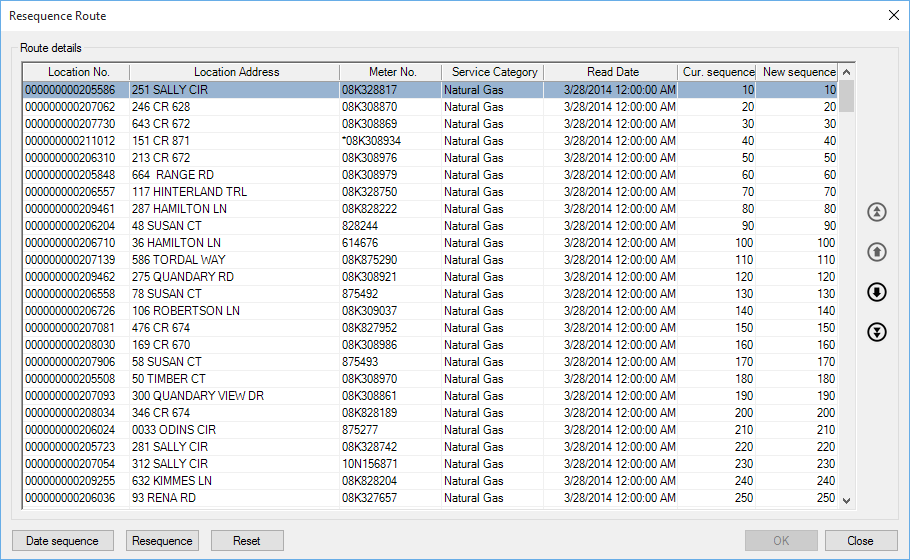
Figure 540: Choose Route to Resequence
Change the order of the routes by selecting a location in the list and clicking the up/down arrows on the right-hand side of the screen
To move the selected location to the top or bottom of the list, click the double up/down arrows
As the location is moved up or down the list, the sequence number will change to indicate the location’s new position along the route
Date sequence button orders the devices based on the last read date/time.
Resequence button orders the devices sequentially starting from 1.
Reset button reverts any changes made to the sequence.
Click OK
Multi-Register AMR Import
UMS has the ability to import readings for multi-register meters. UMS comes with built-in support to import multi-register readings from "Neptune ARB NSight file layout". The default AMR import configuration file for "Neptune ARB NSight" is installed with the UMS Server software and is located under "<UMS Server install directory>\Config\NeptuneARBNSightImport.xml".
The AMR Type "Neptune ARB NSight" in tblAMRType should be set to True for IsImport. When importing meter reads on the Import Meter Reads screen, select Neptune ARB NSight.
Go to the Service Configuration screen > System Settings and set the AMR Import Configuration File Path to Config\NeptuneARBNSightImport.xml as seen in the graphic below.
UMS Server Configuration
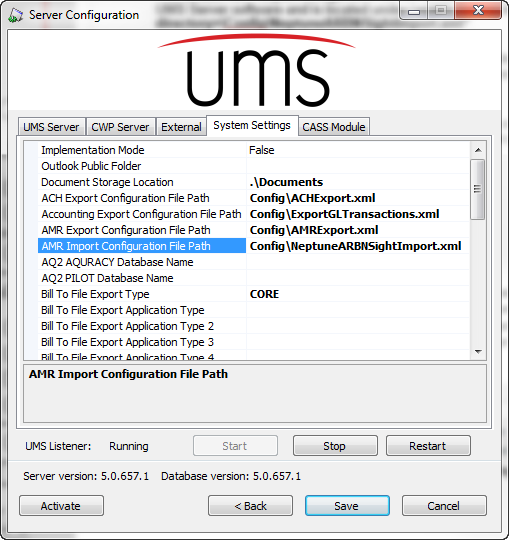
Figure 541: Server Configuration
When importing the Meter Read File at Billing Menu > Meter Reads > Import Meter Reads, select "Neptune ARB NSight" as the file layout.
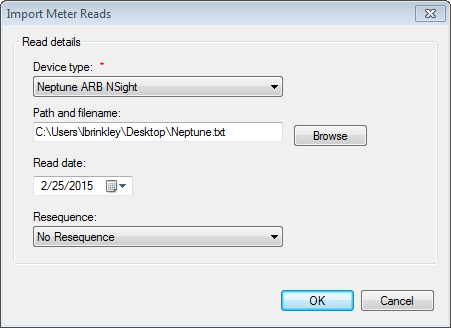
Figure 542: Import Meter Reads
Standard UMS Server Configuration
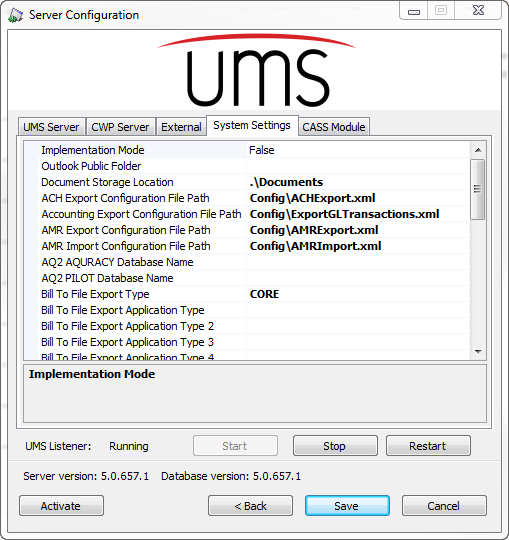
Figure 543: Standard Server Configuration
Any of the xml import layout files from AmrImport found at Program Files\CUSI\UMS Server\Config can handle multi-register meters by adding the three lines to the AmrImport.xml file. The START_POSN and END_POSN must be change to match the import file.
<amr:READ_MEASUREMENT_TYPE SIZE="4" EXCLUDE="N" START_POSN="62" END_POSN="65">
<amr:INVALIDDATA PATTERN="" REPLACEVALUE=""></amr:INVALIDDATA> </amr:READ_MEASUREMENT_TYPE>