Delinquency Transactions
Create Delinquency
Through this function you process delinquencies.
From the menu bar, select Billing>Calculations>Create Delinquency. The Create Delinquency dialog box displays.
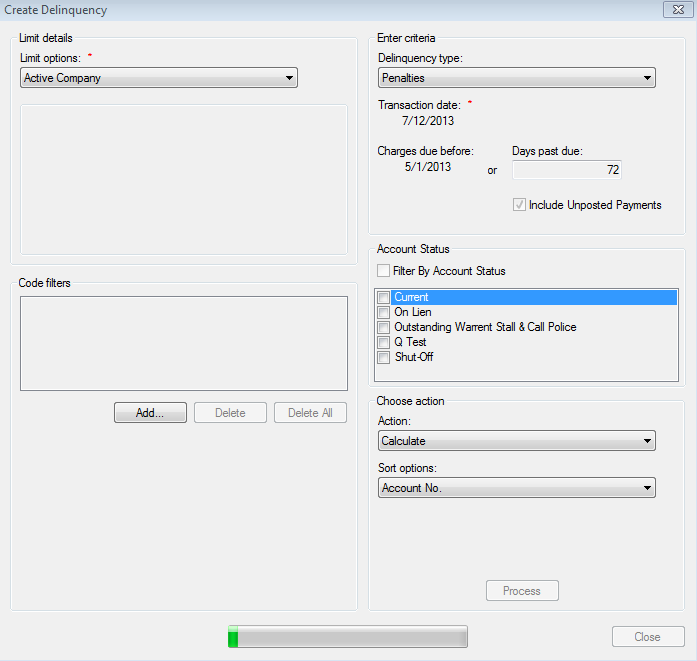
Figure 371: Create Delinquency
Limit options. Select the desired limit options. Refer to Getting Started> Common Functions—Limit Options
Location/Customer. Click Browse and, from Search for the desired location. Refer to Getting Started>Searching for instructions on searching. To remove the selections in the Location and Customer fields, click Clear
Search routes. Click Select Routes. In the Select Routes dialog box, click the applicable route. Then click OK. To remove all routes selected, click Clear
Search cycles. Click Select Cycles. In the Select Cycles dialog box, click the applicable cycle. Then click OK. To remove all cycles selected, click Clear
Bill group. Click Browse and, from Search for the desired bill group. Refer to Getting Started>Searching for instructions on searching
Code Filters. Click Add
 and add the desired code
filter(s). Refer to Getting Started>Code Filters for details on
making a selection in this portion of the dialog box
and add the desired code
filter(s). Refer to Getting Started>Code Filters for details on
making a selection in this portion of the dialog boxDelinquency type. Click the drop-down list arrow and select the type of delinquency to process: Penalties, Interest, Shutoffs, Bad Debt Write-Offs, Collection Sold, Lien Creation, or Lien Write-offs
Shutoffs. Customers can be alerted to the Shut Off date with an automated phone system. Refer to the section entitled, AMS Call Interface. Click Create Work order. Refer to the section entitled, Create Work Orders from Shutoffs
Bad Debt Write-Offs. In the Minimum past due balance field, type the dollar amount balance that must be passed due to create a delinquency
Collection Sold. Click the Collection Data button. Refer to the section entitled>Collections Sold Data
Transaction date. Click the drop-down list arrow and select the applicable date
Charges due before. Click the drop-down list arrow and select the applicable date. The Charges due before date MUST be at least one day after the Due Date. You may also choose to indicate the days past due in lieu of a date. If billing is done monthly and charges should only be created for those customers with two bills past due, enter a date that is 60 days prior to the Transaction Date.
Days past due. Type the number of days past due that apply to the delinquency type. You may also choose to select a date before which charges are due
Include Unposted Payments. When selected, will include any unposted payments made
Action. Click the drop-down list arrow and select the desired processing action: Calculate, Review Calculations, Delinquency Edit List, Post, Preview Register Detail, Preview Condensed, or Preview Register Summary
Sort options. Click the drop-down list arrow and select the desired sort option: Account No., Location No., Name, Zip Code, or Route + Read Sequence
Process. Click Process. The processing takes place in the background and the screen refreshes
Select another limit option to work with, or click Close to exit the dialog box
Post and Create Miscellaneous Statements
Some delinquency types allow immediately creating a miscellaneous statement upon posting (if the company option has been enabled). These types are Penalty, Interest, Shutoff, and Lien Creation. After selecting the Post action, click "Create misc. statement" and enter a due date for the miscellaneous statement. This process will:
Post each delinquency
Create a miscellaneous statement for each posting
Assign the selected due date to each miscellaneous statement
Flag each new miscellaneous statement as printed
If automatic customer communication is enabled, any customers enrolled in an automatic communication preference will be sent a statement using the subscribed automatic methods.
Create Work Orders from Shutoffs
When working with the Create Delinquency function, if the Delinquency type of Shutoff is selected, it is necessary to create a work order. To display this dialog box, do the following:
While viewing the Create Delinquency dialog box, move to the Delinquency type field
Click the drop-down list arrow, select Shutoff
Click Create Service Order. The Create Service Orders from Shutoffs dialog box displays
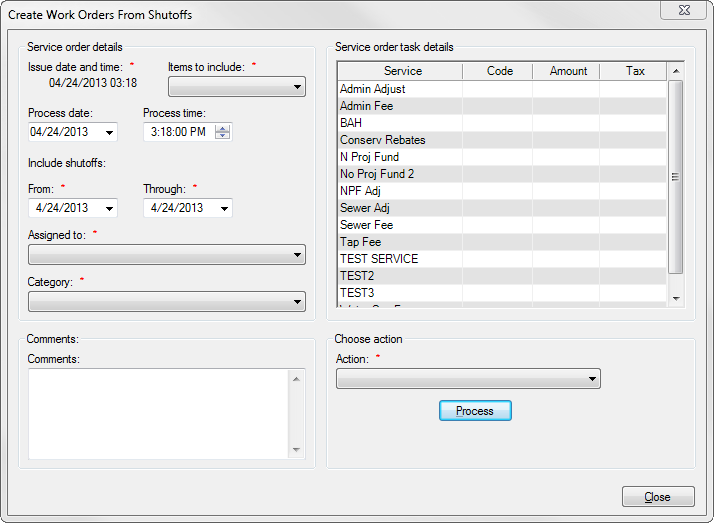
Figure 372: Create Work Orders From Shutoffs
Issue date and time. By default, the current date/time is displayed. This field cannot be edited
Items to include. Species whether metered, non-metered, or both should are to be included on this work order. Click the drop-down list arrow, and select the desired choice
Process date. Specifies the date on which the work order is to be processed. Click the drop-down list arrow and select the applicable date
Process time. Specifies the time at which the work order is to be completed. Click in the field and type in the time. Press tab to move between the various components of the time (e.g., hours, minutes, AM/PM)
Include shutoffs. Indicates the date range for which to include shutoffs. In the From and Through fields, click the drop-down list arrow and select the applicable date
Assigned to. Click the drop-down list arrow, and select the desired choice
Category. Indicates the category for this work order. Click the drop-down list arrow, and select the desired choice: All, None, Reconnect, Repair, Reread, or Shutoff
Comments. Type any comments related to this work order. This is a free-form text field and any combination of letters, numbers, and symbols may be entered
Work order task details. All available services are shown under the Services column. Click in the Code column, and select the desired code for this work order
Action. Click the drop-down list arrow and select the desired option
Create work orders. When selected, generates all the work orders for the location related to the shut off. For example, if shut off involves reading the meter and then shutting it off, two work orders are generated
Review work orders opens a dialog box in which you can view all work orders that were generated
Preview work orders. Prints all the existing work orders generated
Collection Sold Data
Through this dialog box, you enter all the information regarding collection of a debt. To display this dialog box, do the following:
While viewing the Create Delinquency dialog box, move to the Delinquency type field
Click the drop-down list arrow, select Collections Sold
- Click Collection Data. The Enter Collection Sold Data dialog box displays |
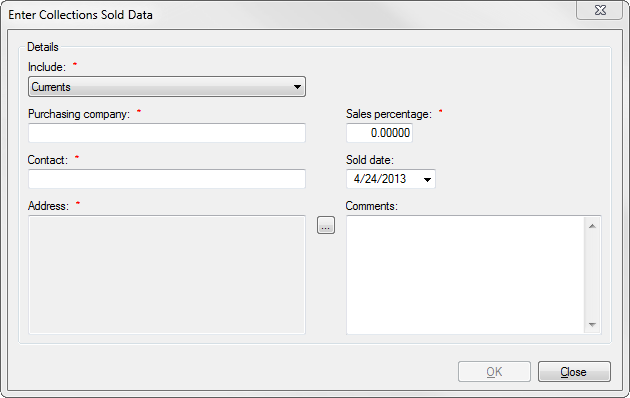
Figure 373: Enter Collection Sold Data
Include. Indicates what to include in the collection data: Current, Final, or Currents & Finals
Purchasing company. Specifies the name of the company that is purchasing this debt for collection. Type the name in the field
Contact. Specifies the name of the person at the purchasing company. Type the contact name in the field
Address. Specifies the address for the purchasing company. Click Browse, and complete the Setup Location Address dialog box. Refer to File Menu: New Customers—Customer Maintenance
Sales percentage. Indicates the percentage your company receives from any amount collected by the purchasing company. Type a percentage in the field
Sold date. Indicates the date this debt was sold. Click the drop-down list arrow and select the applicable date
Comments. Type any comments about this debt. This is a free-form text field and any combination of letters, numbers, and symbols may be entered
Click OK