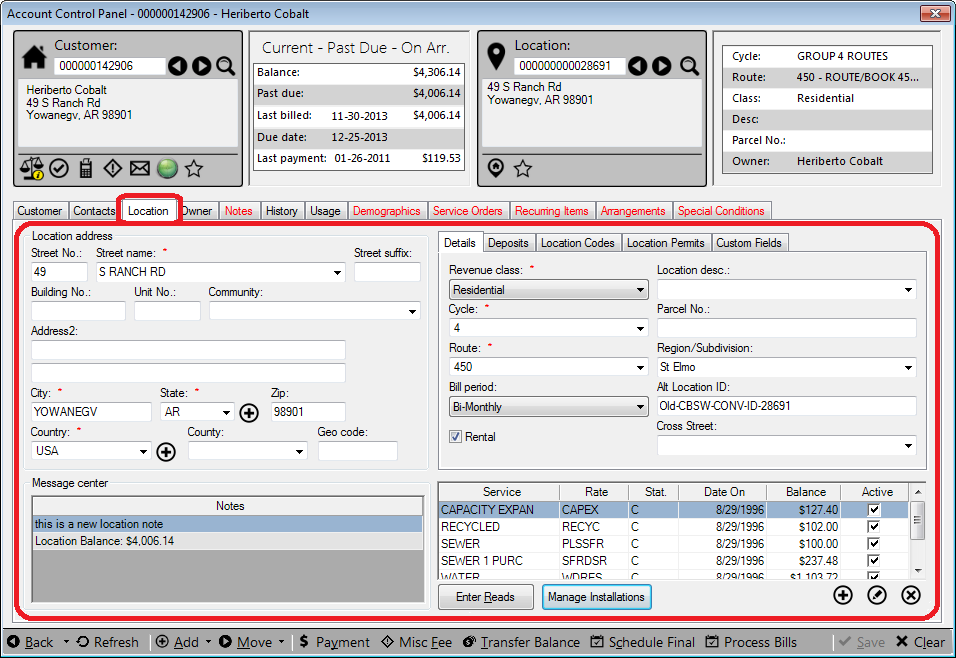
Account Control Panel
The Account Control Panel is the screen that appears upon log on to UMS. This window is the point of access for most day-to-day functions.
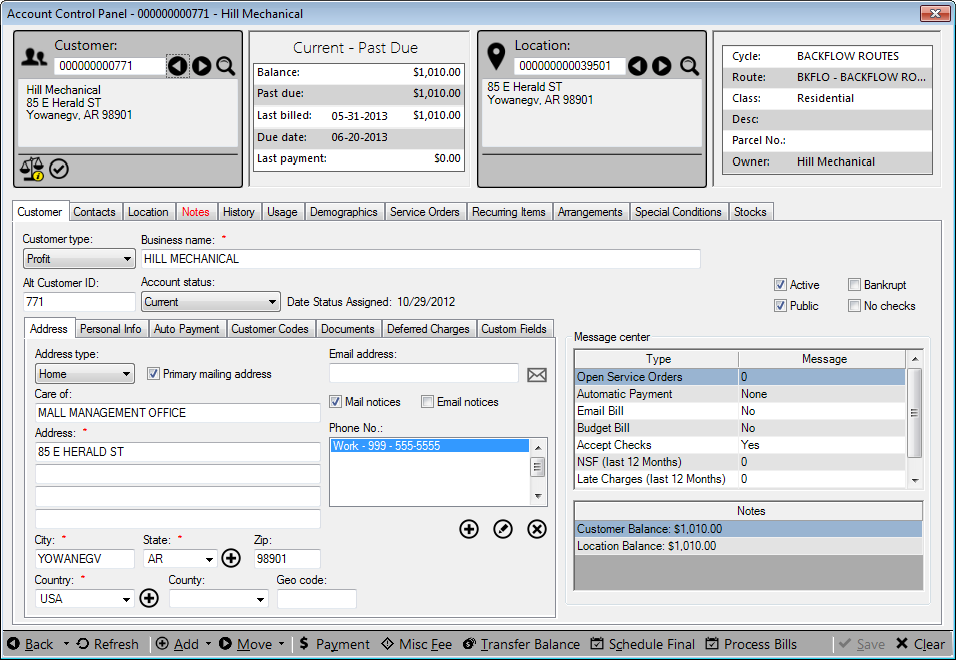
Figure 50: Account Control Panel
The Account Control Panel is divided into several sections and tabs that help organize your UMS activities. The various panel functions are described in more detail on the following sections.
Account Control Panel Dashboard
The top portion of the Account Control Panel is the Dashboard, and it consists of information cards which display important account information for each individual customer.
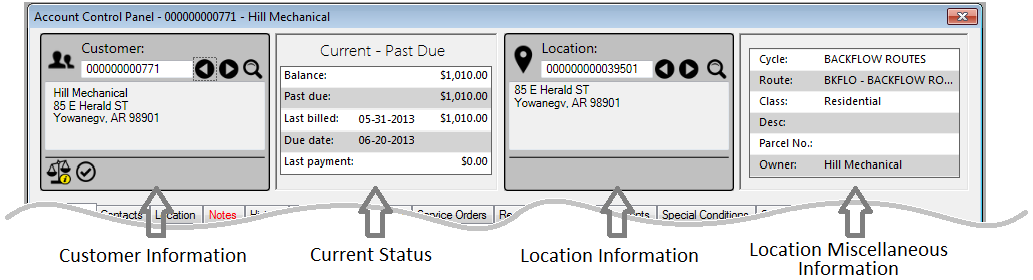
Figure 51: Account Control Panel Dashboard
The first card on the left is called the Customer Information card, and next to it is the Current Status window. The Location Information and Location Miscellaneous Information cards follow on the right.
The Customer and Location Information cards are interactive windows, and User input is allowed in the selection/search boxes. The Current Status and Location Miscellaneous Information boxes provide information only, and do not accept User input.
Customer Information Card
Customer-specific information and tasks are most readily accessed through the Customer Information Card.
Figure 52: Customer Information Cards
In order to begin managing customer information, first enter an account number into the Customer Information card. If necessary, perform a search using the tools previously described.
Tip: When no Customer is selected, clicking on the right arrow will pull the very first Customer number in UMS. When there is a Customer displayed, the left and right arrows will open the previous (left) and next (right) Customers.
Once a customer has been selected, the associated information will be displayed in all sections of the Account Control Panel window. The Customer Information Card will show the name and address of the Customer, as well as icon(s) which provide additional information about that customer’s account. When you hover your mouse over these icons, their names/functions will display. The icon next to the name indicates the type of customer (e.g. individual or business), and the icons at the bottom of the window will show key information about the account status at a glance. A list of these information icons and their meanings is provided below.
Note that additional icons may be defined for Special Conditions.

Image Type |
Trigger |
Image Tool Tip |
Image |
|---|---|---|---|
Balance |
Balance due on account is either zero or not past due |
Balance – Current |
|
Balance |
Balance due on account is past due. |
Balance – Past Due |
|
Balance |
Balance due on account is past due, and service will be shut off |
Balance – Shutoff |
|
Arrangement |
Payment arrangement in place |
On Arrangement |
|
Bankruptcy |
Account has a bankruptcy |
Bankruptcy |
|
Public |
Information for account is private |
Private |
|
No Checks |
Checks not to be accepted |
No Checks |
|
Automatic Payment |
Automatic payments in place |
Automatic Payments – [Payment Method] |
|
Bad Debt |
Account has uncollectable balance due |
Bad Debt |
|
Collections |
Account has been sent to collections |
Collections |
|
Budget Bill |
Account is set up for budget billing |
Budget Billing |
|
Email Bill |
Customer receives bills by e-mail |
Email Bills |
|
Account Status |
Account is current |
Account Status – Current |
|
Account Status |
Account is shut off |
Account Status – Shutoff |
|
Globe |
Customer is a registered Web user |
Web User |
Table 1: Customer Information Icons
Account Status Card
The most recent status information for the selected account is displayed in the Current Status window.
Figure 53: Account Status Cards
The header of the Account Status card displays the customer’s payment status at a glance:
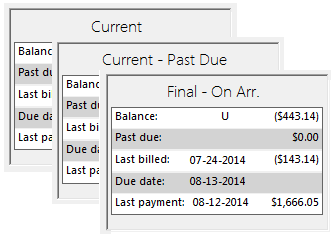
- The activity status (Current, Waiting, or Final) of the account is
indicated in the top bar of the card.
- If an account has a status such as past due or scheduled for shutoff,
this is also indicated in the window header.
A summary of the latest account activity is listed in the main section of the window. The main elements listed are:
- Balance is the total amount owed by the customer, for all
associated services and locations.
- Past Due is the total amount that is past due as of the current
date. This may or may not be the entire balance, depending on how your company determines due/past due amounts.
- Last Billed is the date and the amount of the latest charge
transaction. Note that this does not indicate which service was billed, only that it was the latest charge.
- Due Date is the due date of the latest billed amount. Again, this
does not indicate which service is was billed.
Last Payment is the date and amount of the last payment received. The amount should include any open or service open credit associated with the payment.
Note: If a “U” is shown with a payment, this indicates that this transaction has not yet been posted. If a "G" is shown with a date, this indicates that a grace note has been entered
Location Information Card
Location-specific information is usually accessed when the associate customer account information is entered, but may also be found by entering the Location number in the Location information card.
Tip: When no Location is selected, clicking on the right arrow will pull the very first Account number in UMS. When there is a Location is displayed, the left and right arrows will open the previous (left) and next (right) Locations.
Just as location information is filled in automatically when the Customer number is entered, the Customer information is populated with the associated information when the Location is entered.
Figure 54: Location Information Card
Clicking on the Location (map pointer) icon at the top of the card will open a map showing the Location in question. Also, like the Customer Information window described above, the Location Information Window has icons at the bottom of the window to indicate any important information associated with a particular location. A list of the icons used in this card is given in Table 2, below.
Note that additional icons may be defined for Special Conditions.
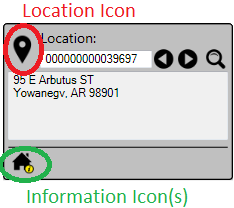
Image Type |
Trigger |
Image Tool Tip |
Image |
|---|---|---|---|
Open Service Order |
Location has an open service order |
Open Service Order |
|
On Lien |
Location has a lien placed |
On Lien |
Table 2: Location Information Icons
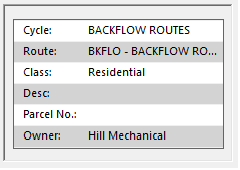
Service Location Information Card
Figure 55: Service Location Information Card
The right-most box on the dashboard is the Service Location Information card. It displays Cycle, Route, Revenue Class, Location Description (if entered), Location Parcel Number (if entered), and Owner name for the location in question. If there is no owner defined, UMS displays the customer name by default.
Account Control Panel Tabs
The center section of the Account Control Panel is the primary location for all UMS information. Each of the tabs has several information sections, most of which can be edited by the User. Many of the tabs have additional tabs within them.
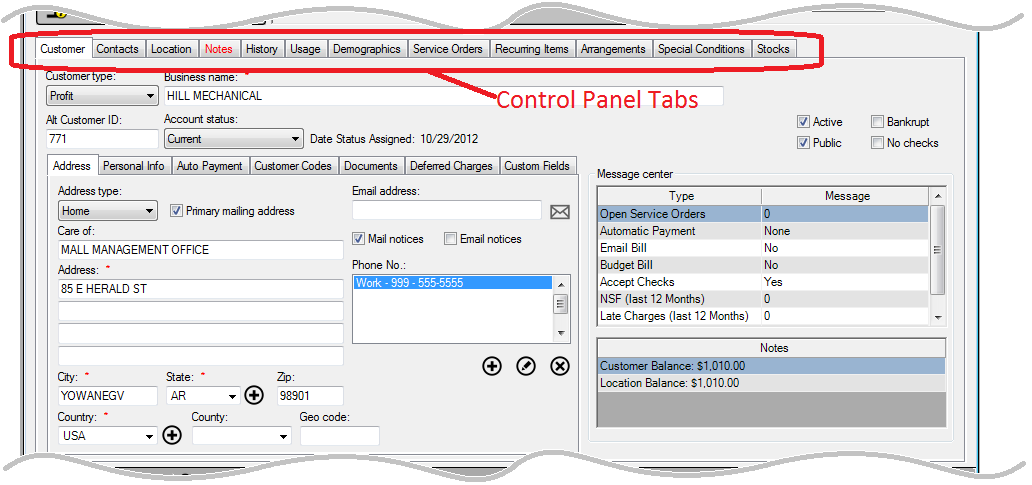
Figure 56: Account Control Panel Tabs Section
The availability of tabs, functions, and tasks within this window will vary depending on User roles and also on the type of information already entered. These tasks and tabs are described in more detail below.
Customer Tab
The Customer tab is used to enter and review customer information. This information includes contact information, messages and notes, and any information concerning the customer-related account settings.
Figure 57: Account Control Panel (ACP) - Customer Tab
This tab consists of three main areas: a Customer ID section, a Personal Information Tabs section, and a Message/Notes Center section.
Figure 58: Account Control Panel – Customer Tab Sections

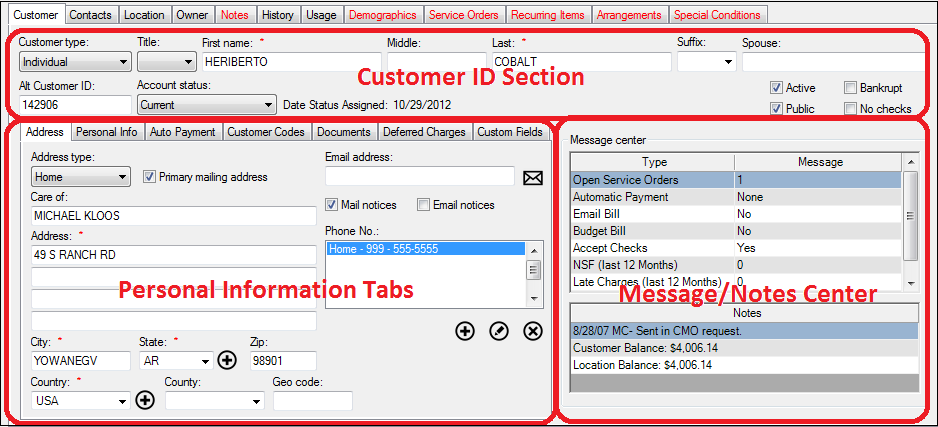
Customer ID Section
This section identifies the Customer at a glance, and provides general account information.
Figure 59: Customer Tab Customer ID Section

Customer Type
This section of the Customer Tab will change slightly, depending on which Customer Type is selected. For an Individual Account, Title, Name, and Spouse fields will appear. If the type is changed to Profit (corporate account), Non-Profit, or Government, those fields will be replaced with a Business Name box.
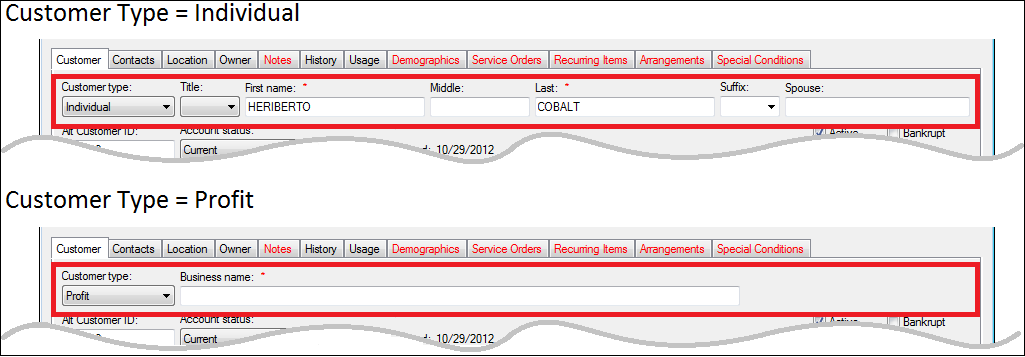
Figure 60: Customer ID Types
Alt Customer ID
This field is not mandatory. It is often used for legacy ID information for conversions. Alternate IDs are one of the searchable items for Customer ID, so that finding a Customer using a former ID is possible.
Account Status
The values in the Account status menu can be user-defined, and should not be confused with the Account Status (Current, Waiting, Final) specified in the Dashboard section at the top pf the window.
The purpose of this feature is to provide a reference to where a particular account stands within the billing system. An account that is in good standing might only be listed as Current, which is one of two default settings in UMS. The other default setting is Shutoff. However, there are other ways to describe the status of an account, and you can define other entries as appropriate for your processes.
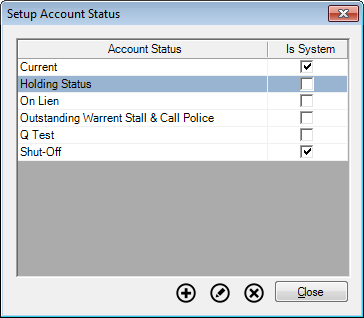
In order to define new status options, go to Setup>System>Account Status. The Setup Account Status window will open. Use the Add (
), Edit (
), or Delete (
) buttons at the bottom of the window to create or modify your Account Status options. Edit and Delete options are disabled for the two UMS default items, Current and Shutoff.
Note: You must have the appropriate user permissions to access this function.
Figure 61: Setup Account Status Menu Options
When the Account Status is changed, the date of the change appears next to that field, as Date Status Assigned. This field is automatically generated each time a new status is saved, and cannot be manually edited.
Check Boxes
The checkbox fields at the far right of this section are flags that give additional details.
- Active. This box indicates whether the Account is active. The
Active box is automatically checked when a new Account is set up.
- Public. If selected, this box indicates that employees may view
the account information. If the box is deselected, the account information is private and can be seen only by Administrators. A Private Information icon (
 ) will appear in the Customer
Information Card if the Public box is unchecked.
) will appear in the Customer
Information Card if the Public box is unchecked.
- Bankrupt. If the account is part of a bankruptcy proceeding, this
box can be used to place a flag on the account. This can be used as a filter to exclude the account from delinquency processing. A bankruptcy icon (
 ) will appear in the Customer
Information Card if the box is checked.
) will appear in the Customer
Information Card if the box is checked.
- Do Not Accept Any Payments.
If this box is selected, no payment of any type can be accepted. A No Payments icon (
 ) will appear in the Customer
Information card if this box is checked.
) will appear in the Customer
Information card if this box is checked.
Disallowed Pay methods
Disallowed Pay Methods can be used to disable specific payment methods for the customer.
Message/Notes Center Section
The Message Center group box displays system and message center notes.
Figure 62: Customer Tab Message Center and Notes Section
Information in the Message Center is for review only. It is populated automatically based on separate entries in other sections and cannot be manually edited. The information provided includes:
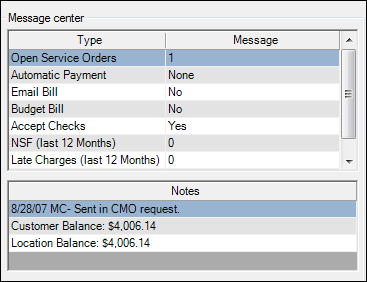
Open Service Orders. Shows how many service orders are currently open for this account.
Automatic Payment. Lists the type of Automatic Payment (Draft, Credit card, or None) set up for this customer.
Email Bill. Indicates whether customer receives an e-bill.
Budget Bill. Indicates whether customer is on a budgeted billing plan.
Accept Checks. Indicates whether checks can be accepted for this account.
NSF (last 12 Months). Lists the current count of NSF transactions on the account.
Late Charges (last 12 Months). Lists the current count of penalty or interest charges.
Deposits holding. (Beyond the field limit in the figure shown; use scroll bar to view.) Lists the dollar amount of deposits holding for this account.
The Notes section below the Message Center displays any notes for which the Message Center flag has been set. (Refer to Customer Tab > `Notes Tab <#_Notes_Tab>`__ discussion below.) In addition, this section contains balance information:
Customer balance. Lists the current balance for this Customer, across all associated Locations (Accounts).
Location balance. Lists the current balance for this Location, for all residents, both current and final.
Personal Information Tabs Section
This section contains all information about the selected Customer, divided into seven tabs: Address, Personal Info, Auto Payment, Customer Codes, Documents, Deferred Charges, and Customer Fields.
Address
This tab contains standard address information. Several addresses may be listed for a given Account.
Figure 63: Customer Tab – Address Tab
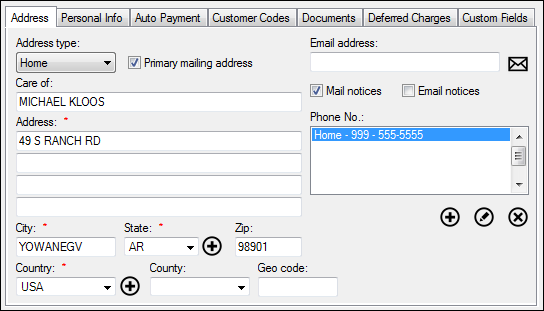
Address type. Select from the drop-down list whether the address to be entered is a home address or other type (work, temporary, etc.) of address.
Primary mailing Address. Check the box to indicate which address is primary. If only one address is entered, this box is checked by default, and cannot be unchecked.
Care of, Address, City, State, Zip, Country, County, Geo Code. Enter the applicable information in the fields provided, either by typing text or selecting from menus.
Note: Not all fields are required, but you will not be able to save the information entered if fields marked with a red star (*) are not filled in.
Email address
Type the customer's email address, if available.
Envelope Icon (
 ). If an e-mail address has been entered,
clicking this button will automatically launch a new e-mail message
from your default e-mail program, already containing the selected
address.
). If an e-mail address has been entered,
clicking this button will automatically launch a new e-mail message
from your default e-mail program, already containing the selected
address.Mail notices. If this box is checked, the customer will receive a physical bill statement.
Email notices. If this box is checked, the customer will receive an e-bill statement. This option is only available if an e-mail address is entered for the Account.
Note: If both Mail notices and Email notices boxes are checked, the Customer will receive both types of statements.
Phone No
Use the Add, Edit, and Delete buttons below this field to manage phone numbers for the Customer. When you click Add or Edit, the Setup Phone No. window will open.
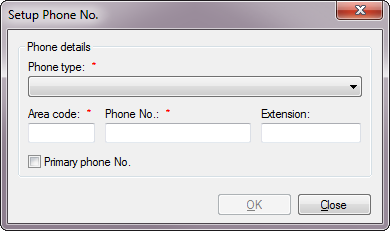
Figure 64: Setup Phone Number
Enter a phone type (home, work, etc.) and the number. Click the Primary phone No. checkbox to indicate that the entered number is the primary number to be used.
If only one phone number is entered, it will be the primary number by default. If more than one number is entered, the one marked as primary will be listed first in the Phone No. field.
Personal Info
The Personal Info tab holds driver’s license, social security, and date of birth information for the Customer. Because this information is sensitive, it can be set up to only show for specific users.
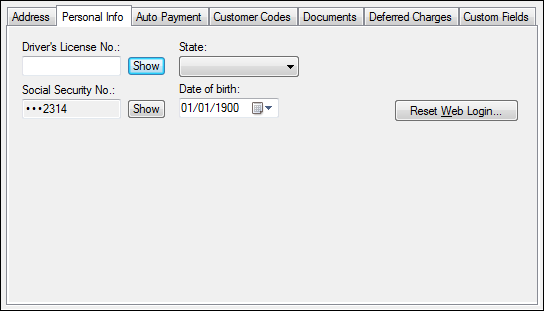
Figure 65: Customer Tab - Personal Info Tab
*Driver's License No. and State. Enter the Customer’s license number in the field and then select the issuing state fromt eh drop-down menu. The number is automatically masked as typed and can only be viewed by a user with sufficient security access rights.
*Social Security No. Enter the customer's Social Security Number into the field, using your company's preferred format. The number is automatically masked as typed and can only be viewed by a user with sufficient security access rights.
*Important Note: By default, only the last four digits of the Driver’s License No. and Social Security No. will be displayed. When the Show button is clicked, a user login box will open. Once your login information has been entered, the field contents will be visible. All information views are automatically tracked by the UMS audit trail.
Date of Birth. Select the Customer's date of birth from the calendar. This can be left at the default date if your company does not track date of birth.
Reset Web Login. This opens the reset login form. This is enabled only for a customer with an e-mail ID and allows the user to reset the online password.
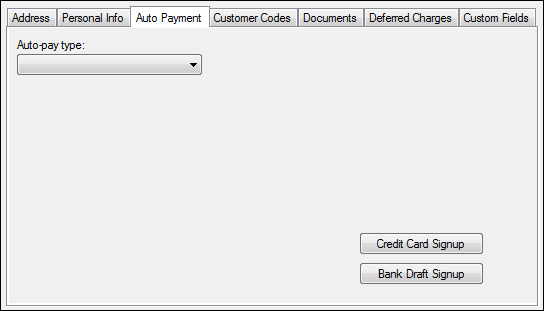
Auto Payment
By default for a new Customer who has not yet been set up for auto payments, this tab will be blank except for an Auto Pay Type menu and two signup buttons. Once an auto-pay is set up, the screen will display the payment information, and the tab header will turn red.
Figure 66: Customer Tab - Auto Payment Tab
The Auto-pay Type menu allows you to define which type of payment to set up. The screen information will change depending on which type of payment (bank draft, credit card, etc.) is selected and entered.
The signup buttons (Credit Card Signup or Bank Draft Signup) will open forms for the Customer to complete and sign to authorize the automatic payment. When you click either of these buttons, a form opens within UMS, pre-populated with previously entered Customer information. This form can be printed or exported for the Customer to finish and sign.
Draft Payments
When Draft is selected as the Auto-pay Type, bank information fields appear.
Figure 67: Customer Tab - Auto Payment Tab Draft Information
Enter the information provided by the Customer.

Notify in Advance. Check this box if the Customer should be notified of the draft amount before the draft is processed.
Account Type. Select either Checking Account or Savings Account, as specified by the Customer.
Bank Routing No. This field contains the specific account draft information provided by the Customer. Select the correct bank from the list or begin typing the routing number to bring up the correct account info.
The drop-down menu will contain previously-entered routing numbers and the associated banks for quick selection. You may also add a new Bank Code by clicking the add button beside the routing number. This will open the New Bank Code window, where you can enter new banking details.
Account No. Type the Customer's bank account number.
The bank account number is automatically masked and can only be viewed by a user with sufficient security access rights. To view the number, click Show and enter your login credentials. All account number views are automatically tracked by the UMS audit trail.
Special Options. Select either Pay Bill Amount, Maximum Amount, or Fixed Amount from the drop-down menu, according to Customer instructions.
Pay Account Balance. The account balance will be drafted every billing cycle.
Maximum Amount. A variable amount will be drafted each billing cycle, according to what is owed, but the draft will never exceed a maximum amount specified by the Customer. When this option is selected, a box for the maximum amount will appear. Enter the specified maximum amount.
Fixed Amount. A fixed amount will be drafted every billing cycle, regardless of the total amount owed. It is possible that the designated amount could be more than the amount owed. If that happens, the excess will be credited to the next billing cycle. When this option is selected, a box for the maximum amount will appear. Enter the specified fixed amount.
Required Amount (Statement Balance): When “Required Amount (Statement Balance)” is selected, the budget amount will be drafted instead of the actual billed amount. For this to work, “Use account level budgets” must be check on the Company > Company Options page. A demographic item must be created and selected on the Company > Company Options page. The demographic item should be added to the customer control panel and a budget amount should be set with the demographic item. Refer to “Setting up Account Level Budget” in this document.
In the absence of a budget amount, this option will default to pay the latest statement balance on account. This amount correlates directly to the amount listed on the ACP for the statement generated with the most recent "Statement Date", excluding any charges not linked to a statement (such as misc charges created after statement creation). In any instance where a customer does not have a generated statement, they will not be billed.
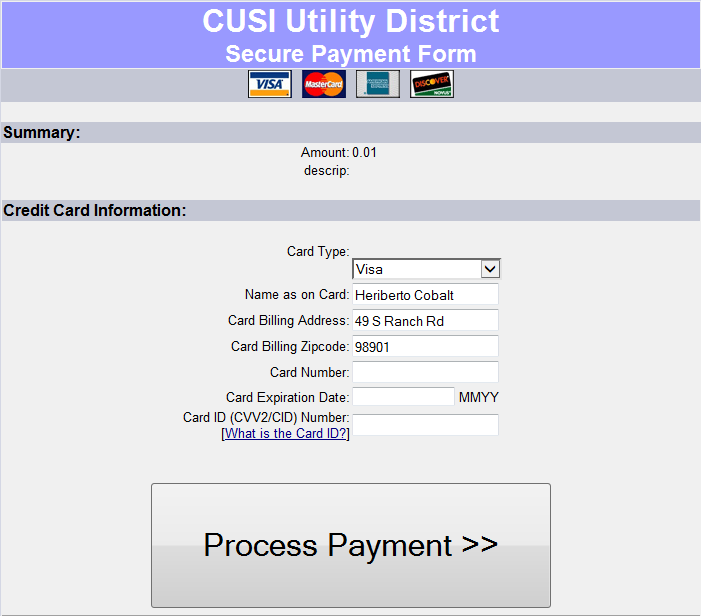
Credit Card Payments
When Credit Card (or similar option) is selected as the Auto-pay Type, bank information fields appear.
Figure 68: Customer Tab - Auto Payment Tab Credit Card Information

Credit card information is not stored within UMS. Recurring credit card payments are processed using tokens. Click the Setup Payment Token button to begin that process. A Hosted Payment Form such as the one below will open.
Figure 69: Credit Card Hosted Payment Form
Follow the on-screen instructions to create the payment token. The token will be saved for future use until deleted.
Special Options. Select either Pay Bill Amount, Maximum Amount, or Fixed Amount from the drop-down menu, according to Customer instructions.
Pay Account Balance. The account balance will be drafted every billing cycle.
Maximum Amount. A variable amount will be drafted each billing cycle, according to what is owed, but the draft will never exceed a maximum amount specified by the Customer. When this option is selected, a box for the maximum amount will appear. Enter the specified maximum amount.
Fixed Amount. A fixed amount will be drafted every billing cycle, regardless of the total amount owed. It is possible that the designated amount could be more than the amount owed. If that happens, the excess will be credited to the next billing cycle. When this option is selected, a box for the maximum amount will appear. Enter the specified fixed amount.
Required Amount (Statement Balance): When “Required Amount (Statement Balance)” is selected, the budget amount will be drafted instead of the actual billed amount. For this to work, “Use account level budgets” must be check on the Company > Company Options page. A demographic item must be created and selected on the Company > Company Options page. The demographic item should be added to the customer control panel and a budget amount should be set with the demographic item. Refer to “Setting up Account Level Budget” in this document.
In the absence of a budget amount, this option will default to pay the latest statement balance on account. This amount correlates directly to the amount listed on the ACP for the statement generated with the most recent "Statement Date", excluding any charges not linked to a statement (such as misc charges created after statement creation). In any instance where a customer does not have a generated statement, they will not be billed.
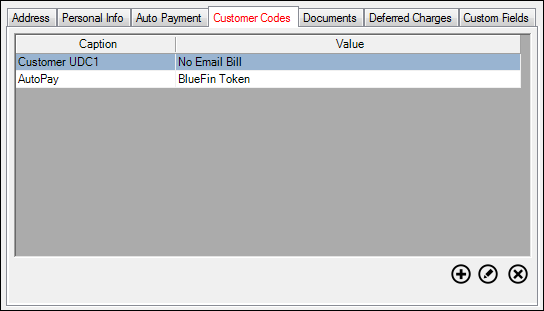
Customer Codes
The Customer Code tab holds the Customer User Defined Codes (UDCs) that are associated with the Customer. Once Customer Codes have been assigned to a Customer, the Tab name turns red.
Figure 70: Customer Tab - Customer Codes
Use the Add (
), Edit (
) and Delete (
) buttons to manage the Customer Codes for the selected Customer. When you click Add (or Edit), the Add UDC (or Edit UDC) window opens.
Figure 71: Add/Edit Customer Codes
The UDC type is pre-selected as Customer because you are adding a Customer Code. Select a UDC caption and UDC value from the drop-down menus. Note that for an existing UDC, only the UDC value can be changed.
If the code you need is not available, you can create a new Customer Code through Setup > User Defined Codes.
Documents
The Documents tab holds any documents that have been attached to the Customer record. Once one or more documents have been associated with a Customer, the Tab name turns red.
Figure 72: Customer Tab - Documents
Use the Add (
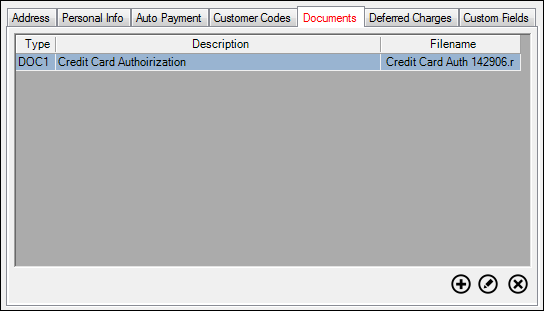
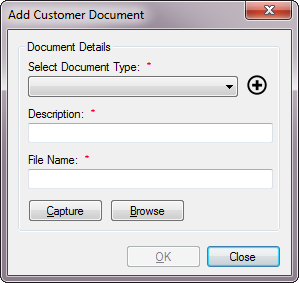
Figure 73: Add Customer Document
Within this window:
Select Document Type. Click the drop-down arrow and select a document type.
If the document type you need is not available:
Click the Add (
) button next to the Select Document
Type field. This will open the Setup Document Types window.
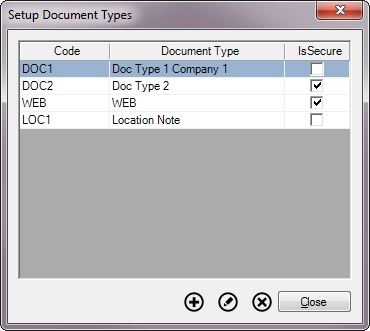
Figure 74: Setup Document Types
Click the Add (
) button to create a new document type. This will open the Edit Document Type window.
Figure 75: Edit Document Type
Within this window:

Enter document code, up to 6 characters including spaces.
Enter a description for the Document Type
Choose whether or not the document is secure. Secure documents cannot be accessed by users without permissions
Click OK to return to the Setup Document Types Window.
Click Close to return to the Add Customer Document window and proceed with document attachment.
Description. Enter a description for the document.
File Name. Click the Capture button to scan a file. Click the Browse button to open an Explorer window so that you can locate the applicable document.
Once you click OK, the selected document will be saved and it will appear in the Documents Tab list.
Deferred Charges
This feature is only available with the purchase of a Deferred Charges license key. The tab will be displayed under the Customer tab on the ACP.
Deferred Charge allows a company to delay a charge until a payment is due. The charge will not display on the account until after a payment has been made. Deferred Charges also allow a company to accept optional charitable donations.
The Deferred Charges tab displays any Deferred Charges associated with the account. These charges can be designed to be opt-in (a Customer has to take action to enroll) or opt-out (a Customer has to take action to not enroll).
Figure 76: Customer Tab – Deferred Charges Tab
A check in the box beside the charge denotes participation in the charge, and blank indicates the customer is not participating. The default status of the checkbox is on if the item was designed as opt-out, and off if the item was designed as opt-in.
Regardless of checkbox default status, the Customer participation can be changed from this tab by checking the boxes off or on.

Creating Deferred Charges
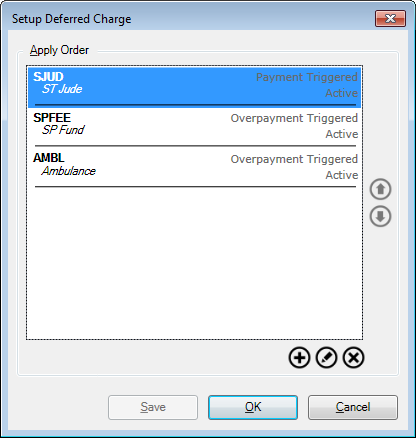
These are created under Setup > Deferred Charge. The Setup Deferred Charge window opens.
Figure 77: Setup Deferred Charge
The arrows to the right of the box allow you to change the Apply Order of the existing charges. Select a line and use the up arrow (
) to move it higher in the list or the down arrow (
) to move it lower in the list.
Use the Add (
Click Add (
Figure 78: Add Deferred Charges
Within this window:
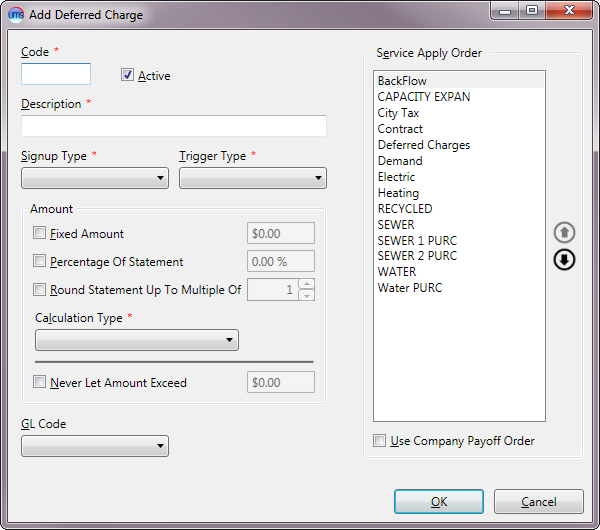
Code. Enter a code designation for the new Deferred Charge, up to 6 characters (including spaces).
Active. This box indicates whether a charge is active. For a new charge, click the checkbox on so that it applies. If you later wish to deactivate the charge so that it no longer applies, use the Edit button to re-enter the Add Deferred Charge window, and uncheck the box.
Description. Enter a descriptive name for the Deferred Charge.
Signup Type. Select the appropriate type for the charge.
Opt-In. Action must be taken to accept the Deferred Charge.
Opt-Out. Action must be taken to decline the Deferred Charge.
Note: Once the deferred charge is saved, the opt-in/opt-out selection cannot be edited.
Trigger Type: Select the appropriate trigger for the charge.
Overpayment. Overpayment-triggered deferred charges absorb overpayments made by the customer. These charges will not raise the account balance, because they are not charged unless payments are available to clear them.
Payment. Payment-triggered deferred charges are placed on the account when a payment is made; regardless of whether or not the customer pays more than is owed. These charges can cause the account balance to increase, because they are charged to the account at the time of the payment; even if funds are not available to clear the charge.
Amount. Select type(s) and amount(s) for the Deferred Charge.
Fixed. A fixed dollar amount is added to the total amount due. Enter the amount in the box provided.
Percentage. A defined percentage of the statement amount is charged. Enter the percentage in the box provided.
Round-Up. This selection rounds the statement up to the nearest multiple of the value entered. For example, a $42.00 statement would be rounded to $45.00 if a nearest multiple of 5 is entered, or to $50 if a nearest multiple of 10 is entered.
Calculation Type. Select from the drop-down menu how the charge will be calculated. This calculation is based on the criteria entered in the Amount section above.
Maximum Of Checked. The charge will be the largest of all specified methods.
Minimum Of Checked. The charge will be the smallest of all specified methods.
Sum Of Checked. The charge will be the total of all specified methods.
Never Let Amount Exceed. If a charge should never exceed a certain amount, check this box and enter that maximum value in the box provided.
GL Code. If applicable, select the relevant General Ledger code to apply.
Service Apply Order. Specify the order of services for the charge. The order can be changed by selecting items and using the up or down arrows to re-order them in the list. Alternately, you can use the Company payoff order (defined separately under Setup > Payoff Order)…) by clicking the Use Company Payoff Order checkbox. When that option is selected, the list will be grayed out.
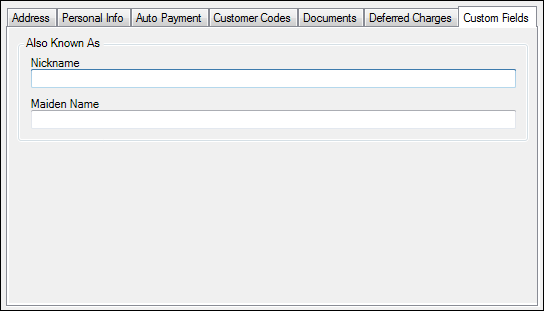
Custom Fields
This tab is designed to hold any miscellaneous Customer information not covered elsewhere. It is customizable for your company’s needs.
Figure 79: Customer Tab – Custom Fields Tab
This tab displays whatever Customer custom fields have been previously set up. In the above example, the fields have been defined to store other names by which the Customer may be known. You can define Custom Fields to suit the needs of your company. To manage custom fields, go to Setup > Custom Fields.
Contacts Tab
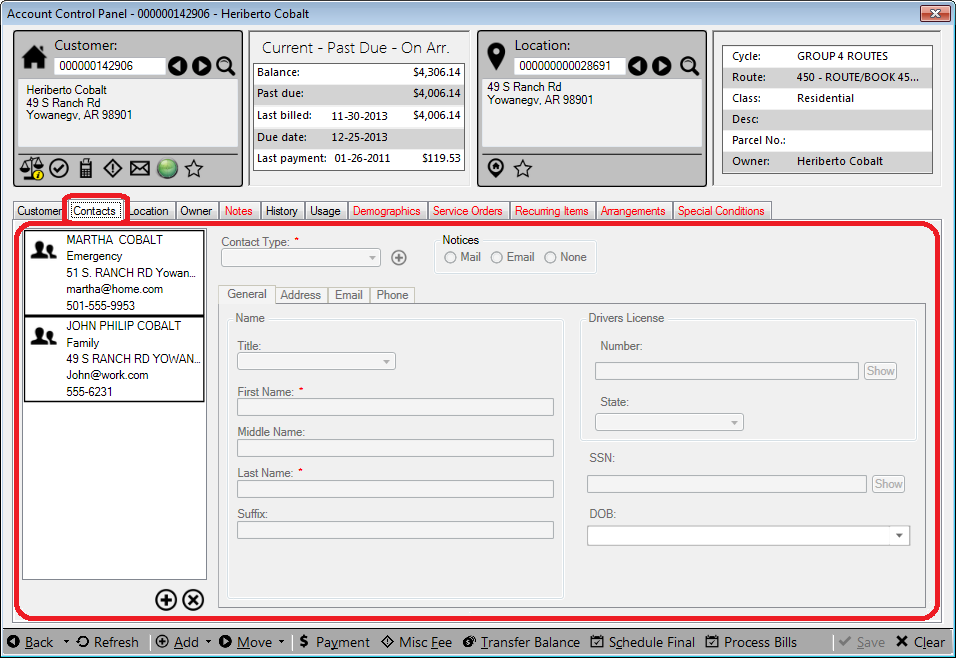
The Contacts tab shows all contacts entered for a customer. The box on the left side of the tab lists each name with specific contact information. On the right side of the tab are four tabs, in which General, Address, Email and Phone information can be stored for each contact listed on the left.
Select any line in the left-hand box to view or edit information. The contact’s primary (or only) information is summarized in the Contacts box, so that you do not have to search for specific details within the tabs.
Figure 80: Account Control Panel (ACP) - Contacts Tab
Use the Add or Delete buttons under the box on the left side of the tab to create, edit, or delete contacts. All fields are editable without opening an Edit function.
Note: When you click Delete, you will not be prompted to confirm the deletion. However, deletions are not permanent until you save your changes. The Refresh button in the footer will take you back to the last saved information.
When you click Add (below the box), a new, blank line is added to the list of contacts, and that line is selected. Enter or edit new or changed information in the tabs/fields on the right for the selected contact.
Header Information
The header information for each item shows the type of contact and if/how the contact receives notices and statements.
Figure 81: Contacts Tab Header Information
These fields are only for the selected Contact, and are visible no matter which information tab is selected.
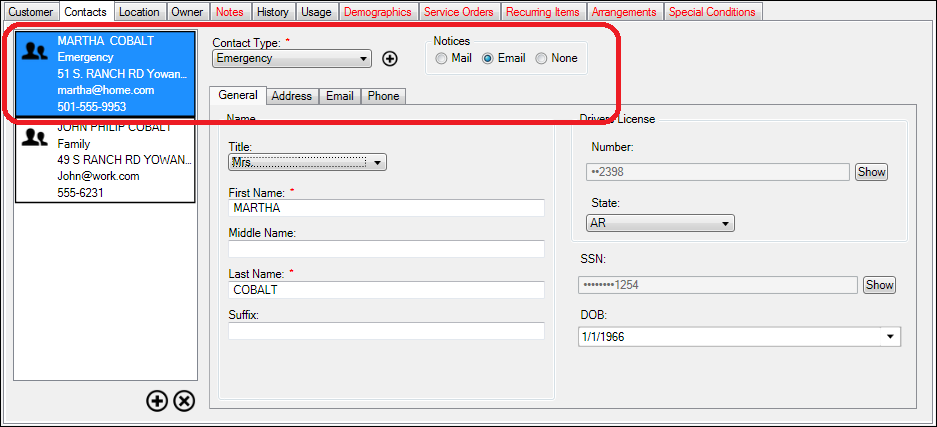
Contact Type
Select a designation for the type of contact.
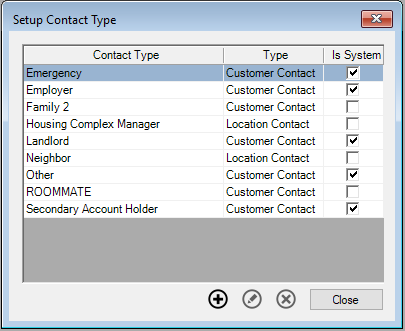
There are several designations (Emergency, Employer, Landlord, Secondary Account Holder, and Other) built into the menu, but custom items can be added to the list.
In order to create a new option, click the
Figure 82: Setup Contact Type
Use the Add (
Contact types can be of type "Customer Contact" or "Location Contact". When contacts are added with a type of "Customer Contact" they are linked to the customer only and will go with them regardless of the location the customer is at. Likewise, when a contact is added with a type of "Loctaion Contact" they will stay with the location regardless of what customer has moved in.
Notices
This is where you designate whether/how a contact is included whenever a “duplicates for contacts” selection is made elsewhere in the system. Select the radio button next to the type of notices (Mail, Email, or None) this contact will receive.
Note: Mail or Email options will only be available for selection if an address or email address is entered on the corresponding tab
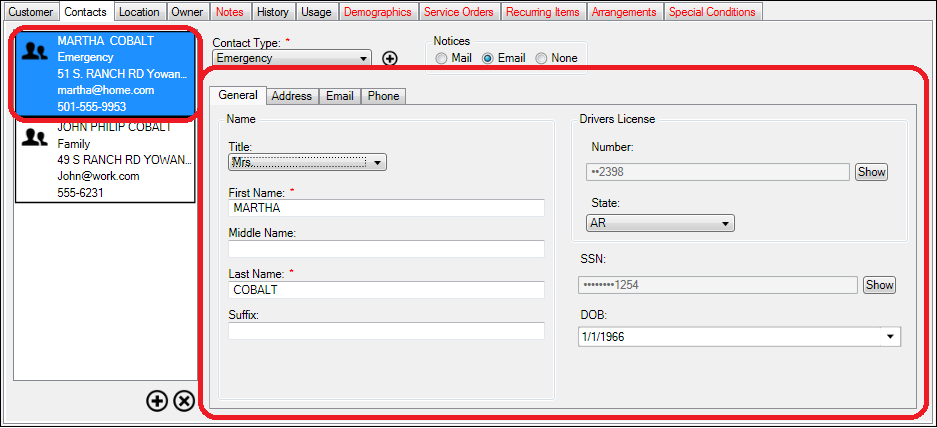
General Tab
Figure 83: Contacts Tab General Information
Enter the contact’s first and last names (required), and middle name/suffix (optional).
You may also enter *driver’s license, *SSN, and/or birthdate information, if this is something tracked by your company.
*Important Note: By default, only the last four digits of the Driver’s License No. and Social Security No. will be displayed. When the Show button is clicked, a user login box will open. Once your login information has been entered, the field contents will be visible. All information views are automatically tracked by the UMS audit trail.
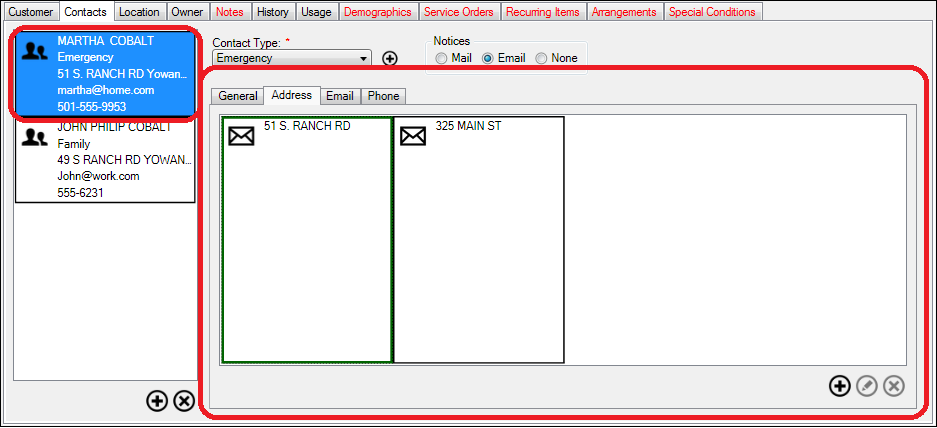
Address Tab
For new contacts, this field is empty. If addresses are already entered, they will be appear as tiles in the window.
Figure 84: Contacts Tab Address Information
If only one address is entered, it is by default primary. When subsequent addresses are entered, you will have the option of designating a different one as primary.
Click Add
Figure 85: Contacts Information - New Address
You must select an address type and enter a street name, city, state, and country. All other information is optional.
Note: For the first address entered (or the one already designated as primary), the Primary address checkbox at the top of the window is disabled. This is because it is by default the primary address. When another address is entered, the box will be active and can be checked so that the new entry becomes listed as primary.

Email Tab
For new contacts, this field is empty. If email addresses are already entered, they will be appear as tiles in the window.
Figure 86: Contacts Tab E-Mail Information
If only one address is entered, it is by default primary. When subsequent addresses are entered, you will have the option of designating a different one as primary. Click Add
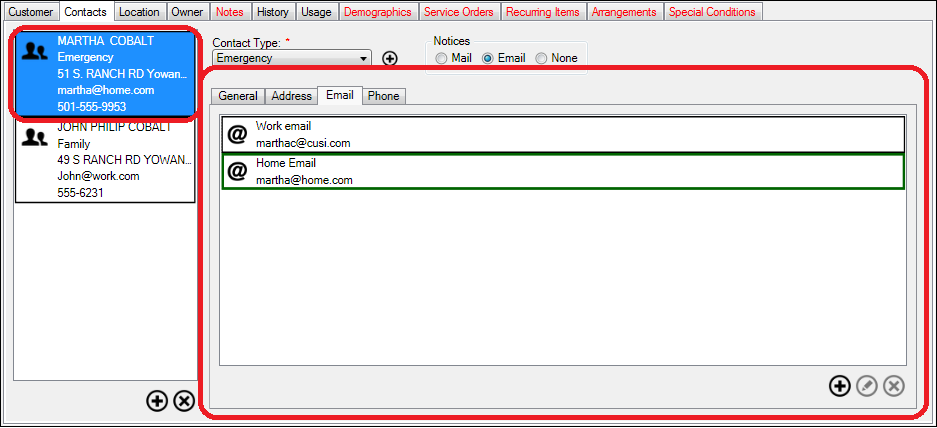
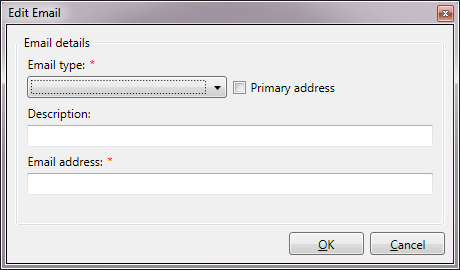
Figure 87: Contacts Information - Edit Email
You must select an e-mail type and enter the address. The description is optional.
Note: For the first e-mail address entered (or the one already designated as primary), the Primary address checkbox at the top of the window is disabled. This is because it is by default the primary address. When another address is entered, the box will be active and can be checked so that the new entry becomes listed as primary.
Phone Tab
For new contacts, this field is empty. If phone numbers are already entered, they will be appear as tiles in the window.
Figure 88: Contacts Tab Phone Information
If only one number is entered, it is by default primary. When subsequent numbers are entered, you will have the option of designating a different one as primary.
Click Add
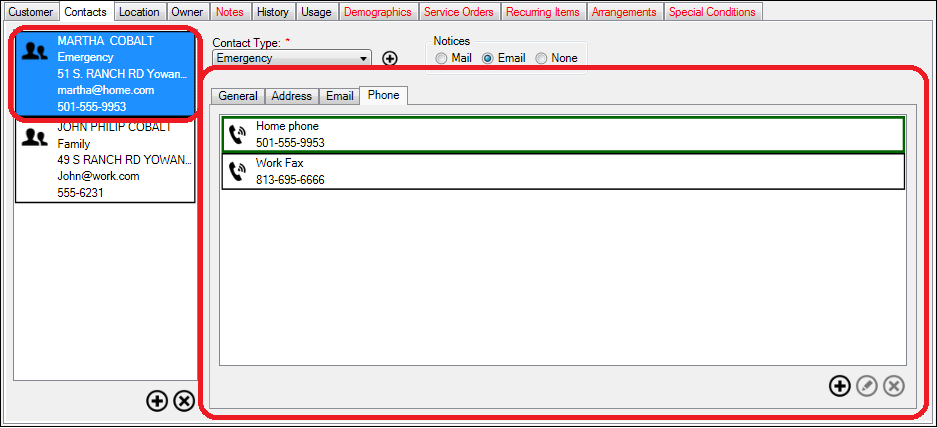
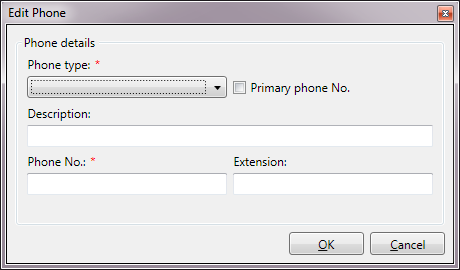
Figure 89: Contacts Information - Edit Phone
Phone type and number are required. The description and extension are optional.
Note: For the first phone number entered (or the one already designated as primary), the Primary phone No. checkbox at the top of the window is disabled. This is because that number is by default the primary number.
Once any change has been made to any Contact, the Save button is enabled. You will be prompted to save your changes before leaving the form. Most of the information fields are optional in this section. However, if any required field (designated *) is empty or contains an error, you will be prompted to correct the error before saving.
Location Tab
The Location tab is used to enter and review location information, including address, notes, and specific information concerning the services provided at that Location.
Figure 90: Account Control Panel (ACP) - Location Tab
This tab consists of four main areas: a Location ID section, a Message/Notes Center section, a Location Information Tabs section, and a Service Details section.
Figure 91: Account Control Panel – Location Tab Sections
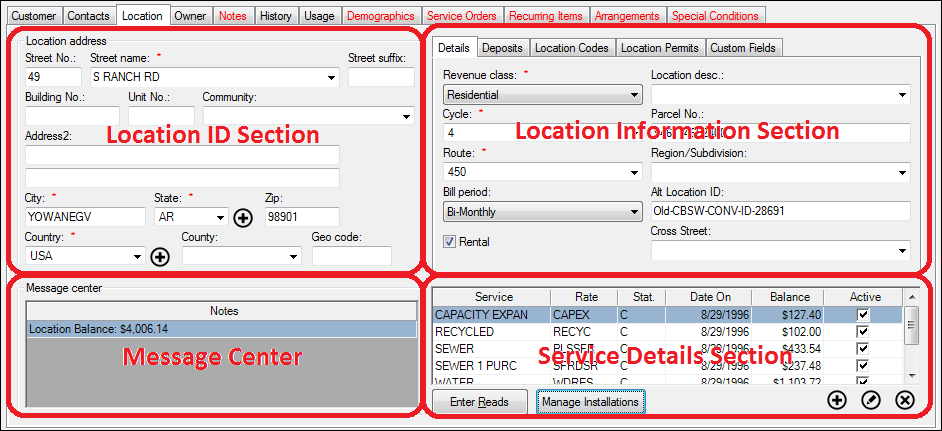
Location ID Section
This section identifies the Location and provides general address information for the physical location where services are being provided. This may or may not be the same as the Customer’s contact address. Enter or edit details as necessary.
Note: Not all fields are required, but you will not be able to save the information entered if fields marked with a red star (*) are not filled in.
Message Center Section
Information in the Message Center is for review only. It is populated automatically based on separate entries in other sections and cannot be manually edited. Any Location notes (refer to Customer Tab > `Notes Tab <#_Notes_Tab>`__ discussion below) will appear here. In addition, this section contains the Location Balance, which includes all services for all current and final residents.
Location Information Section
This section includes all location-specific details associated with the Account. These items are independent of any Customers which may be associated with the Location, and remain linked to the Location regardless of occupant.
This information is separated in to five tabs: Details, Deposits, Location Codes, Location Permits, and Custom Fields.
Details
This section contains more specific identification information for the Location. The fields in this tab may be used as limit options for functions elsewhere in the system, to help narrow searches and reports to very specific Locations. Many of these fields are also search items that can be used in Customer or Location lookups.
Figure 92: Location Information Section - Details Tab
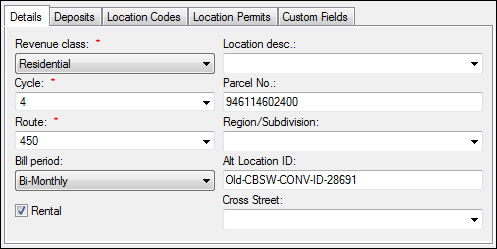
- Revenue Class. Select the appropriate revenue classification from
the drop-down menu. If the appropriate class is not available, new ones can be created through Setup > Revenue Classes.
Cycle. Select the billing cycle for the Location.
Route. Select the meter reading route for the Location.
- Bill Period. The bill period is determined by the cycle selected,
and cannot be manually edited.
- Rental. This checkbox indicates whether the Location is a rental
property. If the box is checked, the current Customer is considered a renter, and the system allows entry of Owner information separate from the Customer information. If it is not checked, the Customer is assumed to be the Owner, and thus there will be no separate Owner tab. (Refer to Owner tab discussion for more information.)
- Location desc. (Optional) Use this field to enter a short
description of the property. You can select a previously-saved description from the drop-down box or free-type in the window. This is a searchable item.
- Parcel No. (Optional) Enter a legal description or other
identifier, up to 50 characters (including spaces). This is a searchable item.
- Region/Subdivision. (Optional) Use this field to further
describe the property, for instance, a name of a subdivision or neighborhood. You can select a previously-saved description from the drop-down box or free-type in the window. This is a searchable item.
- Alt Location ID. (Optional) This field is often used for legacy
ID information for conversions. Enter the ID or other description. This is a searchable item.
- Cross Street. (Optional) You can further describe where the
Location is by selecting a nearby cross street or landmark. Either select an existing street from the drop-down list or free-type.
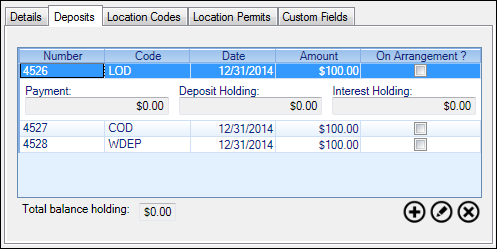
Deposits
This section lists all deposits on hold, not just for the Location, but also for the Customer and/or Account. Refer to Deposits for further information.
Figure 93: Location Information Section - Deposits Tab
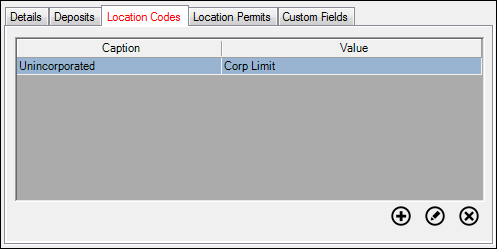
Location Codes
The Location Codes tab holds the Location User Defined Codes (UDCs) and values the same way the Customer tab holds the Customer UDCs. Once Location Codes have been assigned to a Location, the tab name turns red.
Figure 94: Location Information Section - Location Codes
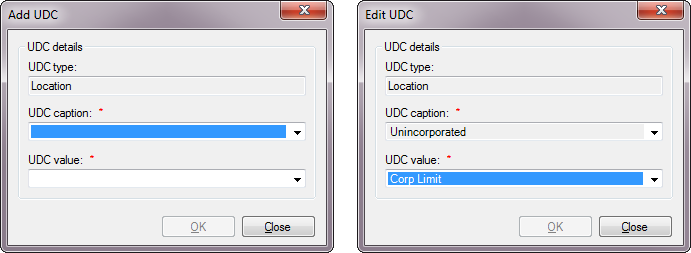
Use the Add (
Figure 95: Add/Edit Location Codes
The UDC type is pre-selected as Location because you are adding a Location Code. Select a UDC caption and UDC value from the drop-down menus. Note that for an existing UDC, only the UDC value can be changed.
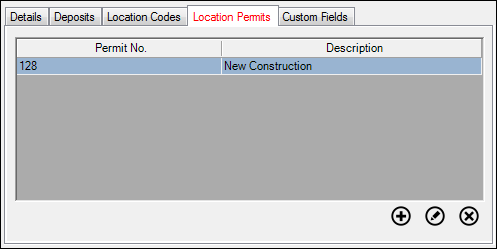
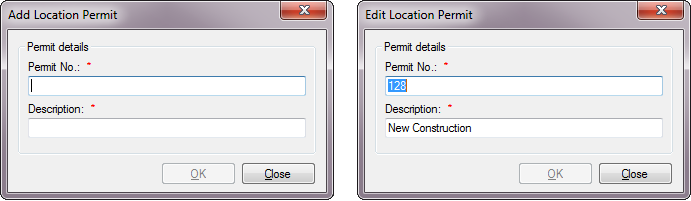
Location Permits
The Location Permits tab holds the permit numbers and descriptions for the location. Once a permit is associated with a Location, the tab name will turn red.
Figure 96: Location Information Section - Location Permits Tab
Use the Add (
When you click Add (or Edit), the Add Location Permit (or Edit Location Permit) window opens.
Figure 97: Add/Edit Location Permits
Enter or edit the Permit No. and Descriptions for the permit, then Click OK to save them to the Location.
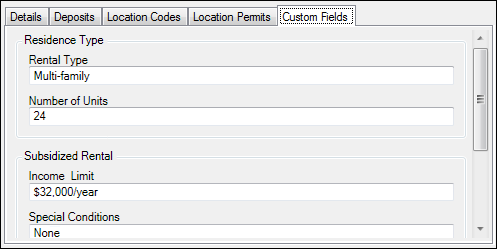
Custom Fields
This tab is designed to hold any miscellaneous Location information not covered elsewhere. It is customizable for your company’s needs.
Figure 98: Location Information Section – Custom Fields Tab
This tab displays whatever Location custom fields have been previously set up. In the above example, the fields have been defined to store rental information. You can define Custom Fields to suit the needs of your company. To manage custom fields, go to Setup > Custom Fields.
Service Details Section
This section lists all services available at the selected Location, along with pertinent information about each service. Additional details for each service line are entered/reviewed by double clicking the line item or by selecting the line and clicking Edit (
). Critical meter information (reads and device history) can also be accessed through this section.
Figure 99: Location Tab - Service Details Section
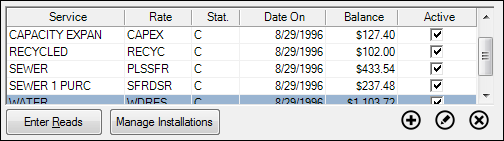
Service Grid
This table summarizes all services for the selected Location. Each line represents one service item, and the columns provide rate code (Rate), utility status (Stat), date service began (Date On), current balance (Balance), and billing status (Active).
Add () and Edit ()
These buttons open the existing Utility Maintenance form for the selected line item. From this window, you will be able to edit the service details.
Enter Reads
This button opens the Enter Readings form for the displayed location. See the Meter Readings section of this Guide for more information.
Manage installations
This button opens the Manage Installations window for the displayed location. Refer to Manage Installations for more information.
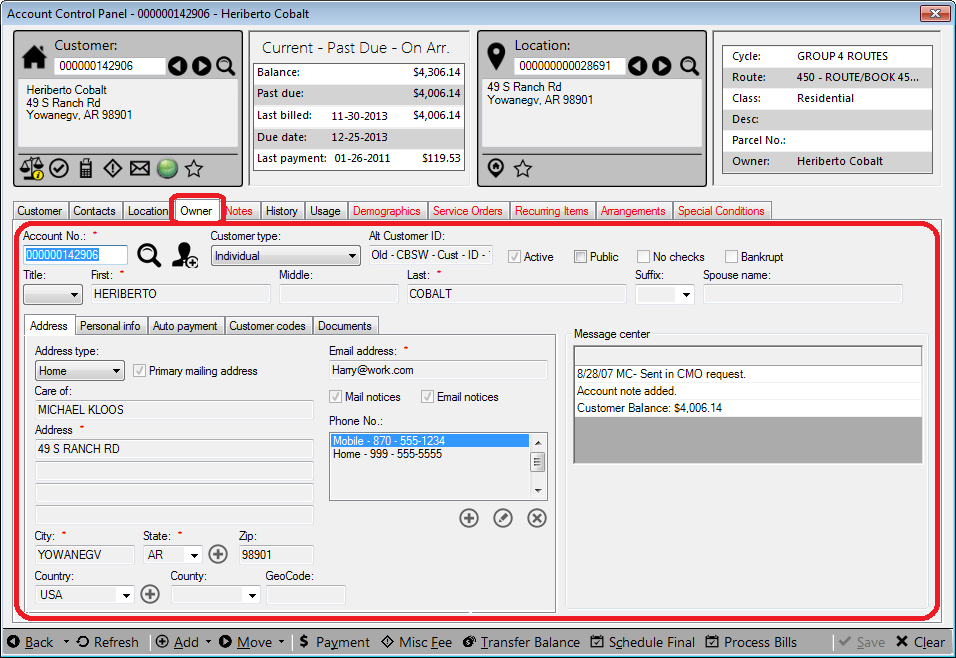
Owner Tab
This tab is only visible if the Rental checkbox in the Location tab is checked, indicating that the current Customer is not the owner of the property. It is similar to the Customer tab, but allows you to set up different information for the individual who owns the property that for the one who occupies it.
Figure 100: Account Control Panel – Owner Tab
The Owner tab features are the same as those of the Customer tab, except that in some cases the placement is slightly different. See Customer Tab section for information on the Owner Tab features.
Notes Tab
This tab stores any notes associated with an active Account, Customer, or Location. These notes are searchable by any of the note fields. When a row is selected, the note text and attached files are displayed in the lower portion of the screen. These may be edited as well.
Note: The entire grid can be copied for pasting into another application (such as Excel or Word) by right-clicking anywhere in the grid and selecting Copy all values when that option pops up.
Figure 101: Account Control Panel - Notes Tab
You can add or delete notes using the buttons below the grid. Edit the contents of an existing note by clicking in the fields to be changed and typing the new information.
Note: You can edit and save changes to notes after they have been initially saved. However, you may need to click out of the edited cell or line item in order to make the Save button available.
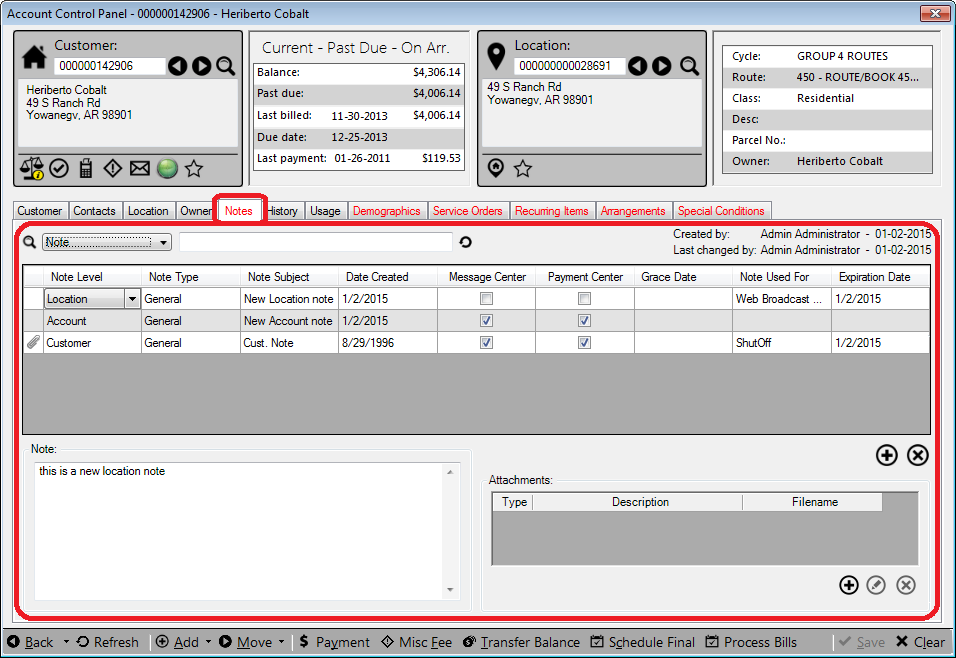
- Note Level. Select Account, Customer, or Location from the
drop-down menu to indicate how the note will be associated within UMS.
- Customer. A customer-level note will be associated only with the
Customer, and will stay with the Customer, regardless of the Location. If a Customer is associated with multiple Locations, and if the note is flagged for the Message Center, the note will appear in the Customer Message Center for all Locations.
- Location. A location-level note will be associated only with the
Location, and will appear in the Location Message Center for that Location, regardless of which Customer may be current.
- Account. An account-level note will be associated with the
selected Customer at the selected Location. If a Customer is associated with multiple Locations, and if the note is flagged for the Message Center, the note will appear in the Customer Message Center for the specified Location only.
- Note Type. Select a note type from the drop-down menu to indicate
its purpose (general notes, billing notes, complaints, etc.). Several default types are included in the list, but user-specified types may also be added. If the item you need is not listed, you can add types through Setup > Customer Note Type.
- Note Subject. Type a descriptive and informational subject using
any combination of letters/numbers. If no entry is made here, the note text added in the box below becomes the subject. Both the subject and the note text can later be edited.
- Date Created. This field is populated automatically when the note
is created, and cannot be edited.
- Message Center. When this box is checked, the note will appear in
the Message Center in the Customer tab (for Note Level = Customer or Account).
Note: The checkbox cannot be selected for Location notes. Location notes will automatically appear in the Location Tab Message Center.
- Payment Center. When this box is checked, the note will appear
when a payment is made to this account (for Note Level = Customer or Account). The box cannot be checked for Location notes.
- Grace Date. Grace periods are applied for customers who are
delinquent but will not be charged penalties for a defined time. The Grace Date is the last day of this reprieve, the day after which penalties will resume. Click in the cell twice (not double-click) to activate the contents. Select the checkbox to activate the calendar, then select the date. The Grace Date is the day after which the customer is again eligible for penalty.
- Note Used For. Select the function (such as statement or
penalty/interest, etc.) for which the note will be used.
- Expiration Date. This field is only active if a selection has
been made in the Note Used For column. Select the appropriate expiration date for the selected note function from the calendar.
- Note. This is the field where the note text is added. Free-type
the note that should appear. This field can later be edited.
- Attachments. Use the Add, Edit and Delete buttons to
attach/detach documents or other files to this note. Multiple files may be attached to each note.
History Tab
The History tab allows you to view overall or filtered account history and also to easily create selected new transactions for the displayed account. These new transactions are specific to the type of transaction selected in the grid.
Figure 102: Account Control Panel - History Tab
The account history can be viewed by different criteria, such as transaction history or payments made. Choose a listing by selecting an item from the View drop-down menu at the top of the tab, and then clicking the Refresh (
) button next to the menu.
When a line in the history table is selected, a series of buttons appears at the bottom of the tab. These buttons may be used to create additional transactions relevant to the line item selected, and therefore, which buttons appear depends on what transactions are available for that item. The button selection also depends on the permissions granted to the User.
Each button opens the associated transaction form in either Add or Edit mode. The same functions are available by right-clicking on the line item in the table. See the corresponding UMS function discussions elsewhere in this User Guide for additional information on these transactions.
The following are the types of actions that may be performed (depending on User access rights):
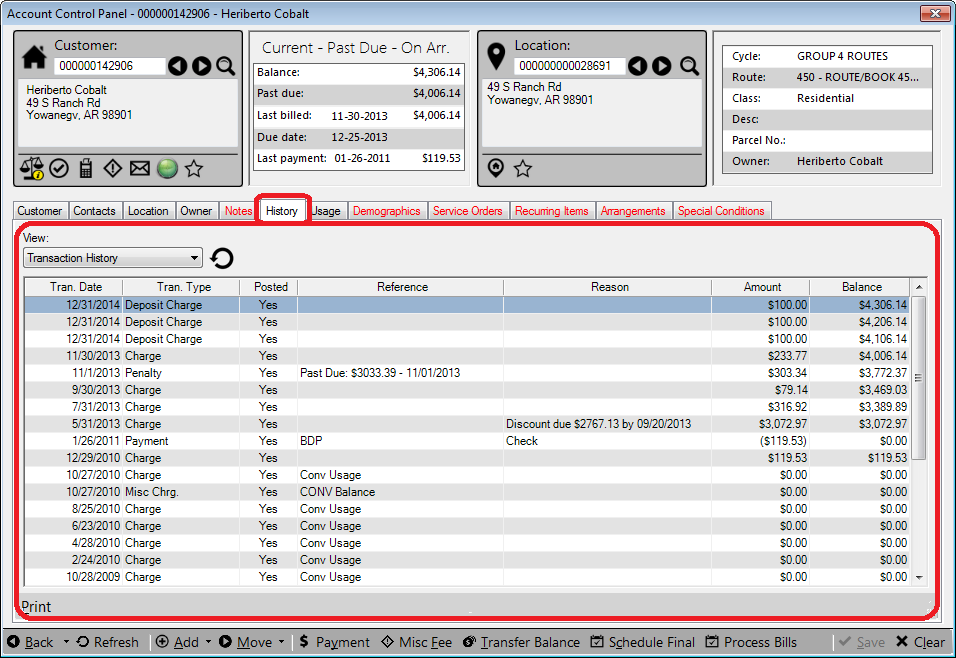
- Print. This option opens the Print Report dialog box, which
allows you to select print or export options. The report is generated for the full account history, not just for the selected transaction.
- Adjust Bill. This opens the Make Adjustments to Bill window,
where parts of the bill can be manually changed. Most fields are not available for changing once a payment has been made and posted. However, if a change can be made, it will adjust all charges associated with a particular adjustment, such as taxes or linked charges (e.g. sewer charges based on an adjusted water charge).
- Adjust. This option opens the Add Unposted Adjustment form
when the selected history grid row is a posted charge. If an un-posted transaction is selected, the Adjust button opens the Edit Adjustment form with the selected adjustment transaction.
- Transfer Payment. This option opens the Transfer Payment
window, which allows a payment to be moved from one account to another.
- Print Receipt. This option is only available when you select a
payment transaction.
- Delete Unposted Payment. If a payment has not been posted yet,
clicking this button erases the payment. You will be prompted to confirm that you do wish to delete.
- Refund. This option is available only for posted refund
transactions. It will open the Add Refund form.
- NSF. This button opens Add NSF or Edit NSF form. You will
first be prompted to select a payment type (Select Payment Methods window).
- Reverse. When the Reverse button is selected for a payment
line, the Add Reversal window will open. If a payment has already been reversed, this option will not be available.
- Statement. This option will open the Select Report Format
window, which will allow you to select the statement format to be used. Note that the full current statement is printed.
- Print Statement Duplicate For Contacts. This option will open the
Select Report Format window, which will allow you to select the statement format to be used. Note that the full current statement is printed and a duplicate will be printed for each contact belonging to the customer.
- Email Receipt. This option prints a receipt to a file (file type
specified by the User) and attaches it to a new email message. If an e-mail address is on file for the Customer, the message will be automatically addressed.
- Email Statement. This option allows users to email a statement to
the customer. Users will see this option when the Charge row of the statement to be sent is highlighted. This follows the Company setup options for e-bills.
Usage Tab
This tab lists service usage details for the selected Location.
Figure 103: Account Control Panel - Usage Tab
Service. The upper portion of the tab contains summary usage information, which can be filtered by service or viewed for all metered services at once. The information shown includes usage read date, service, rate code, actual/billed/adjusted usage, whether budget billing is in place, and charges (minimum and total).

Note: The table can be sorted (up or down) by any of the fields by clicking (once or twice) on the column header.
Meter Details. The lower portion of the tab gives more detailed information for any line item selected in the Service section above. This section shows usage and status information for all applicable meters.
Demographics Tab
This tab holds any demographic items associated with the Customer, Location, or Account. These items are primarily used with the UMS Water Conservation Module (if licensed for your system) and Account Budget Billing.
Figure 104: Account Control Panel - Demographics Tab
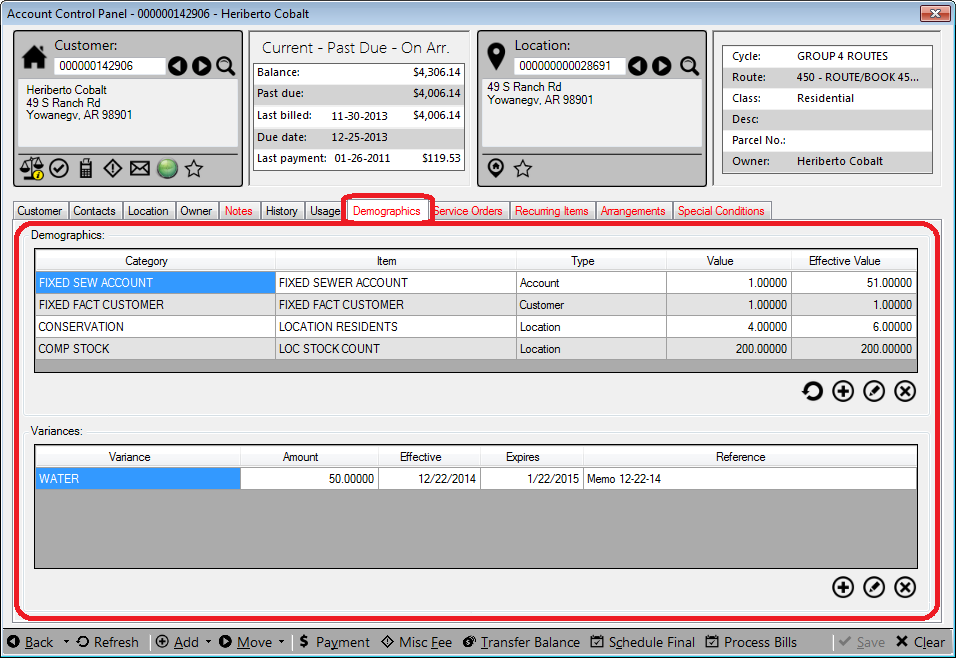
Demographics Section
This upper section of the window lists all demographic items entered for the selected Account, Customer, or Location.
Use the Add, Edit, or Delete buttons to manage demographic information.
Note: If an edit is performed on an existing Demographic record and there is history associated with that record, the new value overwrites the old value and the previous record is no longer available.
The Add button opens the New Demographic Detail form. The Edit button opens the same form in edit mode.
Figure 105: New Demographic Detail
For a new or edited item, enter or select the appropriate values for each field.
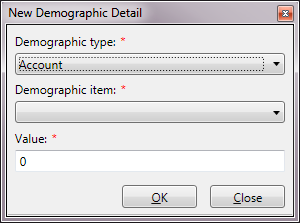
- Category. In general, these terms are descriptions of the type or
purpose of demographics being recorded. Categories are created and managed through Setup > Setup Demographic Categories. Each Category is assigned either Account, Customer, or Location type when it is created.
- Item. In general, these terms are descriptions of the specific
demographic item being recorded. Items are created and managed through Setup > Setup Demographic Items. Each Item is associated with a type (Account, Customer, or Location) and a Category.
- Value. This is the number items or instances associated with a
particular demographic item. The number entered multiplies the value assigned to the item in Setup Demographic Items.
- Effective Value. This value is automatically calculated based on
the value and multipliers entered, taking into account any variances added to the item.
Variances Section
This lower section of the tab shows any variances associated with a selected demographic item in the upper section. Use the Add, Edit, or Delete buttons to manage demographic information.
Use the Add, Edit, or Delete buttons to manage demographic information. The Add button opens the New Demographic Variance form. The Edit button opens the same for in edit mode.
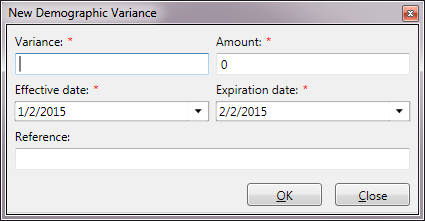
Figure 106: New Demographic Variance
For a new or edited item, enter or select the appropriate values for each field.
- Variance. This is a free-type field which should describe the
type/reason for the variance.
- Amount. Enter the variance amount. This will affect the Effective
Value in the upper section above.
- Value. This is the number items or instances associated with a
particular demographic item. The number entered multiplies the value assigned to the item in Setup Demographic Items.
- Effective Date. This is the date when the variance goes into
effect.
Expiration date. This is the last day the variance will apply.
- Reference. This free-type field is provided for any relevant
comments to identify, describe, or track the variance or its source.
Service Orders Tab
This tab displays service orders for the account. Service Orders for the selected Account can be created or managed from this tab.
Note: Service Orders for individual accounts or for groups of accounts can also be created and managed through the Service Order Control Panel (under Management > Service Order). See Service Order Management for discussion.
Some of the features described will only be visible if a Service Order Interface (such as Elements) has been configured for your system. In addition, some users will have fewer options, depending on permissions assigned.
Figure 107: Account Control Panel - Service Order Tab
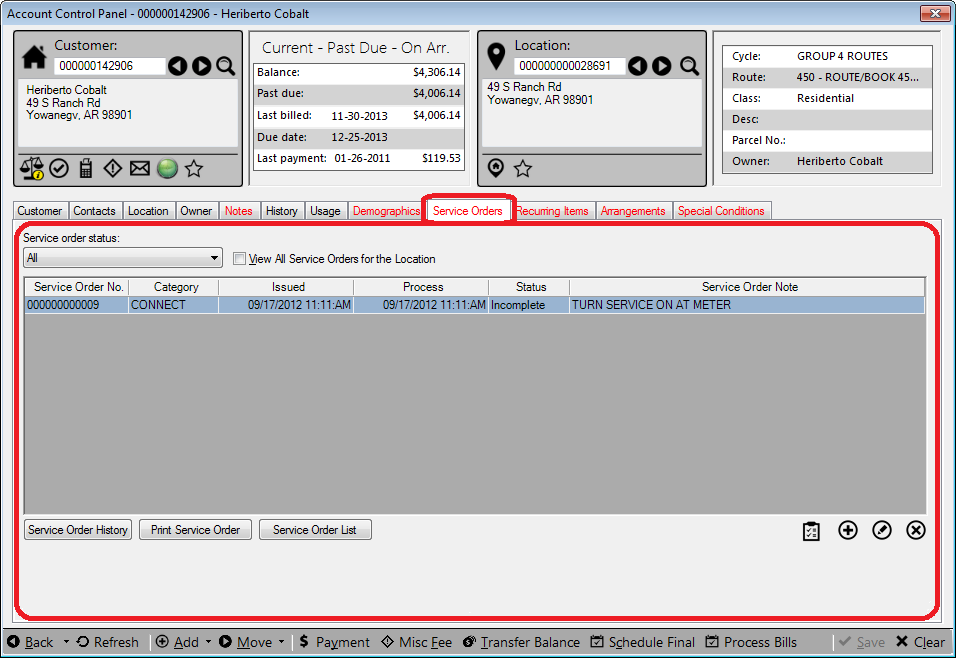
External or UMS. This feature is only available if you are using a Service Order Interface. If no external interface is configured, only UMS service orders will be managed through this tab.
Service order status. This menu allows you to filter the list of Service Orders by completion status (complete, incomplete, or both).
View All Service Orders for the Location. When this box is checked, the list will contain all service orders associated with the Location, regardless of which Customer may be associated with the service order.
Service Order List. The table will be populated with information for all service orders meeting the specified criteria. The Complete (
 ), Add (
 ), Edit
(
), Edit
( ), and Delete (
 ) buttons below the table can
be used to manage the orders. Refer to Service Order Management
discussion for additional information.
) buttons below the table can
be used to manage the orders. Refer to Service Order Management
discussion for additional information.- Service Order History. This button launches the Service Order
History report. When you click it, the Print Report dialog box will open, allowing you to select how the report will be printed/exported.
- Print Service Order. This button allows you to print the service
order form for the selected service order.
- Service Order List. Generates a report on service order
information for that selected location.
Recurring Items Tab
This tab displays information about recurring discount items applied to the current account. Recurring discounts may be single-time or recurring discount credits or rebates. They may be applied before or after taxes, depending on how they are defined when created (Setup > Setup Recurring Items).
Figure 108: Account Control Panel – Recurring Items
At the top of the tab is a drop-down search menu and value field, which allows searching by Code, Description, Type, or Effective Date. Next to this is a checkbox that allows you to filter the display list for only active items.
The table lists all recurring items associated with the selected Account. Right-click anywhere in the table and select Copy all values to copy the table contents for pasting into another application such as Excel or Word. Click the Delete button beneath the table to delete a selected line, or the Add button to create a new item.
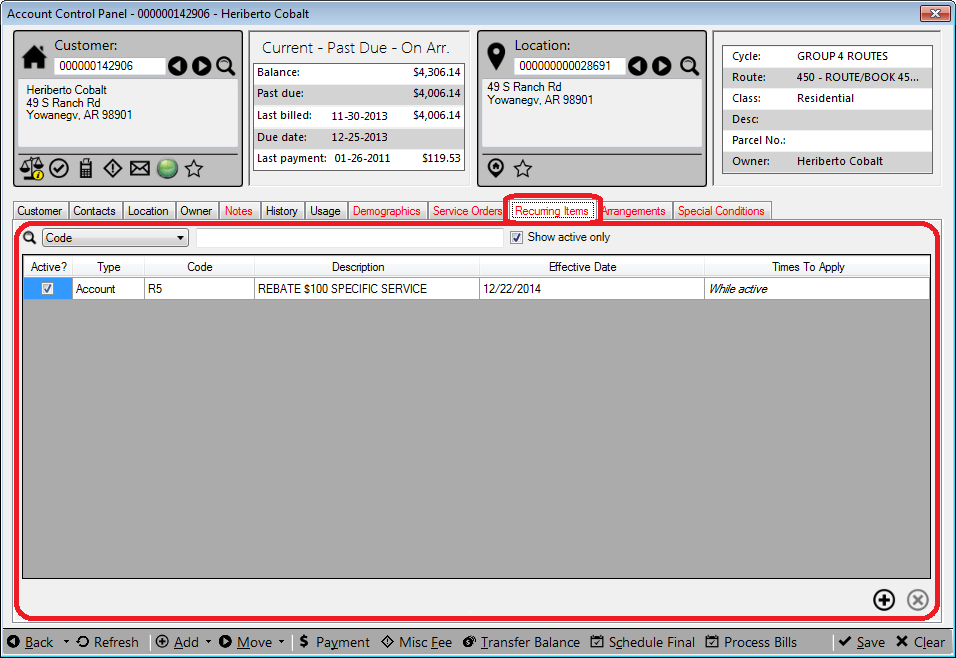
Note: You must save a new item before it will be applied. Once saved, the items cannot be edited or deleted.
- Active. This checkbox indicates whether the item is currently
active for this Account.
Note: You will not be able to check the Active box until the item is saved (Save button in the footer or saved as prompted when leaving the page). Once the item is saved, the box will be checked by default.
Once an active item has been deactivated, it cannot be reactivated. It will need to be re-added as a new item.
- Type. Select from the drop-down list whether the item applies to
the Account, the Customer, or Location.
- Code. Choose the applicable code from the drop-down menu. Codes
are set up and defined separately, under Setup > Recurring Items.
- Description. Select the required item description from the
drop-down menu. The menu is populated from the items associated with the selected Code, as defined when the code is set up.
- Effective Date. The effective date is the date upon which the
item first applies. Click in the field and select a date from the pop-up calendar. It will default to the current date, but any date can be selected.
- Times to Apply. This field shows the number of times the credit
will be applied to the account. A number in this cell indicates a specific number of recurrences. If the value is zero, the cell will show While active, indicating that the credit will continue until manually ended.
Note: The value that appears when the line is opened is the default value assigned to the item when it is created. It can be edited, but only until the item is saved.
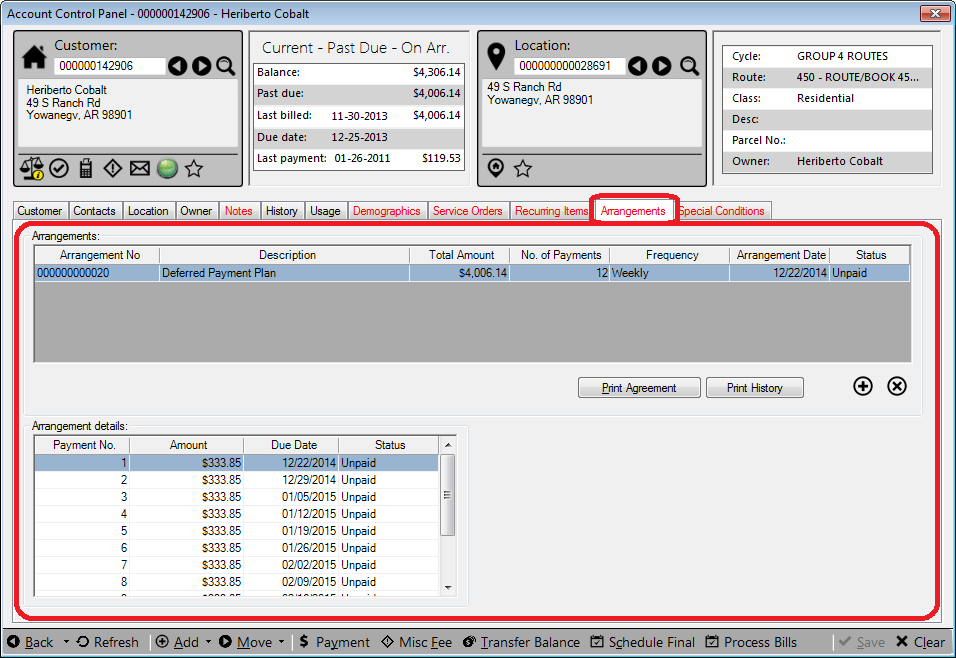
Arrangements Tab
The Arrangements tab shows any arranged payment plans set up for the selected Customer, and allows new payment arrangements to be configured.
Figure 109: Account Control Panel – Arrangements Tab
This tab consists of two main sections. The upper section is a grid that gives summary information for the payment plan (current or completed). The lower section provides payment details for the selected plan. Neither of these sections can be manually edited. They display information based on entries elsewhere (Arrangement Wizard, Payments, etc.) in the system.
Between the two sections are buttons which will generate reports of the plan details (Print Arrangement) or the summary/history (Print History). Next to these are Add and Delete buttons. The Add button opens the New Payment Arrangement Wizard, for setting up a new plan.
Note: An account must have a balance for an arrangement to be set up. If a Customer already has an arrangement in place, a new one cannot be added until the first one is completed. In addition, no payment arrangement can be created until all account transactions are posted. The Wizard will not open unless these conditions are met.
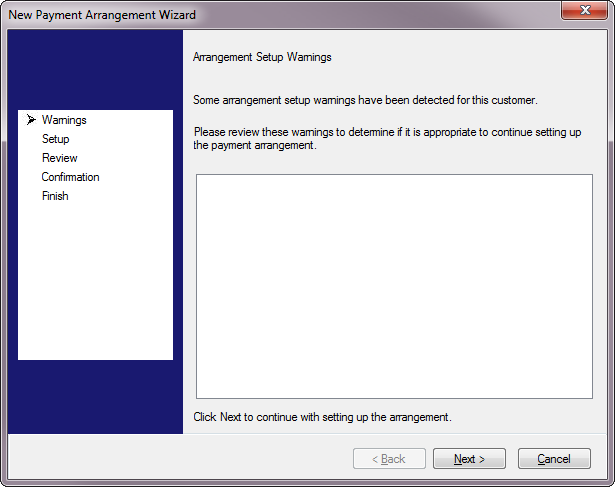
Figure 110: New Payment Arrangement Wizard Warnings
The first screen (Warnings) contains any arrangement notes or warnings associated with the Customer. If there are no notes, or if the notes do not preclude arrangements, click Next to proceed.
Figure 111: New Payment Arrangement Wizard Setup
The second screen (Setup) is where the arrangement details are entered.
- Description. Free-type an applicable description of the
arrangement. This is the text that will appear in the summary window and in the reports.
- Service window. Select the service(s) that will be associated with
the arrangement by clicking the checkbox(es) on. At least one service must be selected.
- Account balance. This amount is the total of all of the balances
for the services selected in the above window. This total is automatically generated based on the selections, and cannot be manually edited.
Note: The balances shown are current account balances, including both past-due and not-past-due amounts.
- Arrangement amount. This is the total amount that will be
included in the arrangement plan being set up. It may or may not include the entire selected balance, but it cannot exceed the total.
- Remaining Balance. This amount is the part of the total account
balance that is not included in the arrangement. It is the difference between the Account balance and the Arrangement amount, automatically calculated and not manually editable.
- No. of payments. Enter the number of payments for the
arrangement.
- Payment. This is the amount of each arranged payment. This is
directly calculated from the arrangement amount and the number of payments, and cannot be manually edited.
- Due with regular billing. When this box is checked, the payment
due dates will coincide with regular bills. When it is unchecked, two additional fields are shown:
- Frequency. Select from the drop-down menu how often the
arrangement payments will be due. This does not affect the regular billing cycle.
Start Date. Select the date when the first payment will be due.
- View History. Click this button to show the account transaction
history without closing the Wizard. The Customer / Location History window will open in view-only mode. Double-click on any transaction to view details, but you will not be able to make any changes.
Click Next to move to the Review window.
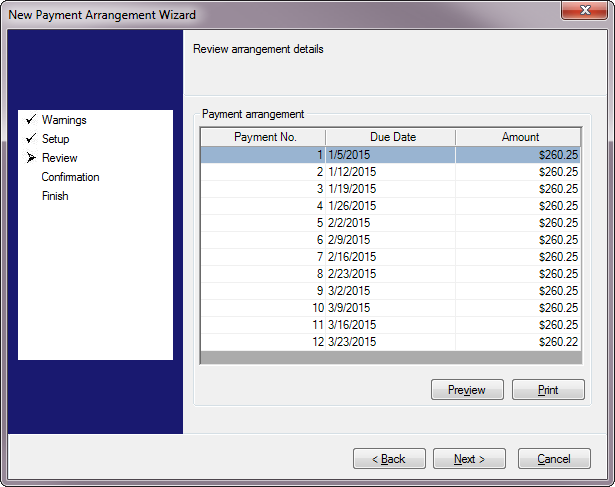
Figure 112: New Payment Arrangement Wizard Review
The Review window will show a list of payments and due dates, based on the entries made in the previous window. This is the same information that will be displayed in the lower section of the Arrangements tab after you exit the Wizard. You can generate a report from here using the Preview or Print buttons.
If changes need to be made, click Back to return to the Setup screen for edits. If the information is correct, click Next to proceed to the Confirmation screen.
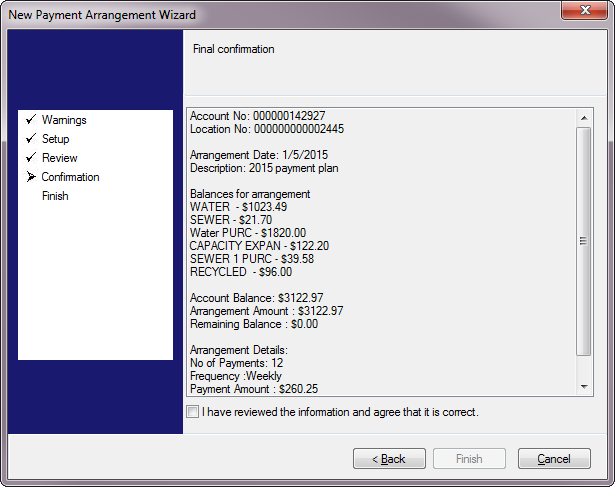
Figure 113: New Payment Arrangement Wizard Confirmation
The confirmation screen will list all of the details for the arrangement. If there are any errors, click the Back button to return to previous screens and make changes. If no changes are needed, click the checkbox at the bottom of the screen, indicating that the information has been reviewed is correct. This will activate the Next button, which when clicked will take you to the Finish screen.
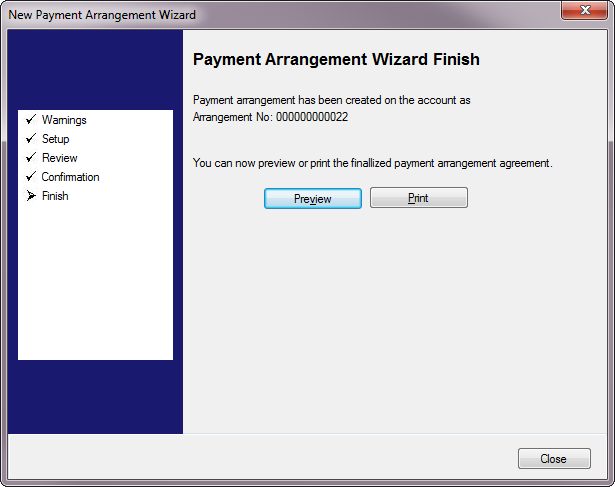
Figure 114: New Payment Arrangement Wizard Finish
The Finish screen is a confirmation that the arrangement has been saved. No input is required.
Note: Once you reach this point, there is now an Arrangement No. assigned. This is done automatically by UMS, and is the same number that will appear in the list in the main Arrangements tab once you have exited the wizard.
You may generate a report from this screen or return to the Arrangements tab. Click Close to exit the Wizard.
Special Conditions Tab
Special Conditions are used to exempt a customer, account, or location from actions such as penalty calculations or statement printing. Conditions are only available if specified conditions are met.
Figure 115: Account Control Panel – Special Conditions Tab
Special conditions are created and managed through Setup > Setup Special Conditions.
At the top of the tab is a drop-down search menu and value field, which allows searching by Code, Description, Type, Effective Date, or Expiration Date. Next to this is a checkbox that allows you to filter the display list for only active items.
The table lists all special conditions associated with the selected Account. Click the Delete button beneath the table to delete a selected line, or the Add button to create a new condition. You must save the condition before it will be applied.
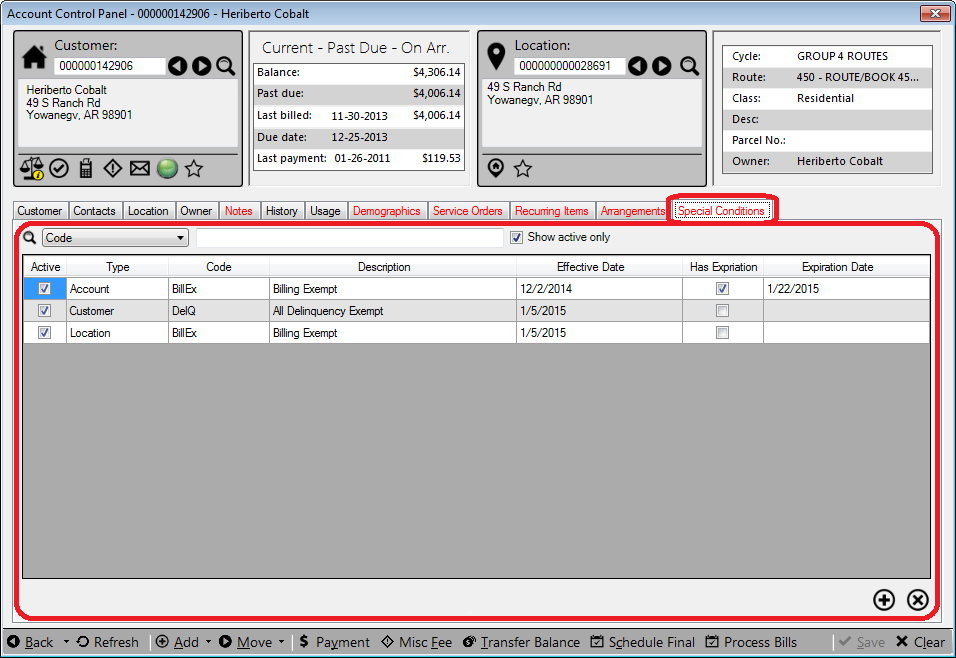
Active. This checkbox indicates whether the item is currently active for this Account.
Note: You will not be able to check the box until the item is saved, it will be checked by default.
Once an active item has been deactivated, it cannot be reactivated. It will need to be re-added as a new item.
Type. Select from the drop-down list whether the item applies to the Account, the Customer, or Location. This field will not be editable after the condition is saved.
Code. Choose the applicable code from the drop-down menu. Codes are set up and defined separately, under Setup > Setup Special Conditions. This field will not be editable after the condition is saved.
Note: If an icon is associated with a particular code it will appear in the Customer or Location Information Card
Description. The description field will populate automatically with the description defined for the selected code. It is not manually editable.
Effective Date. The effective date is the date upon which the item first applies. Click in the field and select a date from the pop-up calendar. It will default to the current date, but any date can be selected.
Has Expiration. If the condition will expire, click this checkbox on. Leave it unchecked if the condition is permanent. If the box is checked, the Expiration date field will become active.
Expiration Date. This field will only be active if the Has Expiration box is checked. The expiration date is the last day the condition will apply. Click in the field and select a date from the pop-up calendar. It will default to the current date, ut any date later than the effective date can be selected.
Account Control Panel Footer Toolbar
The bottom of the Account Control Panel has a footer toolbar designed to provide easy access to UMS features.

Figure 116: Account Control Panel Footer Toolbar
When UMS functions are accessed from the footer toolbar, the associated forms are opened for the currently open Account.
Back
This button tracks previously viewed Customers/Locations, allowing users to return to previous pages. When you click on the Back button itself, you are automatically moved to the previous screen viewed. When you click on the arrow, a list of recently viewed locations opens, and you can select any item from the list.
Refresh
This button refreshes the information for the currently displayed Customer/Location.
Add
This button allows new Customers and Locations to be easily added to UMS. When you click the Add button or the arrow next to it, a menu opens, giving you the choice of adding a Customer, a Location, or a Location using a template.
Add Customer
If “Auto generate Customer No.” is check at Setup > System > Company > Company Options, the Customer number will display once the information is entered and saved. If UMS is not set to auto generate, the New Customer No. window will open.
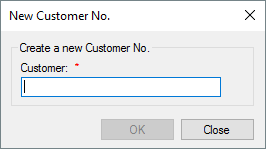
Figure 117: New Account No. Dialog Box
Type a new Customer number, and click OK.
Add Location
If “Auto generate Location No.” is check at Setup > System > Company > Company Options, the Location number will display once the information is entered and saved. If UMS is not set to auto generate, the New Location No. window will open.
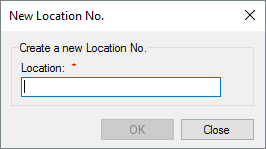
Figure 118: New Location No. Dialog Box
Type a new Location number, and click OK
Add Location using Template
With this option, another list will pop up. The list will have all previously-saved templates for selection, as well as the options Manage Templates and Save as Template.
Select an existing template
Choosing one of the existing templates from the pop-up list will open The Setup Location Address window, which will be pre-populated with any information that was saved when the template was created.
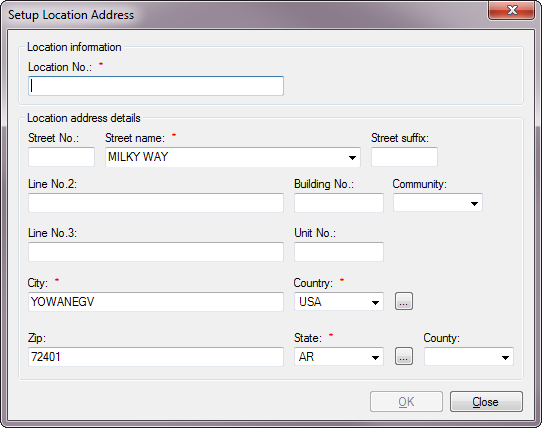
Figure 119: Setup Location Address
Edit as needed and fill in the remaining information, then click OK. You will be returned to the Account Control Panel and the new Location will appear in the Location Information Card.
Manage Templates
This selection will open the Setup Location Templates window.
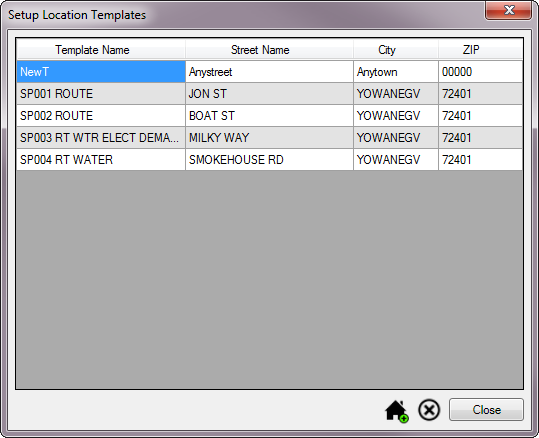
Figure 120: Setup Location Templates
You can choose a template for your new Location from here by selecting
the appropriate line, then clicking the  button. Just as
selecting a template from the pop-up menu will do, this will open the
Setup Location Address window described above, pre-populated with
the information saved in the template.
button. Just as
selecting a template from the pop-up menu will do, this will open the
Setup Location Address window described above, pre-populated with
the information saved in the template.
You can also delete existing templates, by selecting lines and clicking
the Delete () button.
Save as Template
This selection is only active if a Location (new or existing) is currently open. Once you have entered the Location information from which you wish to create a template, choose Add > Save as Template. The Create Location Template window will open.

Figure 121: Setup Location Address
Enter a name for the new template in the Template Name box at the top of the window, then click OK. The new template will appear in the selection list next time you select Add Location from Template.
Move
This pop-up button allows you to easily move Customers into or out of the current Location. Move In opens the Account Wizard and Move Out opens the Final Bill Wizard. Once a move-in has been started, a third option, Cancel Move In, appears as long as there is no history or deposit information associated with the customer. If you cancel a move-in, you will be prompted to confirm. The following options are only available when they meet the specified criteria. Delete Customer allows users to delete a customer if it has not been associated with a location. Delete Location allows users to delete locations if a customer has not been moved in and/or services have not been added.
Payment
This button opens the New Payment window and selects the current account as the payment recipient. See the Payment Management discussion for details.
Misc. Fee
This button opens the Add Miscellaneous Fee screen. See the Miscellaneous Fees discussion for details
Transfer Balance
This button opens the Transfer Balance screen. See the Transfer Balance discussion for details.
Schedule Final
You can use this function to create a final bill for the displayed Customer, or you can use the Final Bill Wizard to accomplish the same task. See Final Bill Wizard discussion for more information on this alternative.
The Schedule Final button opens the Final Bill window.
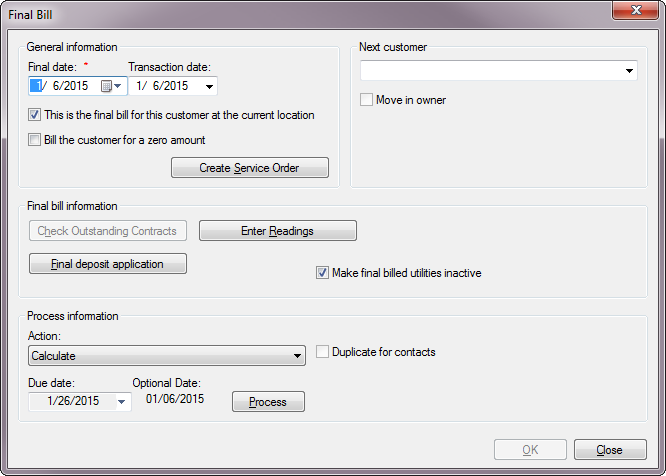
Figure 122: Setup Location Address
This window contains four sections: General Information, Next Customer, Final Bill Information, and Process Information.
General Information
Final Date. This is the date the customer actually vacates the location. The field defaults to the current date, but you can edit as needed. Either type the date or click the calendar icon/arrow and select the date from the calendar.
Transaction Date. This is the date when the final billing will occur. This date must be no earlier than the current date, as final bills cannot be created with transaction dates that are in the past. The field defaults to the current date, but you can edit as needed. Either type the date or click the calendar icon/arrow and select the date from the calendar.
Note: Final Date and Transaction Date fields are only active when the Action specified in the Process Information section in the lower left portion of the tab is Calculate.
This is the final bill… This box will be checked by default. Leave it checked if this is indeed the final bill for this Account.
Bill the Customer for a zero amount. This box will be unchecked by default. Check it only if the Customer should be billed if the balance is zero.
Create Service Order. Click this button if work is required for the finalization. This will open the New Service Order screen. (Refer to Service Order Management.)
Next Customer
Menu. The drop-down menu will be populated with any Waiting Customer(s) created for the Location. Select the correct one from the menu. If there is no new Customer, leave the field blank.
Move in Owner. This checkbox will only be active if the property is designated as a Rental Property and an Owner is specified. Check the box if applicable.
Final Bill Information
Check Outstanding Contracts. Use this button to specify how a Customer’s contracts will be handled.
Cancel: This closes the contract for the billed but unpaid amount.
Transfer: This moves the contract to the next customer.
Bill Balance: This bills the unpaid contract balance on the Final Bill.
Enter Readings. Click this button to enter the final meter reading for the final bill. The Enter Readings screen will open. Refer to Meter Readings.
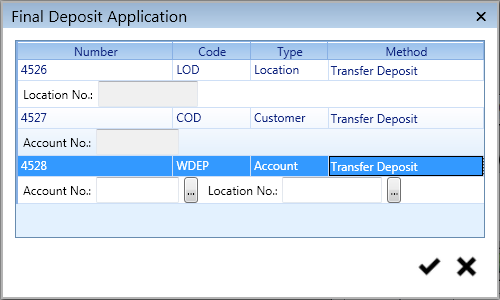
Final deposit application. This button opens the Final Deposit Application dialog box.
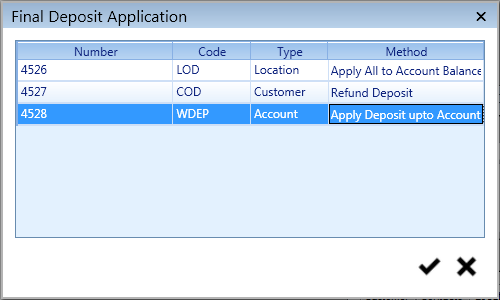
Figure 123: Final Deposit Application
If there are any deposits available, they will appear in this window. Click in the Method field to activate the drop-down menu, and select the disposition method for the deposit in question.
The options for deposit application are: None, Apply All to Account Balance, Apply Deposit to Balance before Refunding, Refund Deposit, Apply Balance up to Account Balance, and Transfer Deposit.
Of these, Transfer Deposit is the only option that requires additional input. If you elect to transfer a deposit, you will be prompted to enter a new Customer, a new Location, or a new Account (Customer + Location), depending on which type of deposit is being transferred:
Figure 124: Transfer Deposits
Type the new Customer and/or Location number in the fields provided, or use the Browse (
) button to search and select.
Once all selections are made, click Save (
) to save changes and close the window. Click Close (
) to close the window without saving.
Make Final billed utilities inactive. Checking this box deactivates the utilities for which the Final Bill is being processed. Any service that will later be opened by a new Customer will have to be manually restarted upon move-in.
Process Information
This function is similar to the process described in the Process Bills chapter. Refer to that section for more specific information.
Action. Click the drop-down list and select the type of action to take. The option you choose will determine which function the Process button will initiate.
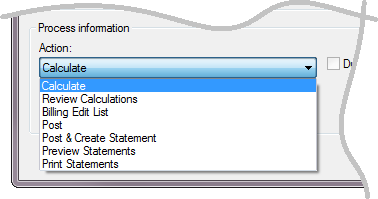
Figure 125: Final Bill Actions Options
Duplicate for Contacts. Select this option if a Final Bill is to be sent to the Customer’s contacts. Only contacts with Notices selected (refer to Contact tab) will be included.
Due date. Enter a due date for the final bill. Default will be a specified number of days after the statement date, as defined under Setup > Preferred Dates.
Optional Date. This field may be used to hold any other relevant date tracked under your company’s processes. It will be stored and will be printed as specified, but does not affect the billing process.
Process. Click the Process button to complete the selected action.
Process Bills
This button opens the Bill Process window for the specific Account. Refer to Process Billing for more information.
Save
This button saves the changes made to the current Customer/Location. It will only be active when there have been changes made. If you try to leave a screen or function without saving, you will be prompted to save before proceeding.
Clear
This button clears the entire Account Control Panel, and cancels any unsaved changes.