Miscellaneous Transactions
The Miscellaneous menu contains UMS Functions not described elsewhere. These range from Addins that may be licensed to your system to miscellaneous accounting functions such as processing bad debts and transferring credit balances. Several of these functions have been simplified by creating wizards to walk you through the processes.
At the top of the menu is the Addins sub-menu. Miscellaneous add-in modules that have been licensed to your system will be listed here. At least one Addin must be licensed in order for this section to appear. The Payment Setup Wizard is the only mandatory Addin, and it is included in every installation. Documentation for the other licensed functions will be available separately, when purchased for your system.
Below the Addins header in the Miscellaneous menu is a list of standard UMS functions. These include:
Adjustments |
Refund Process |
|---|---|
Miscellaneous Fees |
Reinstate Bad Debt |
NSFs |
Refund Check |
Reversals |
Convert SOC to OC |
Refunds |
Transfer Balance |
Payment Setup Wizard
The payment Setup Wizard was created to streamline setup for a system to use the hosted payment for credit cards. From the Main Menu Bar, select Miscellaneous > Addins > Payment Setup Wizard. The wizard will open.
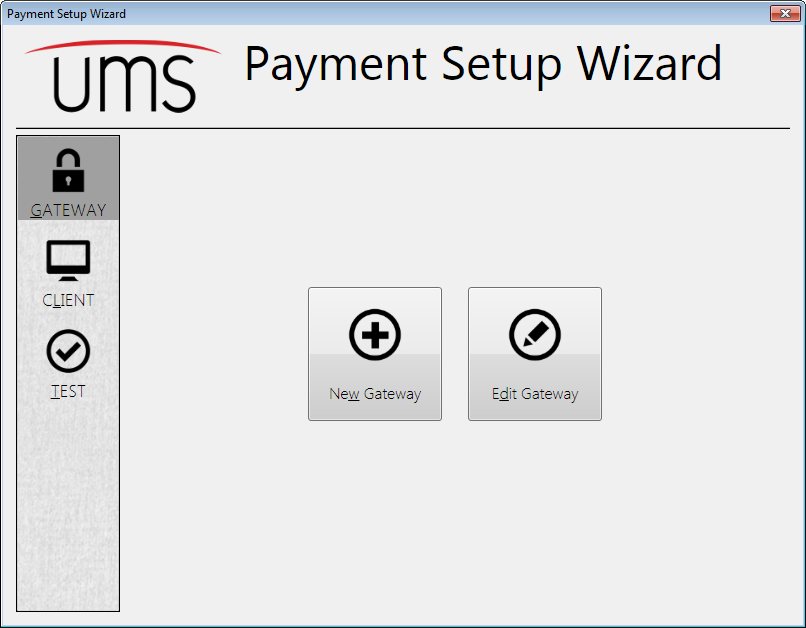
Figure 290: Payment Setup Wizard
There are actually three processes within this Payment Setup Wizard: Gateway setup, Client setup, and the test function. When the window opens, Gateway setup is shown by default. Click on the icons at the left of the screen to switch to the other processes.
CUSI Technical support will use this function to assist you in configuring your system.
Gateway Wizard
The Gateway Wizard will walk you through creating or editing a payment gateway. While it will allow you to create or edit eCheck gateways, its primary focus is on credit cards and the hosted payment form. When dealing with a credit card gateway, you will be guided through configuring the relay server and setting up the online merchant gateway.
Client Wizard
The Client Wizard will walk you through setting up the workstations to use the hosted payment form. Some steps must be performed for every User, even if more than one User works from the same computer.
Test Wizard
The test wizard allows you to quickly test the hosted payment form and the relay server connection.
Adjustments
This function allows you to make adjustments to existing posted transactions. Posted transactions cannot be changed, and therefore any corrections must be made using adjustments. These adjustments are unposted when created, and must also be posted once they are complete, in order to apply them permanently. Adjustment reasons typically include billing errors, account credits, meter leaks, etc.
From the Main Menu Bar, select Miscellaneous > Adjustments. The Setup Unposted Adjustment dialog box opens.
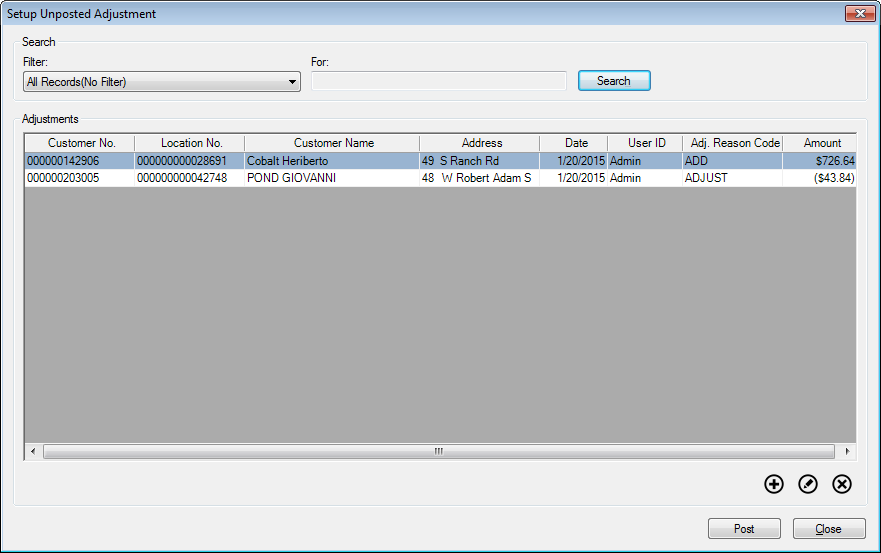
Figure 291: Setup Unposted Adjustment
At the top of the window is a Search section. This allows you to filter the Adjustments to limit the displayed list.
Select a search item from the drop-down Filter menu. The options include the same fields that are in the table. Then enter a search term for the selected filter in the For field, and click Search to limit the results list.
Note: The items in the list can be sorted (ascending or descending) within the grid by clicking on the column headers. Click once to sort ascending, then again to toggle between ascending and descending.
Use the Add, Edit, and Delete buttons below the results grid to manage the transaction adjustments.
Add Adjustments
Before you can add adjustments, you must select a transaction to adjust. The Add button will open the Select a Transaction to Adjust window so that you can choose the appropriate transaction.
Figure 292: Select a Transaction to Adjust
In this screen, you will select an Account and a range of transactions, and then choose one of those transactions for adjustment.
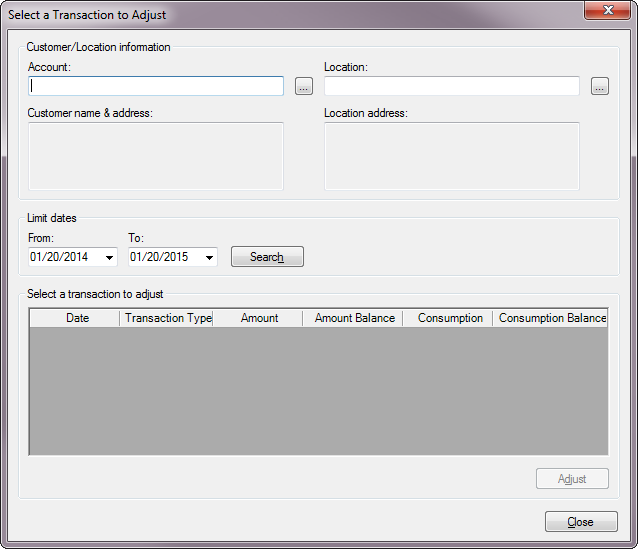
Account and Location. Type in an Account or Location number, or use the Browse buttons next to these fields to search for an Account.
You need only fill in one of these, and the other will be completed by the system. As elsewhere in UMS, if a Customer is associated with more than one current Location, you will be prompted to choose the applicable one.
Once you select an Account, The Customer name & address and Location address will populate automatically.
Limit Dates. Enter a transaction date range to help you find the transaction that needs to be adjusted.
The From date defaults to the current day one year ago, and the To date defaults to the current date. If you know approximately when the transaction in question was made, you can edit these dates to narrow the search range.
Click the Search button to list all of the applicable transactions.
At this point, the screen will be filled in, and there will be a list of transactions in the table:
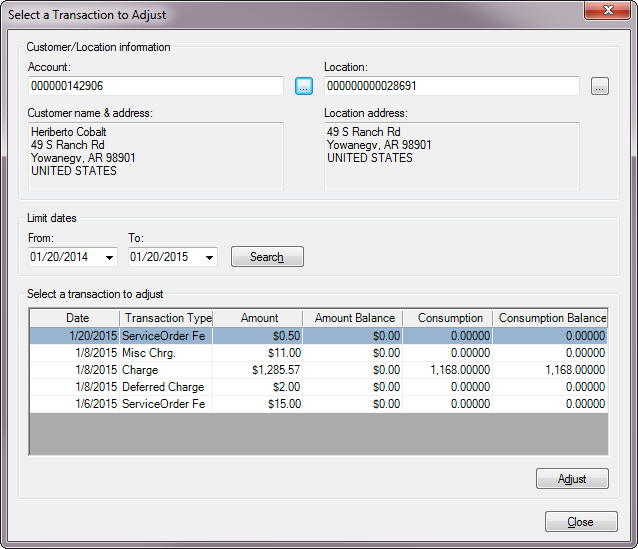
Figure 293: Select a Transaction to Adjust – Form Completed
All posted transactions for the selected Account which meet the date limits are shown. Also note that the Adjust button is now enabled. Select the transaction to be adjusted, and click Adjust. This will open the Add Unposted Adjustment window.
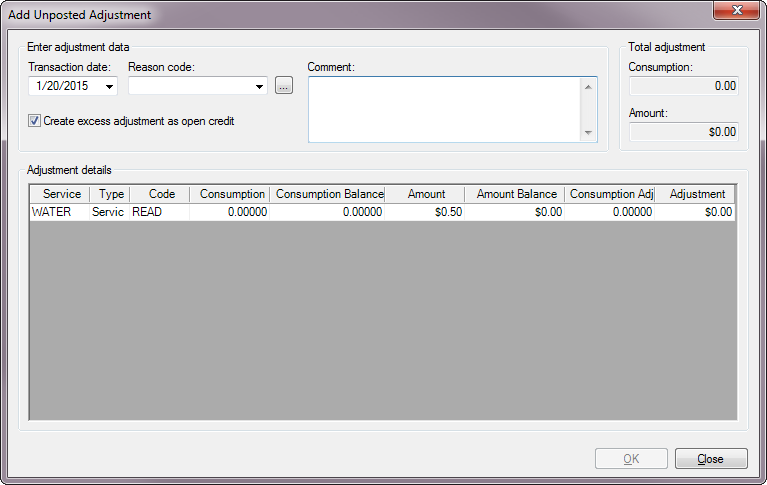
Figure 294: Add Unposted Adjustment
This window may have a single line for a simple transaction, or many lines for a multi-service bill.
Transaction date. This is the date when the adjustment will be applied. This field defaults to the current date, but it can be edited as needed. Enter a date by typing or by selecting from the drop-down calendar.
Reason Code. Enter a reason for the adjustment. Click in the box to open the drop-down list. All previously-saved reason codes will be available for selection.
If the code you need is not in the list, use the Browse button next to the box to create new one. This will open a New Adjustment Reason dialog box.
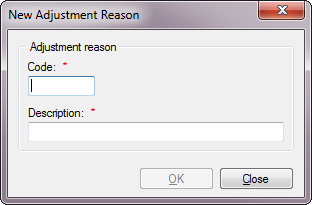
Figure 295: New Adjustment Reason
Code. Enter a descriptive abbreviation for the reason.
Description. Enter a word or phrase to describe the reason.
Once you click OK to save the new code, it will appear in the code list.
Create excess adjustment as open credit. When this box is checked, any overpayment resulting from previously paid charges will be handled as open credit.
Comment. Enter comments concerning the adjustment, as applicable.
Adjustment details. Make specific adjustments to each line item in the grid, as applicable. Most of the columns in the table are for information, to provide identification and detail for the charge being adjusted. The last two columns are for manual adjustments.
Consumption Adj. Enter the net change in consumption for each applicable line item. Increased consumption will be a positive number and lowered consumption will be a negative number.
Amount Adj. Enter the net change in amount (dollar amount charged) for each applicable line item. An increased amount will be a positive number and a lowered amount will be a negative number.
Total adjustment. This is an information field only, and cannot be manually adjusted. It show the total of the adjustments you make for the line item(s) in the transaction details list.
Consumption. This is the total of the of the consumption line item adjustments you make in the Consumption column of the transaction details list.
Note: A consumption adjustment does not automatically create a corresponding charge adjustment.
Amount. This is the total dollar amount of the line item adjustments you make in the Amount column of the transaction details list.
Once you have entered all the adjustments needed for a particular transaction, click OK to return to the Select a Transaction to Adjust window.
Click OK again to return to the Setup Unposted Adjustment window. The newly created adjustments will now appear in the list.
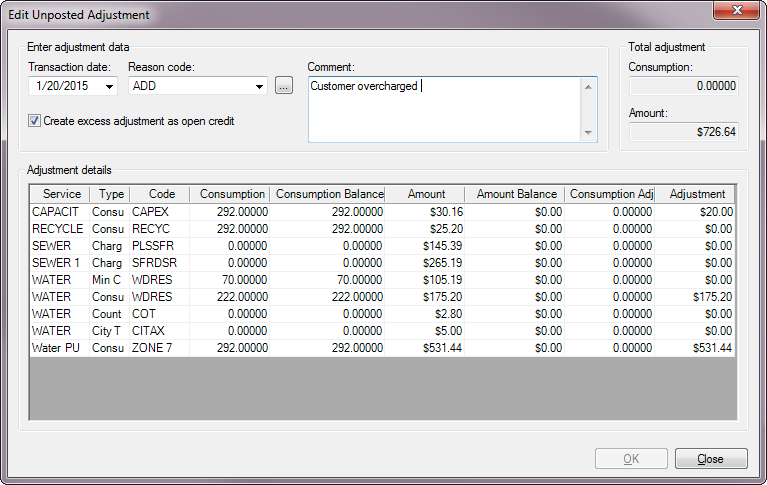
Edit Adjustments
Once an adjustment has been created, it can be edited as long as it has not yet been posted. To edit an adjustment, select the item in the Setup Unposted Adjustment table, and click the Edit button. The Edit Unposted Adjustment window will open.
Figure 296: Edit Unposted Adjustment
This window works exactly the same way as the Add Unposted Adjustment window. All of the same fields can be edited, because the created adjustment transaction has not yet been posted.
Delete Adjustments
To delete a created adjustment, select it from the list in Setup Unposted Adjustment, and click the Delete button. You will be prompted to confirm the deletion.
Post Adjustments
All transaction adjustments created through this function can be changed (or deleted) until they are posted.
Note: You can exit this function without posting, and the adjustments you created will appear in the transaction histories of the affected Accounts as unposted transactions. If you re-enter the Setup Unposted Adjustments window, the same list of adjustments will remain in the list until deleted or posted.
These adjustments can be posted with other transactions using the Post Transactions functions (refer to Post Transactions chapter for details) or they can be posted together without leaving the Adjustments function.
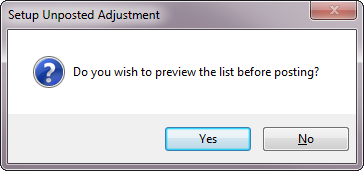
Once at least one adjustment has been created, the Post button in the Setup Unposted Adjustments window will become active. Clicking this button will begin the posting process for all of the listed adjustments:
You will first be asked if you want to view a pre-posting report.
Figure 297: Preview Posting List Prompt
Select No to proceed to posting. If you select Yes, you will be prompted for report preferences.
Figure 298: Pre-Posting Report Preferences
Select your preferred sort order and detail level (Detail, Condensed, Summary), then choose whether you want to preview, print or export. Click Close to proceed without printing after all.
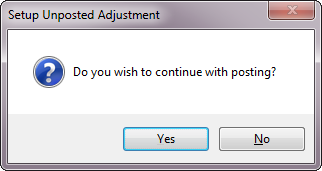
Whether or not you generate the pre-posting list, you will then be asked to confirm whether you want to continue with the posting of the items.
Figure 299: Posting Confirmation
Click No to cancel the posting and return to the Setup Unposted Transactions screen. Click Yes to proceed with the posting.
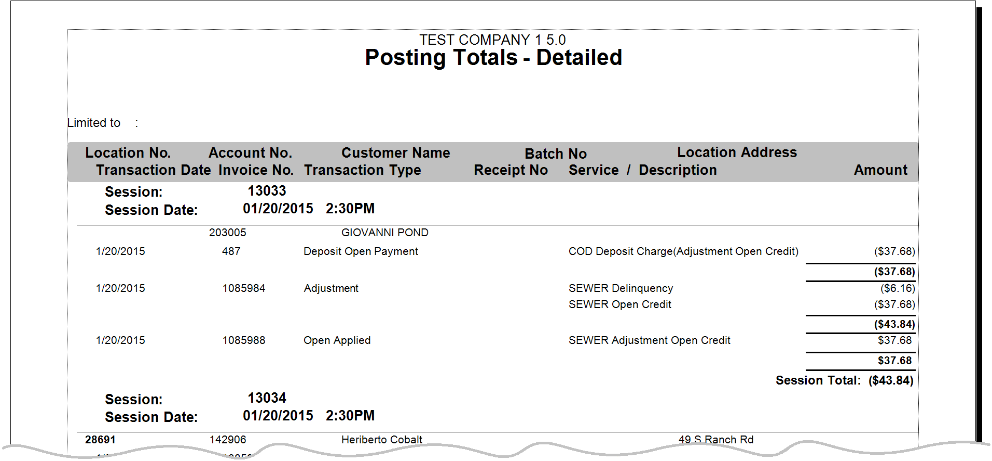
The posting will occur, and you will then be asked if you want to print the posting totals. Click Yes to generate a detailed Posting Report. You will be able to print or export this report.
Figure 300: Sample Posting Report
All adjustments are posted after this point, and each will appear in the individual Account transaction history.

Miscellaneous Fees
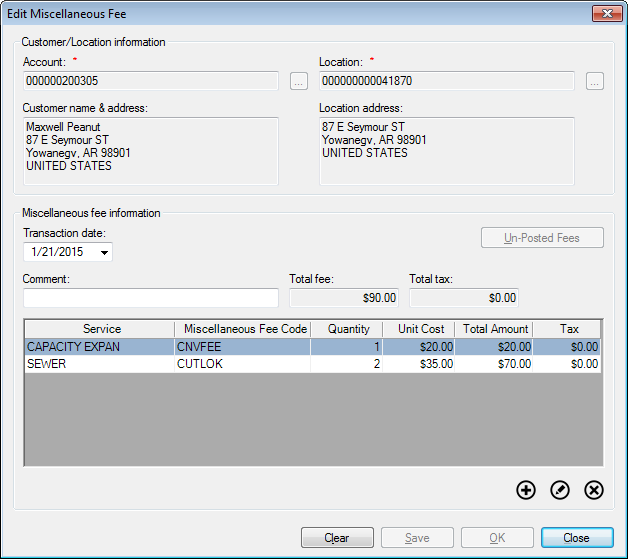
This function allows you to create which do not fall into other fee categories. These fees can be applied to a specific account. Miscellaneous fees can be assessed elsewhere in UMS, for instance in the Account Wizard and Final Bill Wizard. However, the Miscellaneous Fees function allows you to apply fees as a separate task, rather than as a part of another process.
From the Main Menu Bar, select Miscellaneous > Miscellaneous Fees. The Add Miscellaneous Fee dialog box opens.
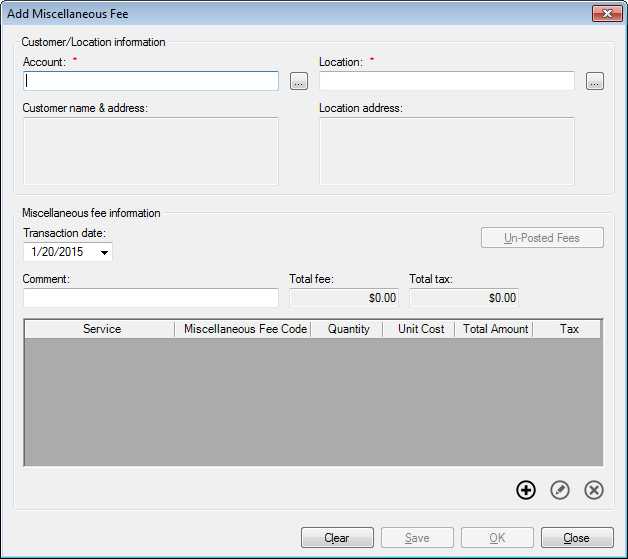
Figure 301: Add Miscellaneous Fee
Customer/Location Information. Type in an Account or Location number, or use the Browse buttons next to these fields to search for an Account.
You need only fill in one of these, and the other will be completed by the system. As elsewhere in UMS, if a Customer is associated with more than one current Location, you will be prompted to choose the applicable one.
Once you select an Account, The Customer name & address and Location address will populate automatically.
Miscellaneous fee information. Enter the details for the miscellaneous fee(s) you are creating.
Transaction date. This is the date when the miscellaneous fee(s) will be applied. This field defaults to the current date, but you can edit as needed. Enter a date by typing or by selecting from the drop-down calendar.
Comment. Enter any comments, references, or identifiers for the fee(s) you are adding.
Total fee. This is the total of all fees added in the grid below. This amount is calculated automatically and cannot be directly edited.
Total tax. This amount is calculated automatically by the system, based on tax information separately set up.
Unposted Fees. This button will only be active if the open Account already has fees added that have not yet been posted. If the button is grayed out, there are no fees awaiting posting. If the button is active, fees have been created and they should be reviewed. Click the button, and the Setup Miscellaneous Fee window will open:
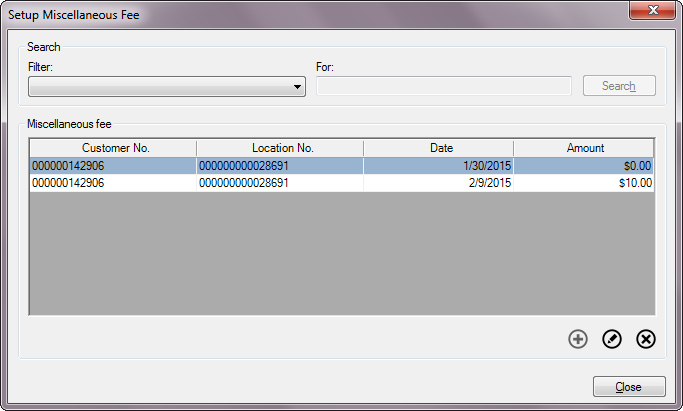
Figure 302: Setup Miscellaneous Fee
This window will list any pending (saved but unposted) fees for the Account in question. You can edit or delete the fees from this window using the Edit and Delete buttons provided.
Note: The search field and Add functions are disabled, because the applicable fees are automatically selected, and this window is in itself a sub-feature for the open fee creation process.
Each of the columns can be sorted (ascending or descending) to simplify location of a specific fee. Click on a column header once to sort ascending, and again to sort descending.
Once you have reviewed the existing fees and made any necessary changes, click Close to return to the Add Miscellaneous Fee function.
Fee details table. This table lists the fees as you create them, and you can manage the new fees from here, using the Add, Edit, and Delete buttons below the grid. These functions are described in more detail below.
Note: The list in this window does not include any of the previously saved fees (which can be reviewed using the Unposted Fees button described above). Once the newly-created fee in the fee details table is saved, however, that fee will disappear from the new fee list and become a part of the Unposted Fees list instead.
When you have finished adding fee(s), click Save to save without closing the window or Close to save and exit. The fees you have created are saved but not yet posted. Refer to Post Transactions for more information on posting the fees.
Adding Miscellaneous fees
Click the Add button to open the Add Miscellaneous Fee Details dialog box.
Figure 303: Add Miscellaneous Fee Details
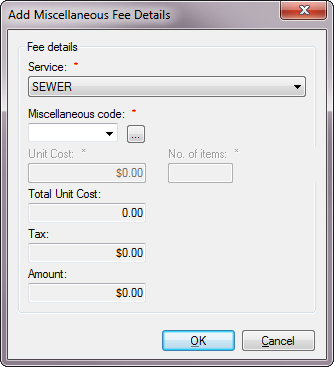
Service. Select the service to which the fee applies from the drop-down menu. Only services that are currently active for this Account will be available.
Miscellaneous Code. Select the applicable fee code from the drop-down list.
Only codes that have been previously defined will appear in the menu. If the code you need is not listed, you will need to create a new code.
Creating a new Miscellaneous Fee code
This is generally done through Setup > Miscellaneous Fee > Add, but the Browse button next to the Miscellaneous code box in this window will allow you to perform the same task without exiting this function.
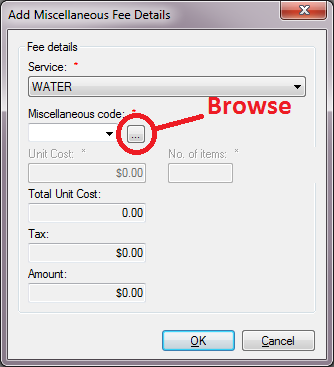
Figure 304: Browse to Add New Miscellaneous Fee Code
Click Browse, and the New Miscellaneous Fee Details window opens. This window has two tabs, Fee Details and Tax Details.
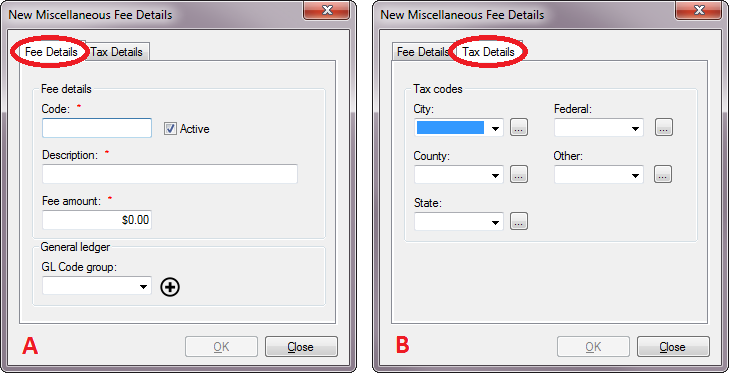
Figure 305: New Miscellaneous Fee Details – A. Fee Details, B. Tax Details
Fee Details Tab
Code. Enter a descriptive code, up to six characters (including spaces). This is what will be listed in the code selection box.
Active. Check this box off or on to deactivate/activate the code. It will be checked on by default for a new code. If the box is unchecked, the code will not be available for selection.
Description. Enter a description or identifier for the code function, up to 25 characters (including spaces).
Fee Amount. Enter the standard fee associated with this miscellaneous fee code. This amount will be applied by default when you use the code, but you will be able to change it as necessary.
GL Code Group. Select the applicable code group from the drop-down list. If the item you need is not listed, use the Add icon next to the menu to create a new code. Refer to the General Ledger chapter of this Guide for details concerning code groups.
Tax Details Tab
There are five levels of taxes available (City, County, State, Federal, and Other). Each of these is set individually, and all five windows work the same way. If any tax codes have already been created for any of the tax levels, they will appear in the applicable drop-down menus. Select the applicable one(s) for the type of tax(es) you need.
If the one you need is not available, the Browse button will open a New Tax Code dialog box, where you can create a new applicable tax code.
Note: This New Tax Code window is also accessible from Setup > Tax Codes > Add.
Refer to the Tax Codes section under the General Ledger chapter for more information on creating and managing tax codes.
When all new fee code details are complete, click OK to return to the Add Miscellaneous Feed Details screen. Note that the new code is selected by default, and the fee and tax information is filled in.
Unit Cost. This is the charge for the miscellaneous service or event requiring the fee. The default amount will be the one assigned to the selected fee code. Edit the amount as needed for your particular circumstance.
No. of Items. Enter the number of instances of the miscellaneous item/service/task requiring the fee. The unit cost will be multiplied by this number in determining the final cost.
Total Unit Cost. This is the total fee for the designated number of miscellaneous items/services/tasks. It is calculated (Unit Cost x No. of Items) automatically by the system and cannot be manually edited.
Tax. This is the total tax to be charged on the fee. It is calculated automatically, based on the tax details defined with the selected code, and cannot be manually edited.
Amount. This is the total charge for the miscellaneous item/service/task requiring the fee. It is calculated (Total Unit Cost + Tax) automatically by the system and cannot be manually edited.
Editing Miscellaneous Fees
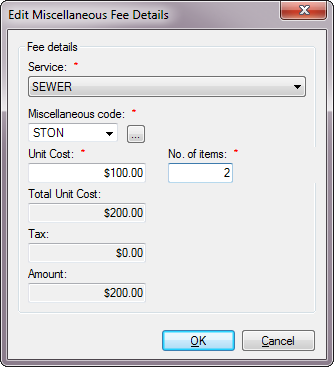
Select an existing fee and either double-click on it or click the Edit button to open the Edit Miscellaneous Fee Details dialog box.
Figure 306: Edit Miscellaneous Fee Details
This window works exactly the same as the Add Miscellaneous Fee Details window, except that the Service selection cannot be edited.
If the service to which the fee is applied needs to be corrected, you will need to delete the fee and create a new one with a different Service selection.
Deleting Miscellaneous Fees
Select the fee to be removed and click the Delete button. You will be prompted to confirm the deletion.
Saving Miscellaneous Fee Transactions
To complete the miscellaneous fee process and create the fee transaction, use the buttons at the bottom of the window. Clear (clear all information) and Close (cancel the action) are always active, but once you have added at least one fee, the Save and OK buttons at the bottom of the window will be enabled.
The OK button will save the entered information and create the transaction, moving you out of the Add Miscellaneous Fee window.
The Save button will save the entered information without leaving the screen. You can continue to make changes (including adding, editing, deleting fees) to this fee transaction until you close the window.
Note that once you save your entries the window changes from Add Miscellaneous Fee to Edit Miscellaneous Fee.
Figure 307: Edit Miscellaneous Fee
Once all items have been saved, the Save and OK buttons are disabled again. They will only be enabled if there are any unsaved changes that need to be saved.
When all fees for this particular session have been entered, leave the window (OK if saves are still needed, Close if changes are already saved). The miscellaneous fee transaction has now been created and is ready for review and posting. Refer to Posting Transactions for details on posting.
Misc Fee Post and Create Miscellaneous Statements
Miscellaneous fees allow immediately creating a miscellaneous statement upon posting. If the company option has been enabled, the "Optional misc. statement" block will appear on the screen when adding/editing a misc. fee. This process will post only the fee in the current window. Click "Create misc. statement" and enter a due date for the miscellaneous statement. This process will:
Post only the fee in the current window
Create a miscellaneous statement
Assign the selected due date to the miscellaneous statement
Flag the new miscellaneous statement as printed
If automatic customer communication is enabled and the customer is enrolled in an automatic communication method, the miscellaneous statement will be sent using this automatic method.
NSFs
The NSF function allows you to reverse payments (re-enter charges) that were posted but not completed due to non-sufficient funds (NSF).
The action of applying an NSF to an Account may affect other functions within UMS. Like other delinquencies, non-payments due to NSF are tracked by the system and too many instances may affect the Account status.
Applying NSFs to an account is done through the NSF Wizard. Open the wizard from the Main Menu Bar, by selecting Miscellaneous > NSFs.
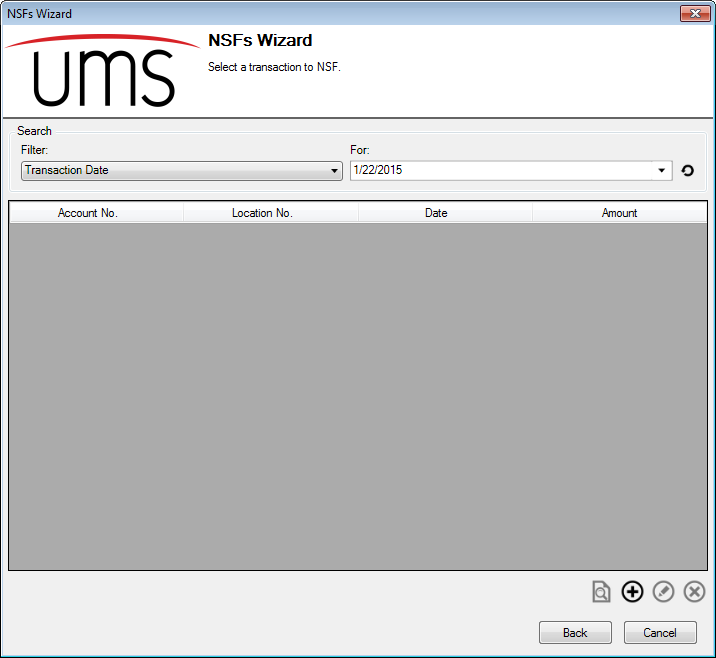
Figure 308: NSF Wizard - Select a Transaction to NSF
The first page of the NSF Wizard contains a list of all unposted NSF transactions. By default, these are filtered for transactions created on the current date, and if you have not yet created any new NSFs, the list will be empty and only the Add button will be active.
Select a search filter from the drop-down menu, and enter the search term in the For field. Click the Refresh button to update the list. Among the filter options are Account identifiers (Customer name or number, Location number or address), transaction date or amount, adjustment reason code, and the User who created the transaction. You may also choose All Records (no filter) for a list of all outstanding NSFs.
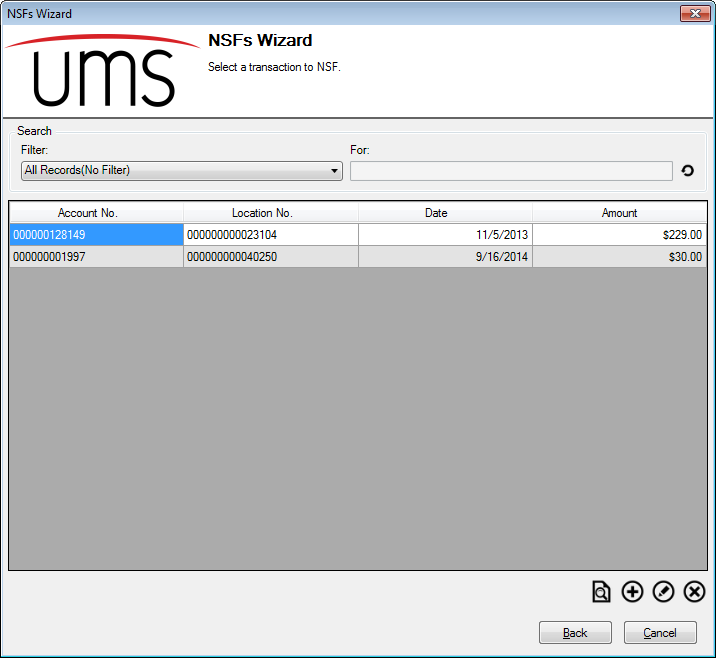
Figure 309: NSF Wizard - Select a Transaction to NSF (No Filter)
Once you have items listed in the table, the buttons below the grid are all enabled. Use these to manage NSFs.
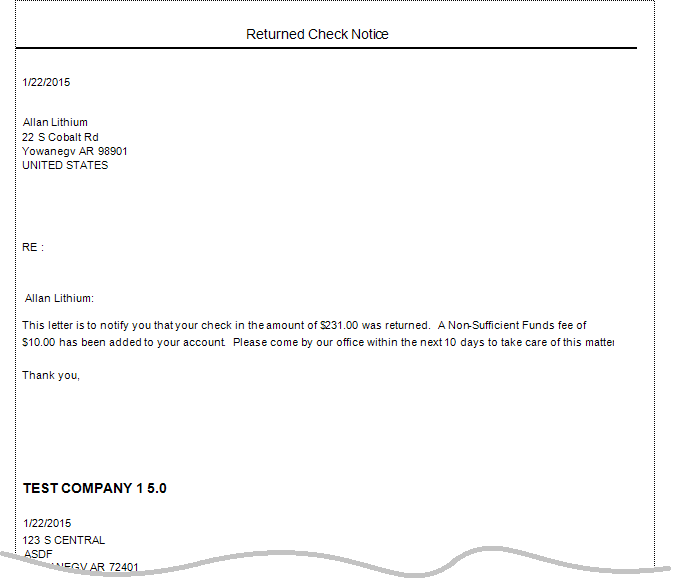
Preview Notice
This button allows you to preview the NSF notice that will be sent to a Customer whose payment was returned.
Select an existing NSF line item and click Preview. The NSF letter that will be sent to the Customer opens in a Crystal Reports window. This can be printed or exported to another program such as Word.
Figure 310: NSF Notice Preview
Add NSF
Note: This section will take you all the way through the NSF Wizard for a new transaction. Editing transactions will be similar, and the differences will be discussed in the next section, Edit NSF.
Click the Add button to add an NSF transaction to the list. This will advance you to the Select a payment for NSF screen.
Figure 311: NSF Wizard – Select a Payment for NSF
When this window first opens, it will be empty. Once you select a Customer or Location in the upper section of the screen, the lower section will populate automatically.
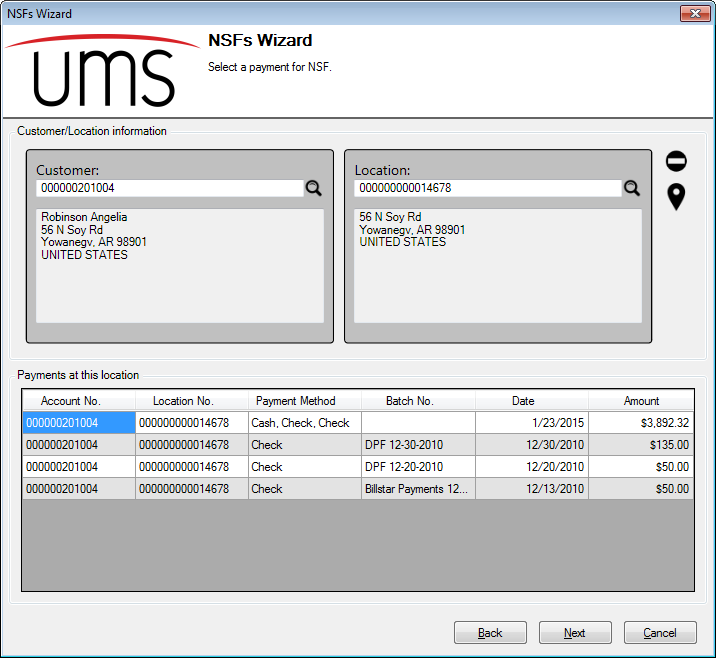
- Customer/Location Information. Select a Customer or Location by
typing the number or using the search functions. If a selected Customer is associated with more than one Location, you will be prompted to choose one.
Tips: Use the Clear (
 ) button to clear the form and
restart. The Map pointer (
) button to clear the form and
restart. The Map pointer ( ) will open a map in your
internet browser, showing the Location in question.
) will open a map in your
internet browser, showing the Location in question.
- Payments at this location. Once an Account (Customer and
Location) is selected, all of the available payments are shown in this section. You will then be able to select the one that was returned as NSF to continue processing.
Note: The pay method(s) used for each payment will be shown in the Payment Method column. If the payment was split among several pay types, the type for each portion will be listed.
Select the returned payment and either double click the item or click Next. This will advance you to the Choose payment methods to NSF screen.
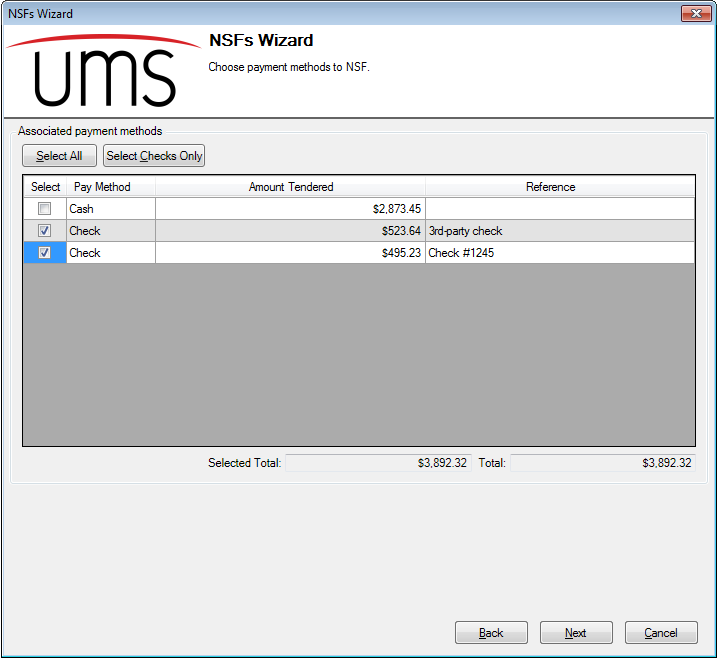
Figure 312: NSF Wizard – Choose Payment Methods to NSF
If the payment in question was made using a single pay method (for instance lump sum cash, a single check, or one credit card transaction), there will only be one line in this table. The payment in the above example was split into three parts, two different checks and some cash. There are thus three line items for the transaction.
The total for the selected payment segments (Selected Total) and all segments (Total) are displayed beneath the table. These are automatically calculated and cannot be edited.
Use the checkboxes next to individual payment segments, or use the Select All or Select Checks Only to choose the payment type(s) that were returned.
Note that all payment types, including Cash, are listed in the window, even though NSF will not necessarily apply. Cash payments are not automatically excluded from NSF processing.
Once you have selected the applicable payment type(s), click Next. This will move you forward to the Create an NSF screen.
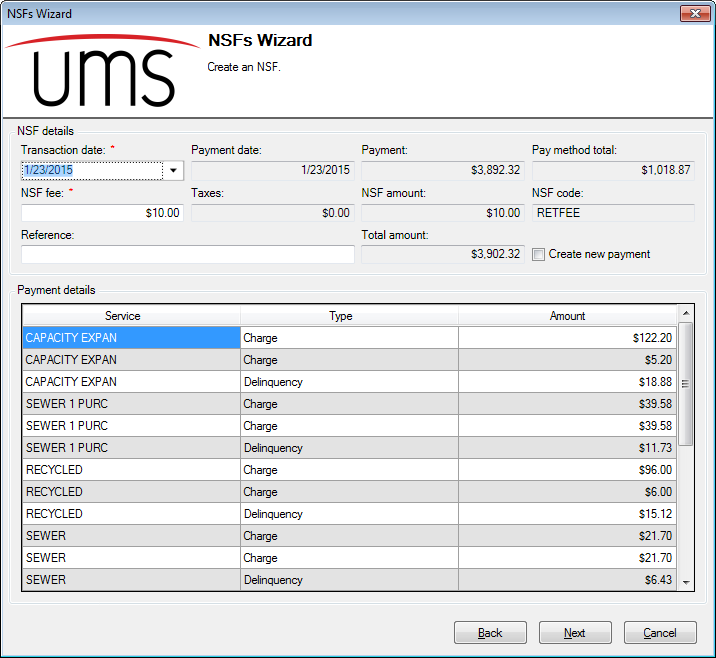
Figure 313: NSF Wizard – Create an NSF
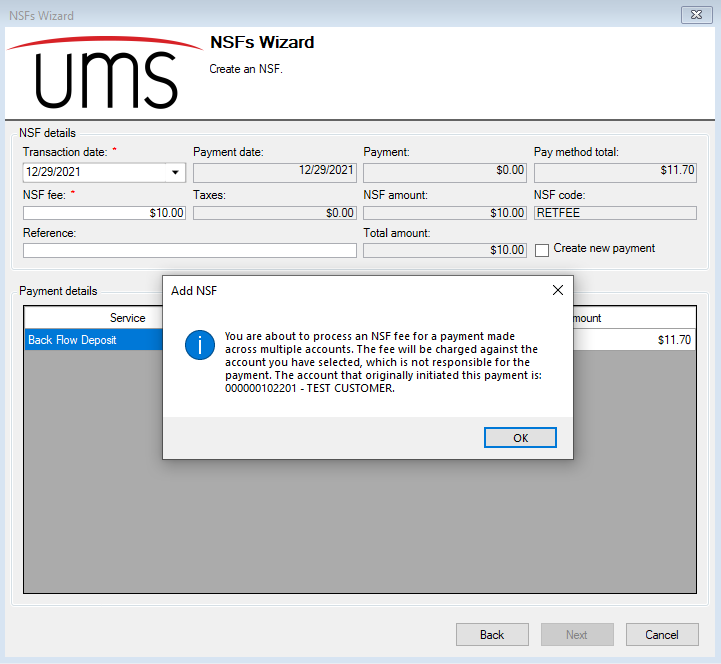
Note: In the event that the NSF fee is being processed on an account that was not responsible for creating the original payment, a dialog will be displayed stating that the account being charged the fee is not responsible for the payment, along with account information for the customer that initiated the associated payment.
Transaction date. This is the date the payment reversal and the NSF fee will be effective.
Payment Date, Payment, and Payment Method Total. These fields are associated with the payment being reversed. As the payment has been posted, these details are provided for reference only, and cannot be edited.
Note: Payment Method Total is the total of all of the payment segments paid by the specified payment method(s). That is, if the payment method selected was Checks, this will be the total of all checks associated with the payment being reversed.
NSF fee. This is the charge that will be added to the account, along with the reinstated original charges when the payment is reversed. By default, this amount will be the standard amount defined for the default NSF code. It can be edited as needed for individual NSFs.
Taxes. This is the total of all taxes associated with the NSF fee. If any taxes are applicable, they will be automatically calculated based on based on the tax levels defined within the NSF Code. If the NSF fee is not taxable, this value will be zero.
Note: If the fee is incorrect, you will need to edit it through Setup > NSF Code.
NSF Amount. This is the amount of the payment fee applied for returned payments. It will be equal to the NSF Fee field described above.
NSF Code. This code contains the fee and tax details for the NSF being created. The default code is automatically applied.
Your company may have more than one NSF code set up, but you will not be able to manually select which code applies to the NSF you are creating. The one designated as default will be automatically chosen. In order to select a different one, you must designate a new code as default through Setup > NSF Code.
Reference. Enter a description or identifier for this transaction, if applicable.
Total Amount. This is the sum of charges due once the NSF is applied. It will include both the original charge that has been reversed and the newly-charged NSF fee and tax(es), if applicable.
Create new payment. If this box is checked, you will be prompted to enter the new payment when you click Next, and you will need to complete this payment before proceeding with the NSF processing.
When this selection box is checked:
After you click Next, a Batch Management dialog box will open, from which you can select the batch into which the new payment will be added.
After you select a batch (highlight and click Select), an Edit Payment window will open, where you can enter the new payment information.
Click Save to save the new payment, and then click Close to proceed with the NSF creation.
Note: If you exit either of those windows without completing the selection, you will return to the Create an NSF screen, where you will need to click Next again. If you do not have a new payment to add, uncheck the Create new payment box to proceed.
The payment details grid is provided for reference only. It lists all of the charges included in the payment, charges that will be reinstated with the reversal.
Once you have entered or confirmed the applicable fields for your NSF transaction, click Next. This will complete the NSF application and bring you to the last page of the Wizard.
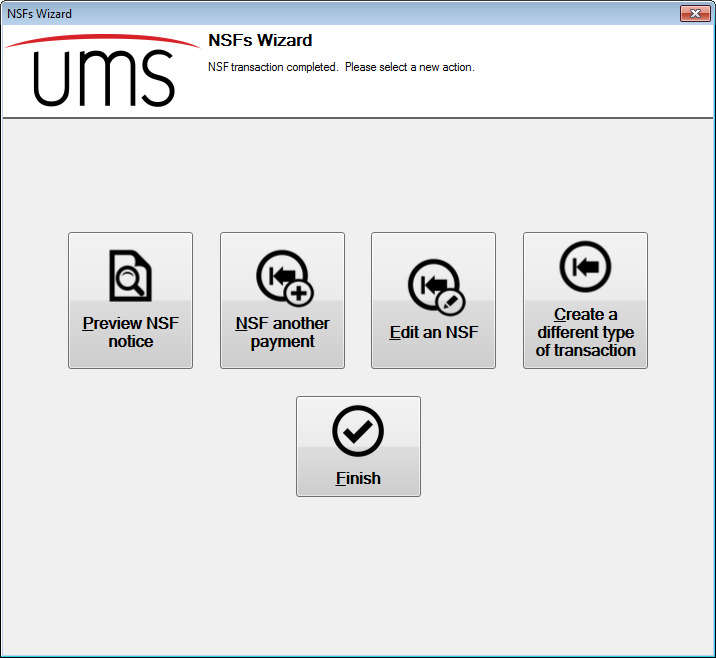
Figure 314: NSF Wizard – Please Select a New Action
This page provides five options, now that the previous transaction is complete:
- Preview NSF Notice. This option opens a preview of the notice for
the NSF transaction just created.
Note that selecting this option performs exactly the same task as selecting the Preview button for a selected existing NSF in the Select a Transaction to NSF screen, except that the selected NSF is automatically the one you just created.
NSF Another Payment. This option takes you back to the Select a Payment to NSF page for the same Customer, setting you up to make another NSF for that Customer.
Edit an NSF. This option takes you back to the Select a Transaction to NSF page, setting you up to manage NSFs, including creating a new NSF or editing an existing one for any Customer.
- Create a different type of transaction. This option opens the
Transactions Wizard, which is actually the portal to both the Reversal Wizard and the NSF Wizard.
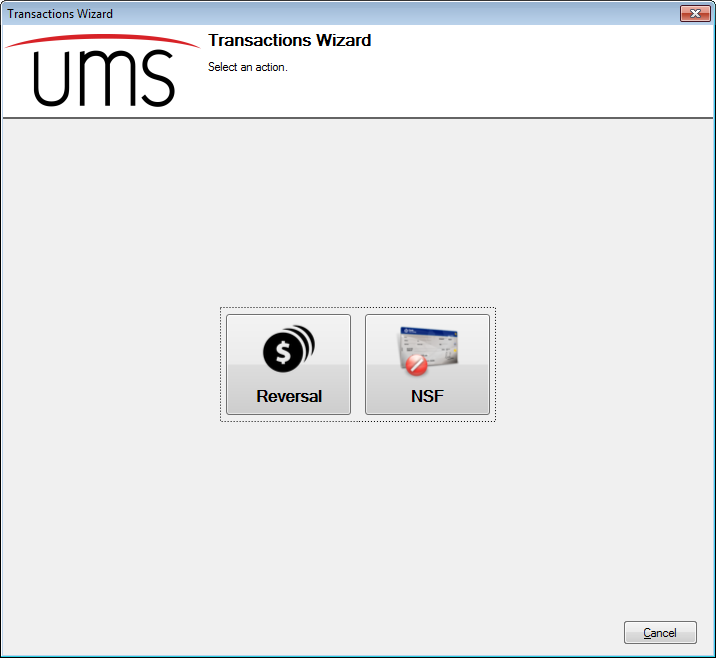
Figure 315: Transactions Wizard –Select an Action
Choosing NSF restarts the NSF Wizard from the beginning, taking you to the Select a transaction to NSF screen.
Choosing Reversal opens the Reversals Wizard from the beginning, taking you to the Select a transaction to reverse screen.
Finish. This option closes the NSF Wizard.
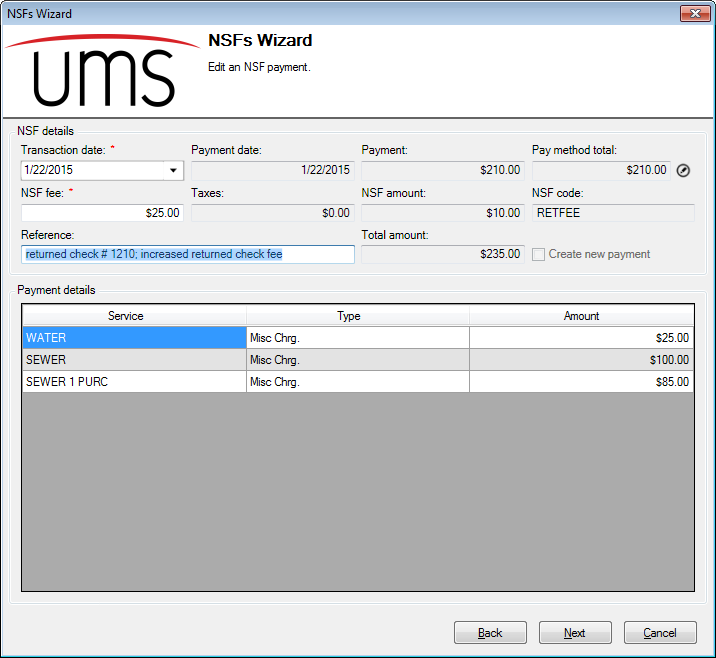
Edit NSF
As long as an NSF transaction has not been posted, it can be edited. Once it has been posted, it can no longer be changed or deleted, and it will no longer be visible in the NSF Wizard.
Note: All of the NSF Wizard screens were discussed above, in the Add NSF section. This section will focus on the differences in the process when an existing NSF transaction is edited.
To change the details for an existing NSF transaction, select the item from the table in the Select a transaction to NSF screen (initial screen for the Wizard) and either double-click the item or click Edit. This will open the Edit an NSF payment screen.
Note: The Select a payment for NSF and Select payment methods to NSF screens are skipped, because the payment has already been selected and these filters need not be re-applied.
Figure 316: NSF Wizard – Edit an NSF Payment
This screen is similar to the Create an NSF payment screen. The same fields are present, but there are two differences:
Figure 317: NSF Wizard – Add/Edit an NSF Payment Differences
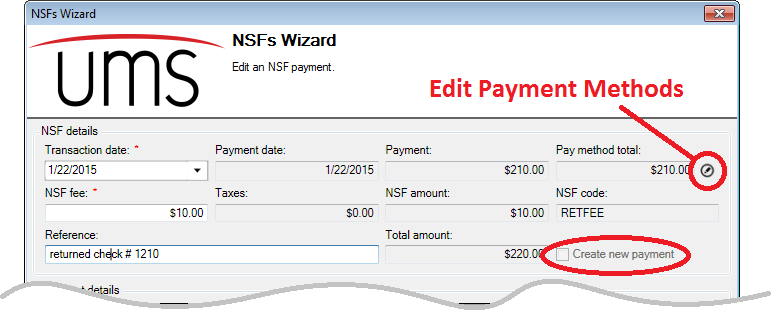
Create New Payment. This selection was available for a new NSF, but is grayed out for existing payments. This is because the new payment can only be automatically generated when the NSF is created. New payments can still be created, but the Batch Management and/or Edit Payment functions will need to be manually opened.
Edit payment methods. This edit option is only available when you edit existing NSFs, as it replaces the need for the Select payment methods to NSF screen. When you click the Edit payment methods icon, a Select Payment Methods dialog box opens.
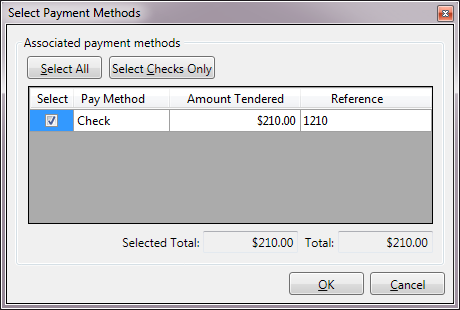
Figure 318: NSF Wizard – Select Payment Methods
This dialog box is exactly the same as the Choose payment methods to NSF screen, which is one of the steps in creating a new NSF transaction.
Editing the payment methods selected is optional.
Click Next to save the edits and complete the NSF transaction. This brings you to the final screen of the wizard, from which you can preview notices, add or edit more transactions, or exit the function. These options are exactly the same as those discussed for creating new NSFs, above.
Delete NSF
To remove an NSF before it is posted, locate the NSF transaction in the Select a transaction to NSF screen, using the search filters if necessary, and click Delete. As long as the transaction has not been posted, it will exist in this section. Once it has been posted, it can no longer be deleted (or edited).
After you click Delete, you will be prompted to confirm the deletion.
NSF Post and Create Miscellaneous Statements
NSFs allow immediately creating a miscellaneous statement upon posting. If the company option has been enabled, the "Optional misc. statement" block will appear on the screen when adding/editing an NSF. This process will post only the NSF in the current window. Click "Create misc. statement" and enter a due date for the miscellaneous statement. This process will:
Post only the NSF in the current window (along with any automatically created reversal transactions)
Create a miscellaneous statement
Assign the selected due date to the miscellaneous statement
Flag the new miscellaneous statement as printed
If automatic customer communication is enabled and the customer is enrolled in an automatic communication method, the miscellaneous statement will be sent using this automatic method.
Reversals
The Reversals function allows you to reverse any payments that have already been posted. This process is very similar to the NSF function, except that the reversal is not due to Customer fault. Most often, a payment reversal is made due to an internal processing error.
Reversals are created through the Reversals Wizard, which is opened by selecting Miscellaneous > Reversals from the main menu bar.
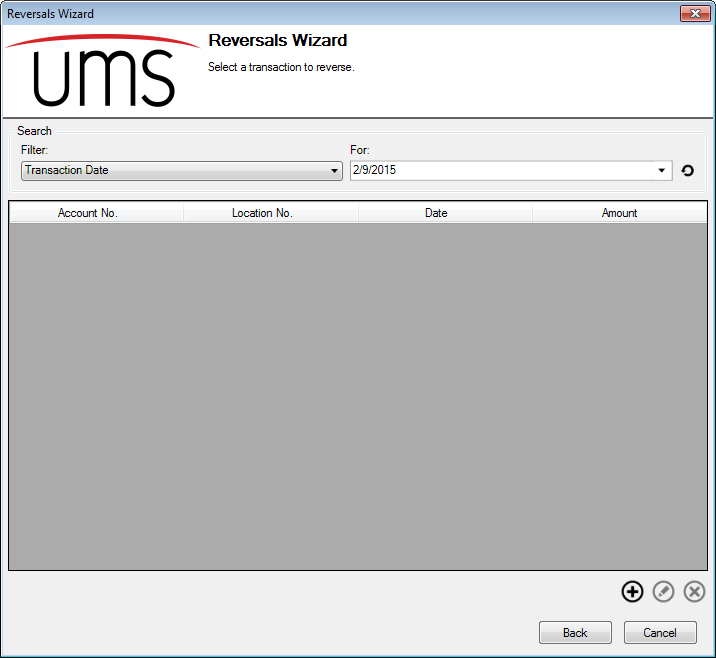
Figure 319: Reversals Wizard – Select a Transaction to Reverse
The first page of the Reversals Wizard contains a list of all unposted reversal transactions. By default, these are filtered for transactions created on the current date, and if you have not yet created any new reversals, the list will be empty and only the Add button will be active.
Select a search filter from the drop-down menu, and enter the search term in the For field. Click the Refresh button to update the list. Among the filter options are Account identifiers (Customer name or number, Location number or address), transaction date or amount, adjustment reason code, and the User who created the transaction. You may also choose All Records (no filter) for a list of all outstanding reversals.
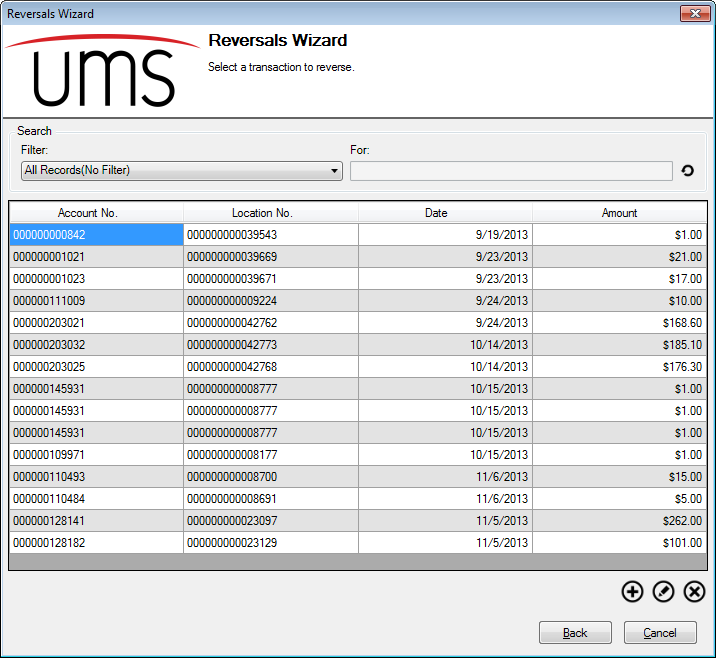
Figure 320: Reversals Wizard – Select a Transaction to Reverse (No Filter)
Once you have items listed in the table, the Add, Edit, and Delete buttons below the grid are all enabled. Use these to manage the reversals.
Add Reversal
Note: This section will take you all the way through the Reversals Wizard for a new transaction. Editing transactions will be similar, and the differences will be discussed in the next section, Edit Reversal.
Click the Add button to add a reversal transaction to the list. This will advance you to the Select a payment to reverse screen.
Figure 321: Reversals Wizard – Select a Payment to Reverse
When this window first opens, it will be empty. Once you select a Customer or Location in the upper section of the screen, the lower section will populate automatically.
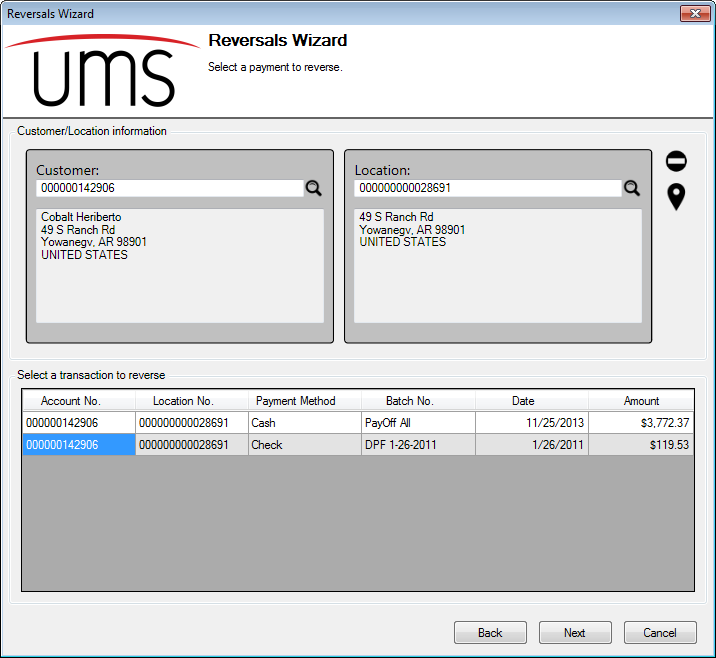
- Customer/Location Information. Select a Customer or Location by
typing the number or using the search functions. If a selected Customer is associated with more than one Location, you will be prompted to choose one.
Tips: Use the Clear () button to clear the form and restart.
The Map pointer () will open a map in your internet browser,
showing the Location in question.
- Payments at this location. Once an Account (Customer and
Location) is selected, all of the available payments are shown in this section. You will then be able to select the one that needs to be reversed to continue processing.
Note: The pay method(s) used for each payment will be shown in the Payment Method column. If the payment was split among several pay types, the type for each portion will be listed.
Select the returned payment and either double click the item or click Next. This will advance you to the Create a payment reversal screen.
Figure 322: Reversal Wizard – Create a Payment Reversal

Transaction date. This is the date the payment reversal will be effective.
Payment Date. This is the date the payment was originally made. This date is associated with the posted transactions, and is provided for reference only and cannot be edited.
Reference. Enter a description or identifier for this transaction, if applicable.
Amount. This is the total amount of the payment being reversed. Like the payment date, it is a posted amount and cannot be edited. It is provided for reference only.
The payment details grid is provided for reference only. It lists all of the charges included in the payment, charges that will be reinstated with the reversal.
Once you have entered or confirmed the applicable fields for your payment reversal, click Next. This will complete the reversal and bring you to the last page of the Wizard.
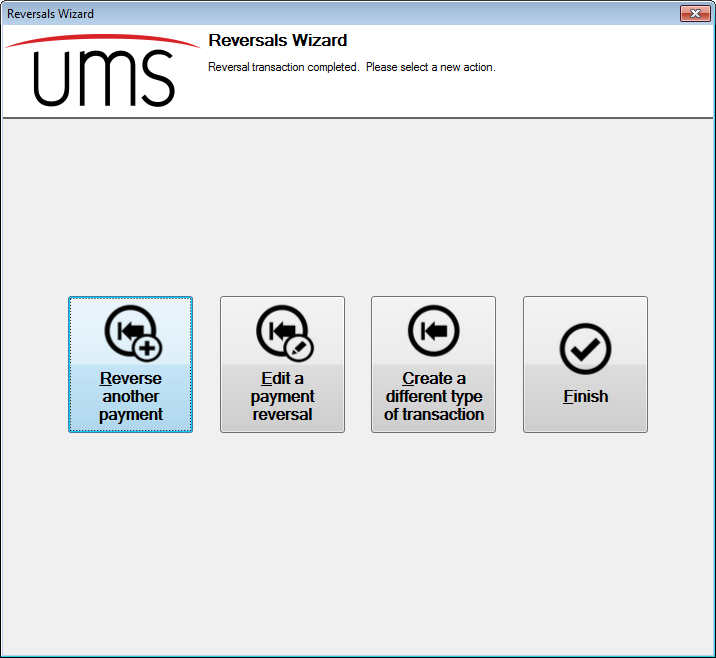
Figure 323: Reversals Wizard – Please Select a New Action
This page provides four options, now that the previous transaction is complete:
- Reverse another payment. This option takes you back to the
Select a Payment to Reverse page for the same Customer, setting you up to make another NSF for that Customer.
- Edit a payment reversal. This option takes you back to the
Select a Transaction to Reverse page, setting you up to manage reversals, including creating a new reversal or editing an existing one for any Customer.
- Create a different type of transaction. This option opens the
Transactions Wizard, which is actually the portal to both the Reversal Wizard and the NSF Wizard.
Figure 324: Transactions Wizard –Select an Action
- Choosing NSF restarts the NSF Wizard from the beginning, taking
you to the Select a transaction to NSF screen.
- Choosing Reversal opens the Reversals Wizard from the beginning,
taking you to the Select a transaction to reverse screen.
Finish. This option closes the NSF Wizard.
Edit Reversal
As long as a payment reversal has not been posted, it can be edited. Once it has been posted, it can no longer be changed or deleted, and it will no longer be visible in the Reversals Wizard.
To change the details for an existing payment reversal, select the item from the table in the Select a transaction to reverse screen (initial screen for the Wizard) and either double-click the item or click Edit. This will open the Edit a payment reversal screen.
Note: The Select a payment for reversal screen is skipped, because the payment has already been selected and that filter need not be re-applied.
Figure 325: NSF Wizard – Edit an NSF Payment
This screen is exactly the same as the Create a payment reversal screen. The only editable fields are Transaction date and Reference.
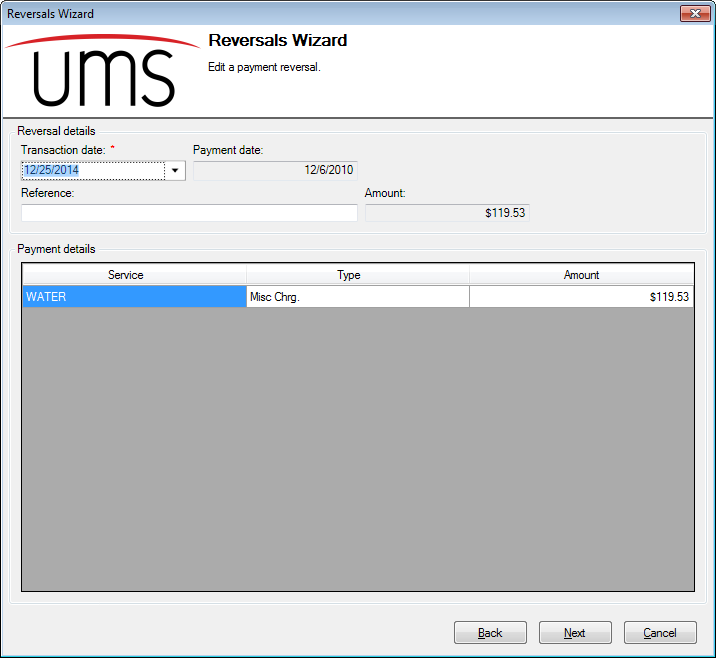
Transaction date. This is the date the payment reversal will be effective.
Payment Date. This is the date the payment was originally made. This date is associated with the posted transactions, and is provided for reference only and cannot be edited.
Reference. Enter a description or identifier for this transaction, if applicable.
Amount. This is the total amount of the payment being reversed. Like the payment date, it is a posted amount and cannot be edited. It is provided for reference only.
The payment details grid is provided for reference only. It lists all of the charges included in the payment, charges that will be reinstated with the reversal.
Once you have entered or confirmed the applicable fields for your payment reversal, click Next. This will complete the reversal and bring you to the last page of the Wizard, from which you can add or edit more transactions, or exit the function. These options are exactly the same as those discussed for creating new reversals, above.
Delete Reversal
To remove a payment reversal before it is posted, locate the reversal transaction in the Select a transaction to reverse screen, using the search filters if necessary, and click Delete. As long as the transaction has not been posted, it will exist in this section. Once it has been posted, it can no longer be deleted (or edited).
After you click Delete, you will be prompted to confirm the deletion.
Refunds
The UMS refund process you to create (and review) refunds for Accounts with credit balances or for Customers/Accounts which are due deposit returns.
From the main menu, Miscellaneous>Refunds. The Setup Refund dialog box opens.
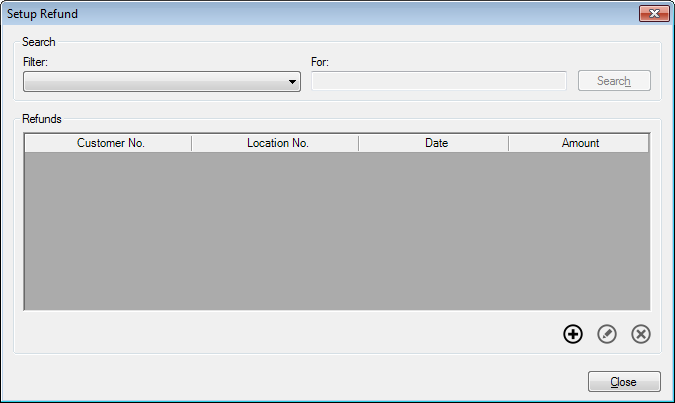
Figure 326: Setup Refund
This function contains all unposted refunds. By default, no filter is selected, so the window will be empty and only the Add button will be active.. Select a filter from the drop-down search menu, and (if applicable) enter a search term in the For box. Among the filter options are Account identifiers (Customer name or number, Location number or address), transaction date or amount, adjustment reason code, and the User who created the transaction. You may also choose All Records (no filter) for a list of all outstanding refunds.
Use the Add, Edit, and Delete buttons below the grid to create and manage refunds.
Add Refund
To create a new refund transaction, click the Add button at the bottom of the Setup Refund window. This will open the Add Refund window.
Figure 327: Add Refund
Customer/Location Information. Type in an Account or Location number, or use the Browse buttons next to these fields to search for an Account.
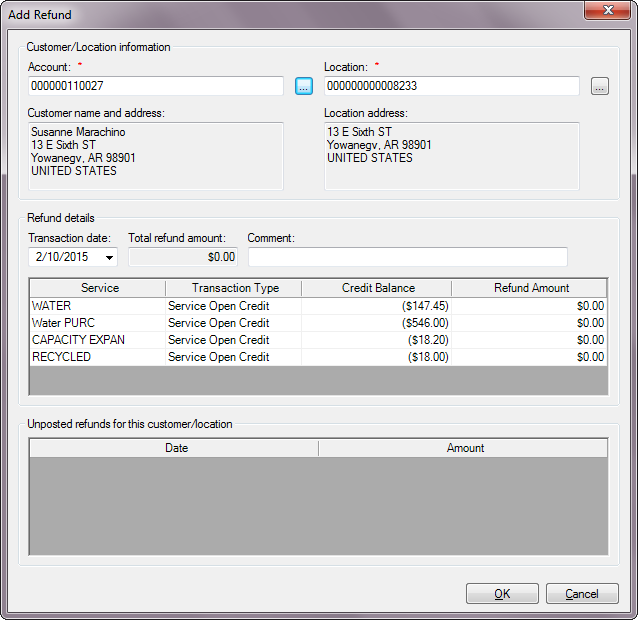
You need only fill in one of these, and the other will be completed by the system. As elsewhere in UMS, if a Customer is associated with more than one current Location, you will be prompted to choose the applicable one.
Once you select an Account, The Customer name and address and Location address will populate automatically.
Refund Details. Enter the details for the refund you are creating.
Note: Refund details will only be available for Accounts with credit balance(s). If the selected Account does not have a credit balance, no lines will be open in the Refund details section.
Transaction date. This is the date when the refund will be applied. This field defaults to the current date, but you can edit as needed. Enter a date by typing or by selecting from the drop-down calendar.
Total Refund Amount. This is the total of all refund amounts added in the grid below. This amount is calculated automatically and cannot be directly edited.
Comment. Enter any comments, references, or identifiers for the refund you are adding.
Refund table. This table will show any credit balances on the selected Account, identified by service.
Note: If the selected Account does not have any credit balances, this section will be empty, and you will not be able to issue a refund. Furthermore, if any refunds have already been created for existing credit balances, those credits will not appear in the table.
Service. This column identifies the service(s) to which the credit balance belongs.
Transaction Type. This column identifies the type of credit balance, either Open Credit or Service Open Credit.
Credit Balance. This column contains the credit balance(s) owed for the Account, broken down by service. This field is for reference only and cannot be edited.
Refund Amount. Enter the refund amount for each line item. Note that the refund amount cannot exceed the credit balance. The total of the amounts entered will be displayed in the Total Refund Amount box just above the table.
Unposted refunds for this customer/location. This table lists any previously created refunds for the selected Account that have not been posted. They are listed by date and amount. As soon as a refund is created and saved, the associated credit balance is removed from the Refund Details section and appear here instead.
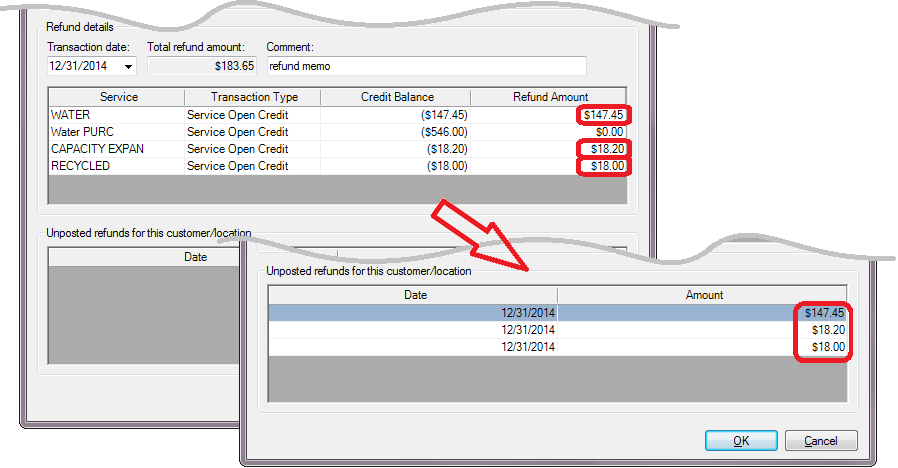
Figure 328: Add Refund - Unposted Transactions
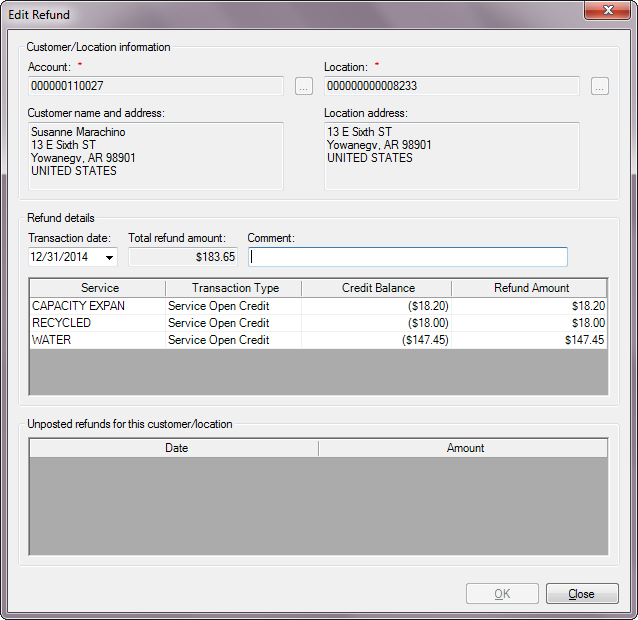
Edit Refund
In order to edit an existing refund transaction, locate the refund line item in the Setup Refund screen, using the search filters if necessary, and click Edit. This opens the Edit Refund window.
Figure 329: Edit Refund
Note: The Customer/Location information in this window cannot be changed. This is because the Account credit balances and the refund item being edited is associated specifically with this Account.
This window is similar to the Add Refund window, except that the unposted items are editable, and thus appear in the service credit grid above.
Delete Refund
To remove a refund transaction before it is posted, locate the refund line item in the Setup Refund screen, using the search filters if necessary, and click Delete. As long as the transaction has not been posted, it will exist in this section. Once it has been posted, it can no longer be deleted (or edited).
After you click Delete, you will be prompted to confirm the deletion.
Refund Process
The Refund Process is actually a refund wizard that allows most refund tasks and processes to be performed from within one function. The Wizard will determine which accounts have credit balances and apply those balances to refunds, balance transfers, or a conversions from Service Open Credit (SOC) to Open Credit (OC), as applicable.
From the main menu bar, select Miscellaneous > Refund Process. This will open the Refund Process Wizard, which begins with Choose the limit options screen.
Choose the Limit Options
Figure 330: Refund Process Wizard – Choose the Limit Options
This first screen of the wizard allows you to apply limit options and code filters. These will limit the scope of processing to just those Accounts meeting the specified criteria. This can be especially useful when groups of refunds for different types of Accounts need to be handled differently.
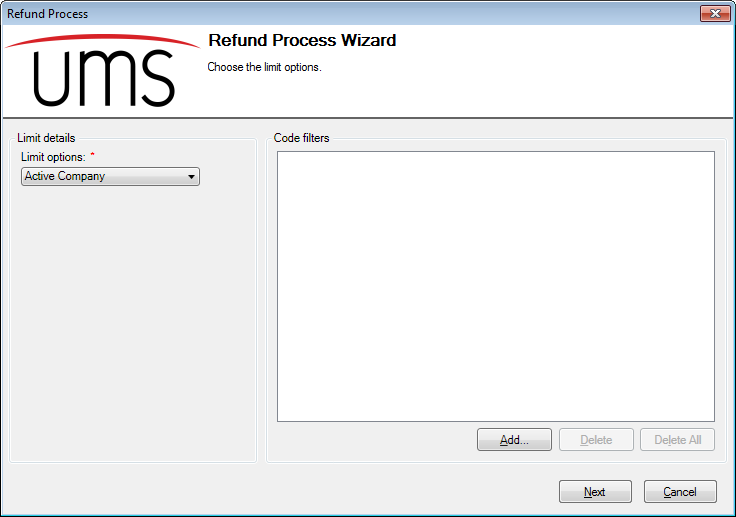
- Limit Options. On the left-hand side of the screen is a drop-down
menu for selecting limit options. Refer to Limit Options for more information on applying these limits.
- Code filters. On the right-hand side of the screen is a code
filters area. Use the buttons below the box to manage the filters. Refer to Code Filters for more information on applying code filters.
The process can go forward even if you do not choose any limits or filters. However, you will receive a warning, asking you to confirm that you do wish to proceed.
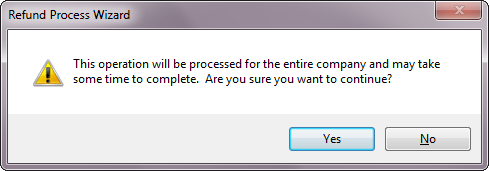
Figure 331: Refund Process Wizard – Limit and Code Warning
Click Yes to continue, and No to cancel the process.
Once your limits and filters are complete, click Next. This will move you to Choose Refunding Options.
Choose Refunding Options
Figure 332: Refund Process Wizard – Choose Refunding Options
This page allows you to further limit the set of refunds to be processed, in addition to setting the transaction date and comments for the entire dataset.
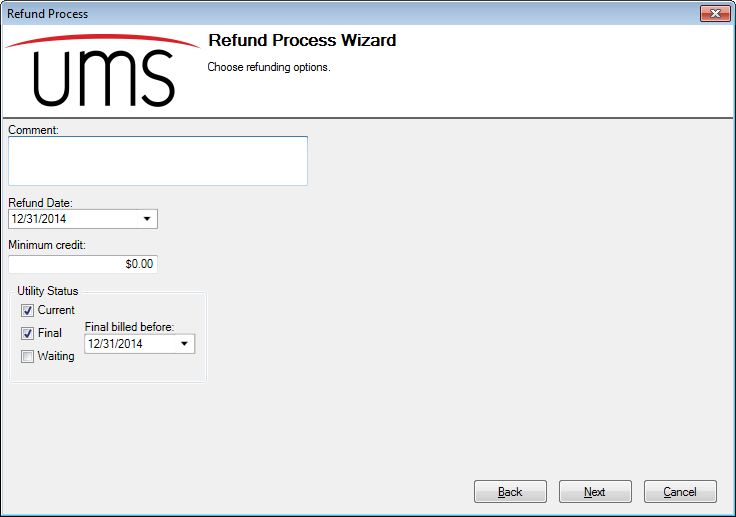
Comment: (Optional.) Enter a comment that applies to the transaction. This comment will appear in the Transaction History for the applicable Accounts.
Refund Date: This is the transaction date for the refund, transfer, or conversion that will apply in the applicable Account histories.
Minimum Credit: If a credit balance is below this amount, the process will overlook it, and not process the refund for the associated Account. Enter the minimum amount that will be included. A zero value means that all credit balances, no matter how small, will be included.
Utility Status: Select Current, Final, and/or Waiting. If a box is checked, results for that status will be included. If it is unchecked, results for that status will be excluded.
Note: All Accounts fit into one of these categories, and therefore at least one status must be selected for any results to be returned. If none of the three is selected, you will not be able to proceed to the next step.
Final billed before: This field is only visible if the **Final* box under Utility Status is selected*. The date entered here will be compared to the move out date(s) for any finalized Accounts, and results will be limited to those that were final-billed before the specified date.
Once these options are selected, click Next to proceed to Review Refund Warnings. Opening this screen may take a few moments.
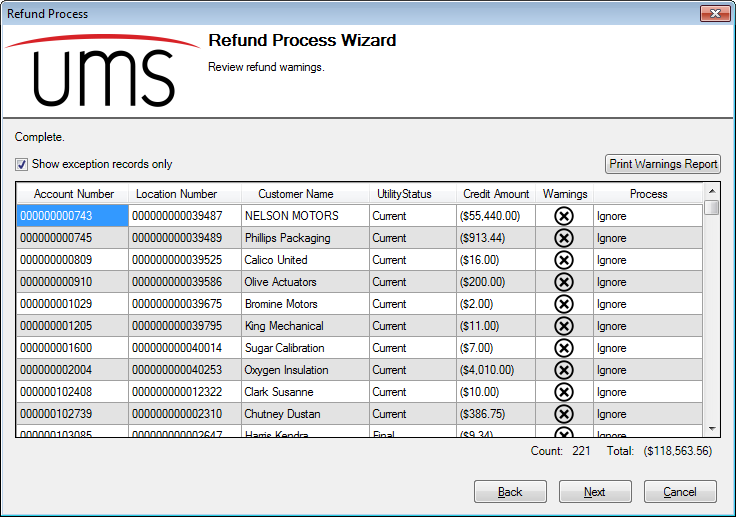
Review Refund Warnings
Figure 333: Refund Process Wizard – Review Refund Warnings
The Review refund warnings page displays the open credit balance accounts after the limit options code filters, and refund options have been applied.
Screen Elements
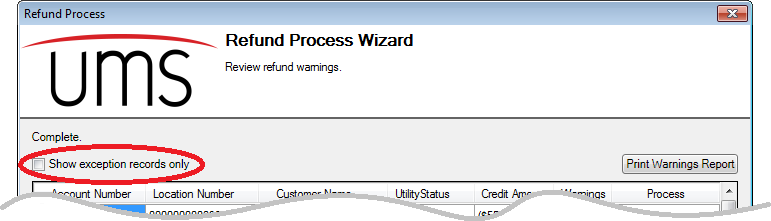
Display Exceptions
Initially, only the Accounts with warnings are displayed in this screen. In order to display all Accounts, including those without warnings, click the Show exception records only checkbox off.
Figure 334: Show Exception Records Only and Print Warning Report
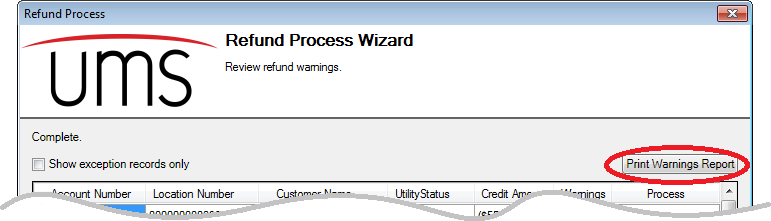
Warnings Report
You can also print the warnings list for review.
Figure 335: Show Exception Records Only and Print Warning Report
Clicking the Print Warnings Report button will generate a report in preview mode, which can then be printed or exported to another program such as MS Word.
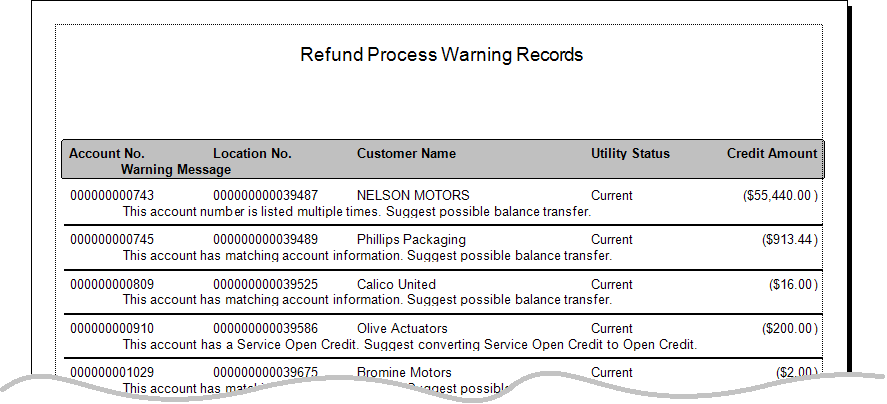
Figure 336: Example Warning Report
Along with the account information from the table, this report will list the warning messages and suggested actions.
Note: These warnings and suggested actions are also in the table, and are visible when you hover your mouse over the Warning icon (
) in each row.
Totals
Beneath the warnings list are two totals fields:
Count is the total number of Accounts with warnings.
Total is the total of the credit balances on these Accounts with warnings.
Note: These totals apply only to Accounts with warnings, and therefore they will not change if all Accounts are displayed.
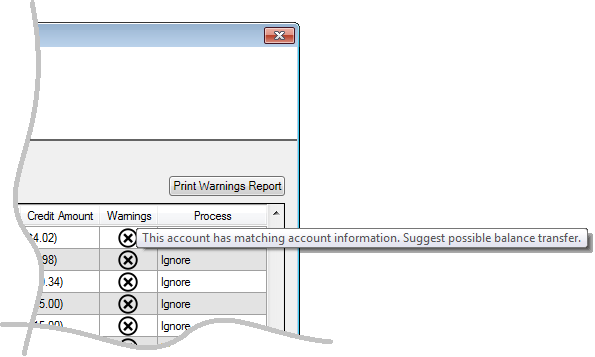
Warnings
Any accounts with warnings will be listed in the grid in the center of the screen. The table will include Account information (Account & Location number, Customer name, utility status, and credit balance), along with warnings and suggested alternative actions.
The Warning icon (
Figure 337: Warning Captions from Warning Icon
The caption that opens up this way is the same as the one printed on the warnings report.
Warnings and suggested actions include:
This account number is listed multiple times. The multiple listing warning refers to all of your UMS system, not just to the account numbers listed within this refund process action. Generally, this indicates that the Customer is associated with more than one Location in UMS.
The suggested action is a balance transfer. This is because it may be appropriate to ensure that all accounts associated with a particular Customer are all paid in full before the Customer receives a refund for any one Account.
This account has matching account information: The matching warning refers to all Accounts in your system, not just those includes in this refund process action. Matching information may indicate that Accounts have a common Customer or other link, and the purpose of the warning is to call for verification.
The suggested action is a balance transfer. This is because the similar information suggests multiple accounts could be linked, and therefore it may be appropriate to ensure all linked Accounts are paid in full before a refund is issued for any of them.
This account has a Service Open Credit. If an Account has a credit associated with a single service (Service Open Credit), other services on the Account may need to be reviewed for possible balances. Using the credit to pay down other services on the Account may be appropriate. In order to do this, the credit balance will need to be converted to Open Credit.
The suggested action is conversion of the Service Open Credit to Open Credit. This is because it may be appropriate to ensure that all services for a single Account are paid in full before a refund for any one service is issued.
Actions
The refund process will allow you to choose what action is taken with the credit balances. The planned action for each limit result will be indicated in the Process column in the Refund Warnings screen.
Note: This is true for Accounts without warnings, as well, even though they are only visible if the Show exception records only box is checked off. The default for these will be Refund. In order to change the default for any non-exception Accounts, these must be made visible.
Defaults
Accounts with exceptions will by default have Ignore selected as the Process action. This is because the warning is designed to alert the User to the potential need for changes, and the Ignore setting requires positive action for any refund processing to proceed.
The default action for Accounts without warnings is Refund. This is because Accounts meeting all the specified limits and criteria without exceptions are presumed to be ready for refund. This option can be manually reviewed and changed if the Show exception records only button is checked off.
Selections
The Process column contains the processing action that will be performed for each item. Which options are available for a given line item will depend on the warning (or lack thereof) associated with the item.
In the example below, the top callout shows that the options are Ignore, Refund, and Transfer Balance. The second callout is for an item that has a Service Open Credit, and therefore the options are slightly different. The third callout is an item without a warning. The only options available in that case are Ignore and Refund.
Figure 338: Refund Process Wizard – Process Options
The four available options are:
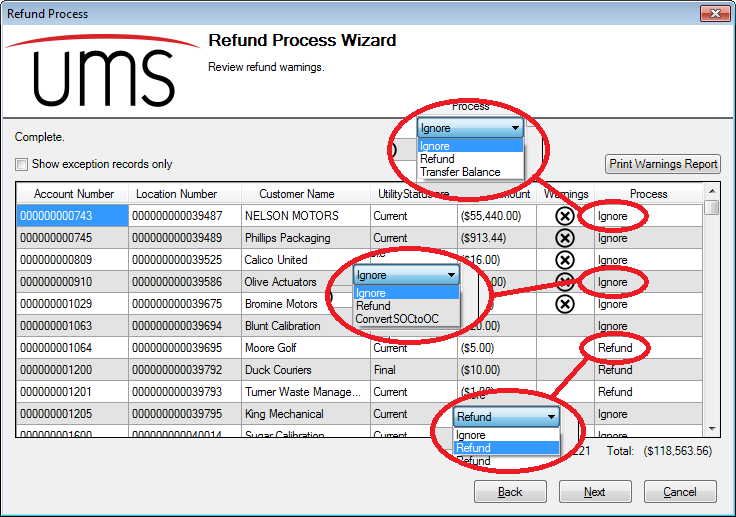
Ignore: No action will be taken when the refund transactions are processed.
Refund: The selected account will be refunded the entire open credit amount.
Convert SOC to OC: This option will only be available if there is a Service Open Credit on a specific service and other services have positive balances. This process action will apply the transactions that will convert the service open credit to an open credit. This option is suggested on accounts with service open credits, in order to ensure that all other services on the Account are paid in full (as applicable) before any refunds are created.
Transfer Balance: The open credit balance of the selected Account will be transferred to another Account.
After Transfer Balance is selected, clicking (or tabbing) away from that selection box will open a Select Transfer Balance window. Note that this may take a few moments.
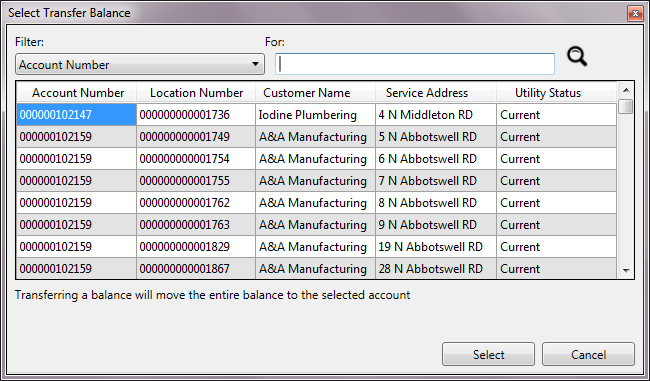
Figure 339: Refund Process Wizard – Process Options
This window is used to locate and select the Account which will receive the transferred credit.
Not all UMS Accounts will be available for transfer. Exclusions include:
Final Customers
Customers with Service Open Credits.
Note: Once you have selected an Account for the transfer, you will not be able to directly correct the selection to another Account. To re-enable the transfer account selection, select another option (Ignore or Refund), click or tab out of the field, and then return to Transfer Balance.
Convert SOC to OC: This option will only be available if there is a Service Open Credit on a specific service and other services have positive balances. This process action will apply the transactions that will convert the service open credit to an open credit. This option is suggested on accounts with service open credits, in order to ensure that all other services on the Account are paid in full (as applicable) before any refunds are created.
Once all of the applicable process options are selected, click Next to proceed to the Review transactions screen.
Review Transactions
Users can choose to delete individual results, all results, or review a pre-posting report. Click Next when the review is complete
The Transfer Balance window opens when the Transfer Balance process action is selected on the Refund Warning page and a column outside of the Process column is selected. The Transfer Balance window will automatically populate if the Warning Status is associated with an account. If not, the grid will be empty and the Choose a different account check box can be checked to search for an account and location to transfer the balance.
Figure 340: Transfer Balance Window
When the Choose a different account check box is unchecked, the Account No, Location No, Customer Name, and Customer Address boxes are all read-only and show the information for the selected row from the grid. The Account Search and Location Search buttons are disabled.
If the Choose a different account check box is checked, the Account No, Location No, Customer Name, and Customer Address boxes are cleared of any values and the Account No and Location No boxes are no longer read-only. The Account Search and Location Search buttons are no longer disabled, leaving the Account No or Location No box will automatically search for the entered value.
Reinstate Bad Debt
The Reinstate Bad Debt function allows a previously written off bad debt to be reinstated. This can happen when an indebted Customer leaves a service area, and then later returns to the area requesting new service. If the debt was written off during the time the Customer was gone, it can be re-applied to the new Account.
Note: Reinstatement of a bad debt only applies if the debt was written off. If a write-off transaction has not been created, the debt is still owed on the delinquent account, and (if applicable) can be transferred to the Customer’s new account using the Balance Transfer function instead.
From the main menu bar, select Miscellaneous > Reinstate Bad Debt. This opens the Setup Bad Debt Reinstatement dialog box.
Figure 341: Setup Bad Debt Reinstatement
This function contains all unposted bad debt reinstatements. By default, no filter is selected, and the window will be empty if you have not yet created any new reinstatement transactions. Until transactions are created, the list will be empty and only the Add button will be active. If necessary, select a different filter from the drop-down search menu, and (if applicable) enter a search term in the For box. Among the filter options are Account identifiers (Customer name or number, Location number or address), transaction date or amount, adjustment reason code, and the User who created the transaction. You may also choose All Records (no filter) for a list of all outstanding reinstatements.
Use the Add, Edit, and Delete buttons below the list to create and manage reinstatements.
Add Bad Debt Reinstatement
To add a bad debt reinstatement, click the Add button below the list. The Add Bad Debt Reinstatement window will open.
Figure 342: Add Bad Debt Reinstatement
Customer/Location Information.
Type in an Account or Location number, or use the Browse buttons next to these fields to search for an Account.
You need only fill in one of these, and the other will be completed by the system. As elsewhere in UMS, if a Customer is associated with more than one current Location, you will be prompted to choose the applicable one.
Once you select an Account, the Customer name and address and Location address will populate automatically.
Choose bad debt write-off to reinstate.
Note: Bad debt details will only be available for Accounts with written-off bad debt(s). If the selected Account does not have any bad debts, no lines will be open in the details section.
Choose a bad debt to reinstate either by double-clicking on the applicable line item, or by selecting it and clicking Edit. This will open the Add Bad Debt Reinstatement Details window.
Figure 343: Add Bad Debt Reinstatement Details

Transaction date. This is the date when the reinstatement will be effective. Select a date at least one day in the future. This field defaults to the current date, but you can edit as needed. Enter a date by typing or by selecting from the drop-down calendar.
Write-off date. This is the date that the write-off transaction was originally created. It is provided for reference only and cannot be edited.
Reinstate Amount. (Fourth column in the charge details table.) This is the amount that will be re-applied to the Customer’s new Account. Each charge included in the original debt will have its own line item in the table. The value for each line will default to the amount of the original debt. If the amount to be reinstated is less than the original amount, enter the actual amount in this column. Otherwise, leave the default amount.
Reinstate the bad debt to the customer/location. Select the Account or Location to which the reinstatement will apply.
Note: This may be the same Location as the one where the debt was originally accrued or a new one, but the debt can only be reinstated to the same service as the one where the debt was created.
You need only fill in one of these fields, and the other will be completed by the system once you have made a selection. As elsewhere in UMS, if a Customer is associated with more than one current Location, you will be prompted to choose the applicable one.
Edit Bad Debt Reinstatement
To edit a bad debt reinstatement, select the item in the Setup Bad Debt Reinstatement window and either double-click or click the Edit button below the table. The Edit Bad Debt Reinstatement Details window will open.
Figure 344: Edit Bad Debt Reinstatement Details
This window operates exactly as the Add Bad Debt Reinstatement Details window. All of the same fields are editable.
Delete Bad Debt Reinstatement
To delete a bad debt reinstatement before it is posted, select the item in the Setup Bad Debt Reinstatement window and click the Delete button below the table. You will be prompted to confirm the deletion.
Once the reinstatement has been posted, it will no longer appear in the Reinstate Bad Debt function, and can no longer be edited or deleted.
Note: Keep in mind that the reinstatement transaction will be dated in the future, and thus it will only appear in the posting list if the date range is expanded accordingly.
Refer to Post Transactions for further details on posting the new reinstatement.
Refund Check
The Refund Check function allows you to issue the refund checks for posted refund transactions. Note that in order to use this function, the refund(s) must first be processed and posted.
From the main menu bar, select Miscellaneous > Refund Check. This will open the Refund Checks window.
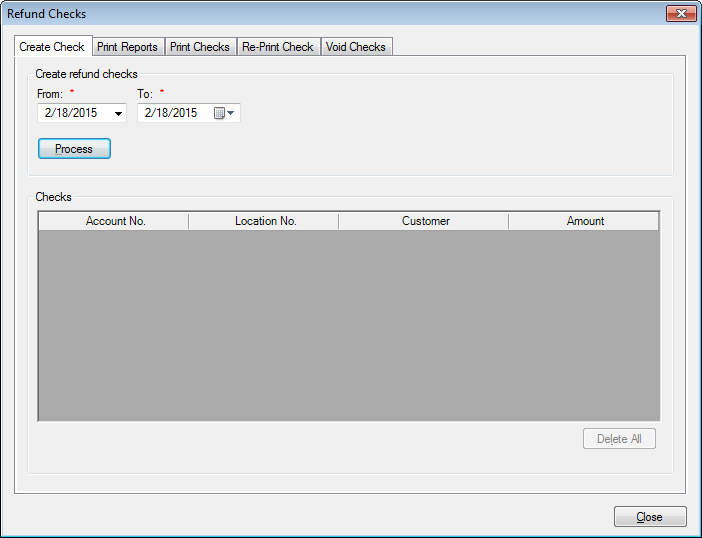
Figure 345: Refund Checks
This window contains five tabs. Within these tabs are all of the functions you will need for managing refund checks.
Create Check
The first tab is where you find eligible refunds for which you need checks. The results from this search will determine what refunds are available for processing in the other tabs.
The checks to be printed will be chosen by their refund transaction posting dates. Select the date range for the checks you need to create, by entering From and To dates in the fields provided.
Click Process to search the database for posted refunds within the selected date range. If any are found, they will appear in the Checks box below.
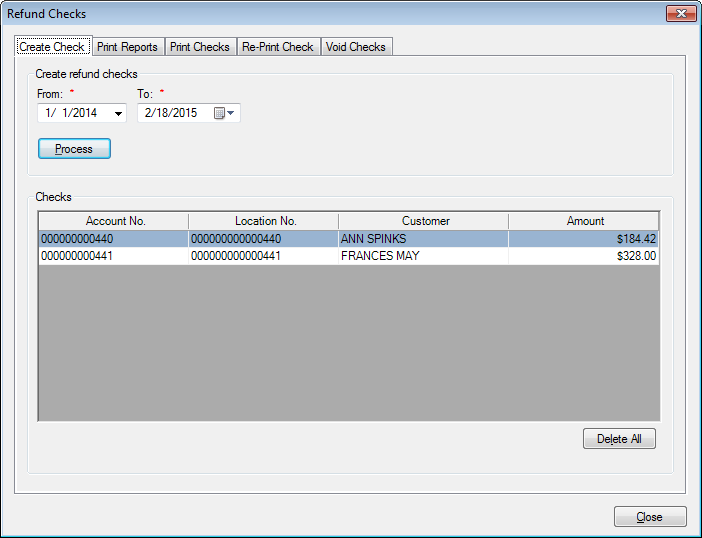
Figure 346: Refund Check - Create Checks
Any posted refunds dated within the specified range will appear in the list. The Checks list can be sorted by any of the listed columns by clicking once (ascending) or twice (descending) on the headers.
None of the fields in the list can be edited, as these are posted items. However, individual line items can be deleted from the list. To remove the results list and begin again, click the Delete All button below the box. You will be prompted to confirm the deletion.
Print Reports
This second tab is for generating list of checks to be issued. Its operation follows that of the UMS reporting function, except that the limiting options apply only to the eligible refund list created in the Create Check tab.
Figure 347: Refund Check – Print Reports
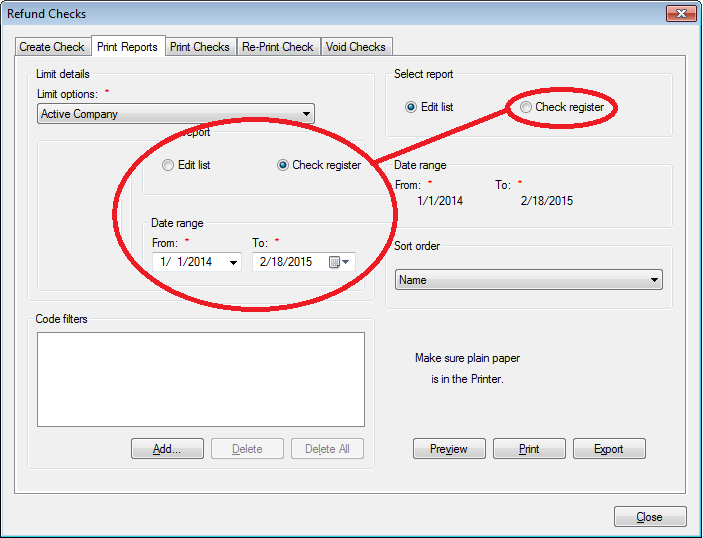
Limit Options and Code Filters. Apply limiters to the data, as necessary. Refer to Limit Options and Code Filters for specific instructions.
Select Report. Choose either Edit List or Check Register by clicking the radio button next to your selection.
Edit List. A list of all refund checks will be generated. Use this option **before* checks are printed*.
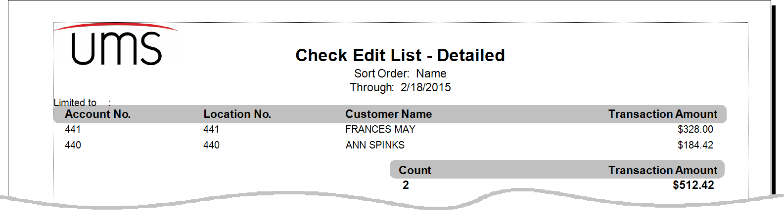
Figure 348: Refund Check – Example Check Edit List
Check Register. A register of printed checks will be generated. In order to appear on this report, checks must be flagged as printed (or voided). Use this option **after* checks are printed or voided.*
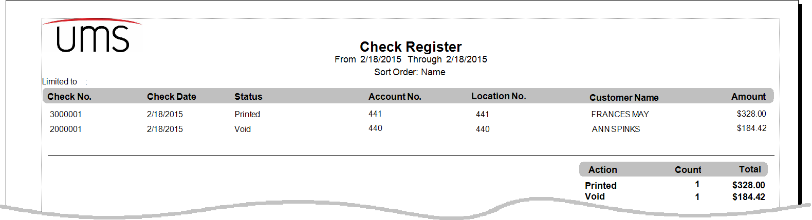
Figure 349: Refund Check – Example Check Register
Date Range. This section is only available if **Check Register* was selected, above. If Edit List is selected, the dates are grayed out.*
Note: These dates will default to either the date range selected (if any) in the Create Check tab, or to the current date if the Create Check tab has none selected.
Leave the default dates, or select new ones by typing or by selecting from the drop-down calendars
Sort Order. Select the desired sort order (Name, Customer No., or Location No.) for your chosen report type.
Note that these are the same fields that appear in the Checks list on the Create Checks tab, by slightly different names.
Select Preview, Print, or Export to generate the report results. Refer to UMS Reporting for specific details for each of these options.
Print Checks
This tab allows you to select which refund checks to print and send them to the printer.
Figure 350: Refund Check - Print Checks
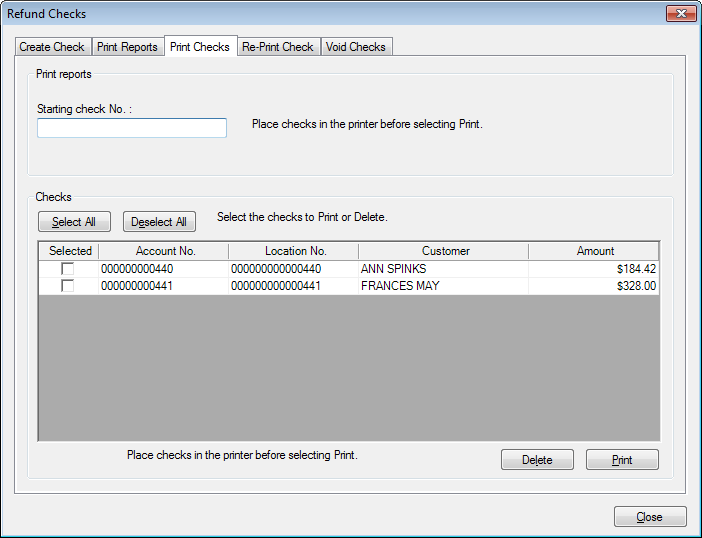
Starting Check No. Type the starting check number from the check stock to be used, and load the check stock into the printer.
Checks. All checks selected in the Create Check or Print Report tabs will be listed.
Note: To delete an item from the list, select the item and click Delete. In order to do this, the checkbox next to the item in question must be checked. You will be prompted to confirm the deletion.
Use the checkboxes next to the listed items to make any final changes. Select individual items by checking the boxes in the Selected column on or off, or use the Select All or Deselect All buttons above the list to aid selection, if applicable.
Print. Once the list is as you need it, click Print to print the selected checks. Once you click Print, you will receive a reminder to insert the checks.
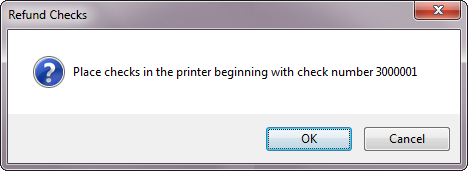
Figure 351: Print Checks – Confirm Ready
This reminder will include the first check number, for easy reference. Click OK to proceed with the printing, or Cancel to abort.
After this point, the checks that have been printed will be removed from the Checks list in the Print Checks tab. Any unselected items (not printed) will remain in the list.
Reprint Check
The Refund Check process in UMS provides a function that allows you to re-print any checks that printed incorrectly. This is done through the Reprint Check tab.
Figure 352: Refund Check - Reprint Check
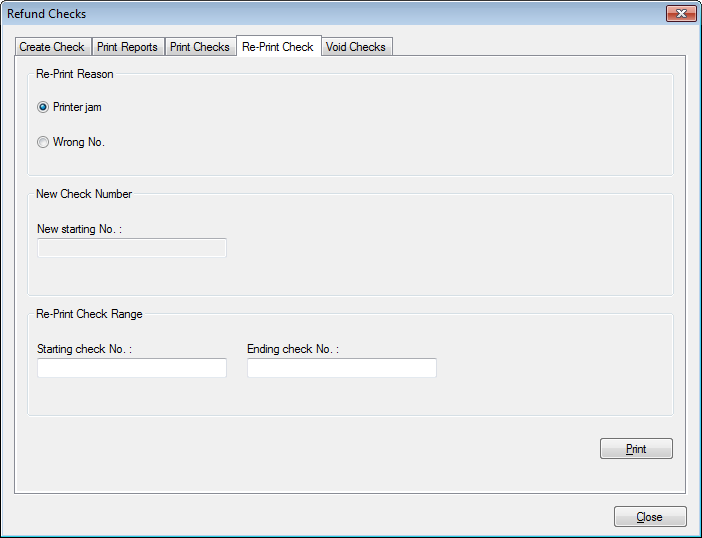
Re-Print Reason. Choose the reprint reason by selecting the radio button next to Paper Jam or Wrong No.
If Wrong No. is selected, the New Check Number section (New starting No. field) is enabled. If Paper Jam is selected, the previously-assigned numbers will be used.
Note: If Paper Jam is the reprint reason, it is assumed that the checks are still viable (not destroyed in the jam, and the assigned numbers will still be usable. Therefore, new numbers are not assigned for Paper Jam reprints, and the New Check Number section is not applicable. If for some reason the jammed checks cannot be used, select Wrong No. instead.
New starting No. This field is only available if the **Re-Print Reason* is Wrong No. *
Enter the new starting number from the check stock, and load the check stock into the printer. This starting number must be greater than the check number(s) being replaced, because you cannot go back to previous check numbers (whether used or unused).
Re-Print Check Range. This is the range of original assigned check numbers for the checks that need to be reprinted. Enter the Starting check No. and Ending check No. into the fields provided for the checks to be reprinted. If only one check is to be reprinted, type that check number in both the starting and ending check fields.
Print. When the re-print is completely set up, click Print. You will receive a confirmation window before the reprinting begins:

Figure 353: Reprint Checks Confirmation
Click OK to proceed with the reprinting, or Cancel to abort.
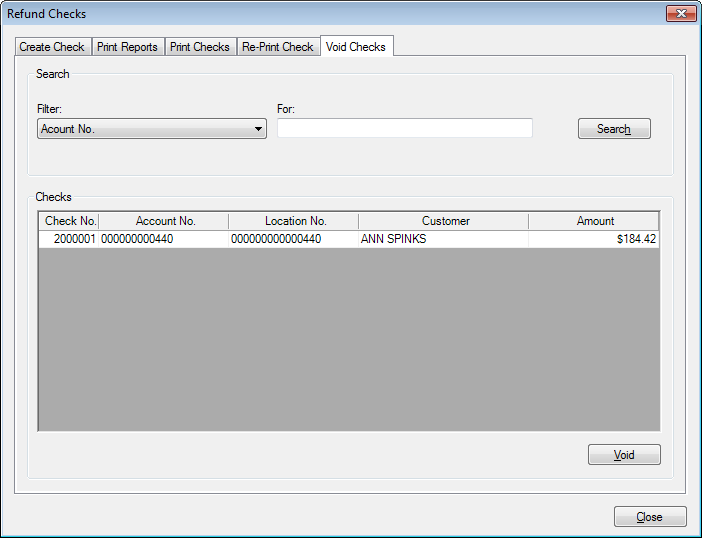
Void Check
Voiding of refund checks is performed though the Void Check tab.
Figure 354: Refund Check - Void Check
All printed checks will be listed in this window. The search fields provided will allow you to filter the checks by Account or Location numbers, check number or date, or Customer name, as needed. This list can also be sorted by any of the columns in the field, by clicking once (ascending) or twice (descending) on the column header.
In order to void a particular check, locate and select it in the list, and click Void. You will be prompted to confirm the void. Click Yes to proceed.
Once a check is voided, it will be immediately removed from the printed checks list. It will revert to non-printed status, which means that it will be moved back to the list of printable checks. The Refund Check process can then be re-started for that specific refund, if needed.
Convert SOC to OC
This UMS function is designed to convert Service Open Credit to Open Credit. This chapter focuses on what these terms mean and how they are handled in UMS
Types of Credit Balances
Account credits (negative balances) can result from pre-payment, overpayment, or any kind of transaction, adjustment, or deposit application that causes the funds paid to exceed the funds owed. Credit balances are divided into two types: Open Credit and Service Open Credit.
Open Credit
An open credit (OC) is a credit balance that is not specifically assigned to any particular service or purpose. Unless otherwise specified, this type of credit can be applied to any charges added to the Account with the OC, or it may be freely transferred or refunded, as applicable.
Service Open Credit
A service open credit (SOC) is a credit that can only be applied to a specified service. That is, the if a credit balance is assigned to water service, for instance, then that balance can only be applied to water charges within the Account containing the SOC.
There are several reasons why an Account might be set up this way. For example, your company may have a third party provider who supplies a particular service (e.g. Garbage), and thus any funds associated with that service should not be comingled with other Account funds. Also, it is possible that a customer chooses to pre-pay one service and not others, and the pre-paid funds should only be applied to that service, even if other utilities on the account carry a balance.
Assignment of Credit Balances
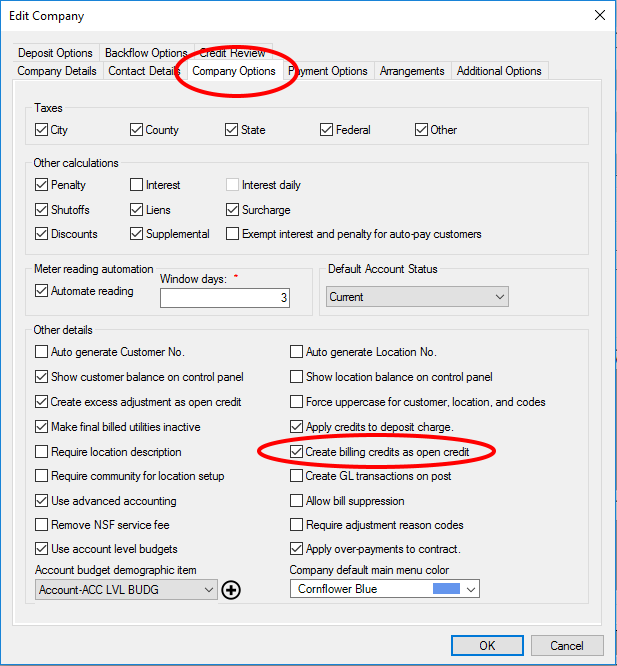
Your company can be configured to assign credit balances as OC or SOC, depending on your processes. This can be a general configuration (Setup >Company >Company Options) or a defined setting for specific situations (Setup > Deposit)
Credit in Company Options
From Setup > Company > Company Options, find the Create billing credits as open credit checkbox.
Figure 355: Setup Company Options – OC or SOC
If the box is checked, all credits will be created as OC. If the box is unchecked, all credits will be assigned to the associated service as SOC when created.
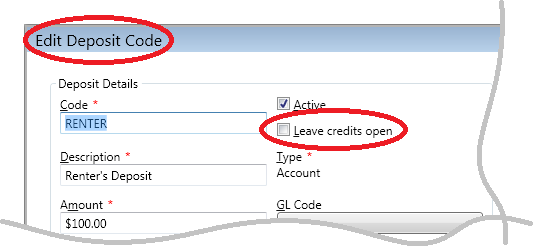
Credit from Applied Deposits
When deposits are returned, one of the options is to apply the released balance to Account charges. Depending on the deposit code setup, this application can result in a credit balance that will either be designated as OC or SOC.
This option is found in the deposit code setup, found under Setup > Deposit for each individual code. Within the code options, find the Leave credits open checkbox.
Figure 356: Deposit Code Options – OC or SOC
If the box is checked, all applications of deposits that use the specified code will be created as OC. If the box is unchecked, all credits will be assigned to the first service in the established payoff order as SOC when created.
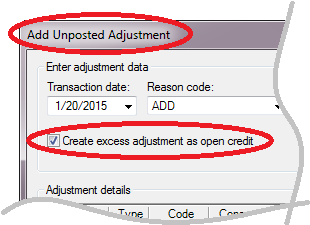
Open Credit in Adjustments
Credit balances may also result from account adjustments. These credits may be created as SOC or OC, depending on the option selected when the adjustment is made. In the Add (or Edit) Unposted Adjustment window (refer to Adjustments section for additional information), find the Create excess adjustment as open credit checkbox.
Figure 357: Add/Edit Adjustment – OC or SOC
If the box is checked, any credit balance resulting from the adjustment will be created as OC. If the box is unchecked, all credits will be assigned to the service being adjusted as SOC.
Conversion of Credit Balances
When an SOC is created, either by accident or design, it may be necessary to convert this credit to OC so that it can be applied or transferred to non-specified charges.
For example, the Account in question may have a positive balance on one service and a negative balance (as SOC) on another service. Rather than leaving the account out of balance, it may be appropriate to use the credit to pay the other outstanding charges. Likewise, there may be instances where a credit (as SOC) needs to be transferred to another Account, which requires that the credit be open.
The Convert SOC to OC allows you to change the type of credit so that you can perform these tasks.
From the main menu bar, select Miscellaneous > Convert SOC to OC. This will open the Convert Service Open Credits to Open Credits window.
Figure 358: Convert SOC to OC
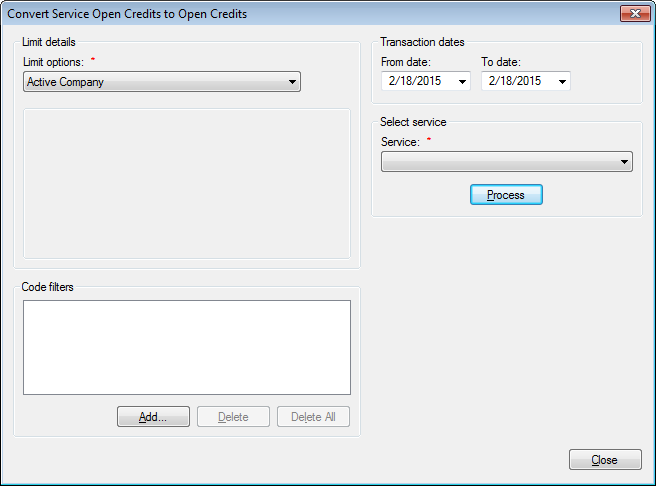
Limit Options and Code Filters. Apply limiters to the data, as necessary. Refer to Limit Options and Code Filters for specific instructions.
Transaction Dates. This is the range of Service Open Credit creation dates to be included in the search for conversion targets. Enter the appropriate date range into the From date and To Date fields. These default to the current date, but can be edited as needed by typing a new date or selecting one from the drop-down calendar.
Select Service. Select the service applicable to the Service Open Credits in question. All available services will be present in the drop-down menu.
Note: Only one service can be selected at a time. If SOC for more than one service needs to be converted, you will need to repeat the process for each service.
Once your selections have been made, click the Process button to proceed. If there are any service open credits meeting the entered selection criteria, the Convert Service Open Credits to Open Credits – [Service] window will open. The header of this window will include the selected service (Water, Sewer, etc.).
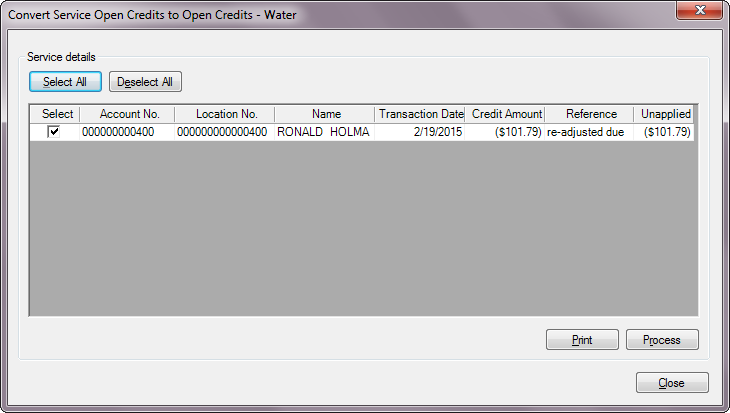
Figure 359: Convert SOC to OC for Designated Service
Use the checkboxes next to the listed items to determine which items to convert. Select individual items by checking the boxes in the Select column on or off, or use the Select All or Deselect All buttons above the list to aid selection, if applicable.
A Print button is provided so you can print the list for review.
Once the credits to be converted are listed and selected, click Process to apply the conversion. You will receive a confirmation box:

Figure 360: Convert SOC to OC for Designated Service - Confirmation
Click Yes to proceed, or Cancel to abort. Once the conversion is finished, you will be returned to the Convert Service Open Credits to Open Credits window, where you can choose another service, or otherwise revise your selection criteria.
Transfer Balance
This function is used to transfer a balance from one Account to another.
From the main menu bar, select Miscellaneous > Transfer Balance. The Transfer Balance dialog box opens.
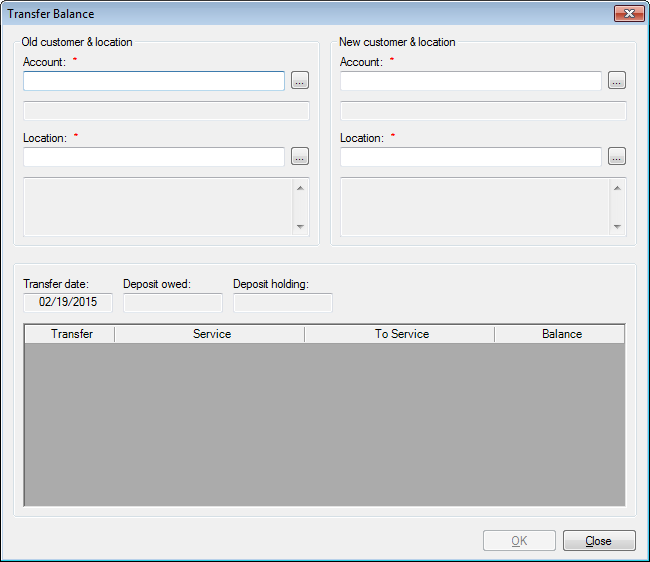
Figure 361: Transfer Balance
For the Account/Location sections in this window, enter either the Account or Location number, and the other will be completed by the system once you make your entry. You can manually enter a full or partial number, or use the Browse button to search for the correct Account. (Refer to Searching for more details on using the search function.) As elsewhere in UMS, if a Customer is associated with more than one current Location, you will be prompted to choose the applicable one.
For both old and new customer/location sections, once you have selected an Account, the address just below the number boxes will populate automatically.
Old Customer & Location. Enter the applicable transfer source Account information.
Note: In order to transfer a balance, the amount cannot be zero. The transferred amount must be either positive (amount owed) or negative (credit balance). If you select a zero-balance account to transfer, you will receive an error message.
New Customer & Location. Enter the applicable transfer destination Account information.
Once the source and destination Accounts are entered, the lower section of the window will populate automatically:
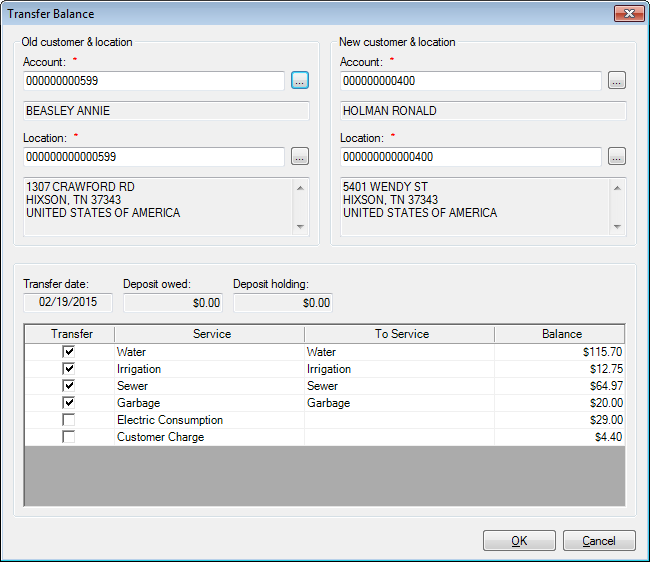
Figure 362: Transfer Balance - Selected Accounts
The lower section of the table (now populated) contains the transfer information and options.
Transfer date. This will be the date that the transfer is effective. It will be the current date, and cannot be edited.
Deposit owed and Deposit holding. These fields show the deposit status for the source Account. These are information fields only, and cannot be edited.
Transfer. This column has checkboxes that indicate which line item(s) will be transferred. By default, all services that have corresponding services in the destination Account will be selected, and any line item without a corresponding destination service is deselected. Click the checkboxes on or off as needed.
Service. This column shows the balance available for transfer, separated by the service to which the portions apply within the Account. These fields cannot be edited.
To Service. This column specifies which destination service will receive the transferred balance(s). A service must be specified for every balance line item being transferred.
If the destination Account has the service to which the balance applies in the source Account, that service will automatically be assigned, and you will not be able to edit the field.
If the destination Account does not have the service to which the balance applies in the source Account, you will need to select a service in the To Service field.
To select a destination service:
Click the To Service cell for each unassigned balance selected for transfer, and choose a service from the drop-down menu.
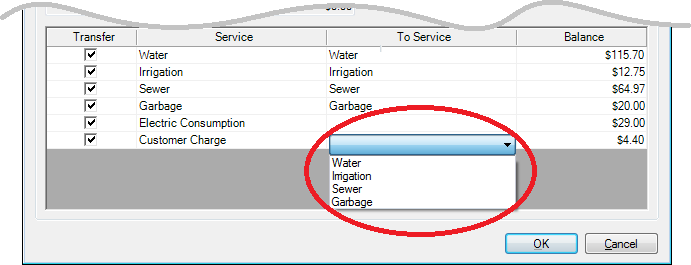
Figure 363: Transfer Balance – Select Service
All services that are attached to the destination Account will appear in the menu. Any balances transferred from foreign services will be permanently applied to the designated service as of the moment of transfer, even though they were otherwise generated.
Once all of the balances and destination services are selected, click OK to proceed with the transfer. You will receive a confirmation message:

Figure 364: Transfer Balance - Confirmation
Note: This confirmation includes a warning that all of the transactions will be automatically posted.
Click Yes to proceed with the transfer and the posting of all related transactions, or click No to go back to the main transfer window.
Transfer Balance Post and Create Miscellaneous Statements
Balance transfers allow immediately creating a miscellaneous statement upon posting. If the company option has been enabled, the "Optional misc. statement" block will appear on the screen when creating a balance transfer. Click "Create misc. statement" and enter a due date for the miscellaneous statement. This process will:
Post both sides of the transfer as normal for balance transfers
Create a statement for the balance transfer recipient
Assign the selected due date to the miscellaneous statement
Flag the new miscellaneous statement as printed
If automatic customer communication is enabled and the customer is enrolled in an automatic communication method, the miscellaneous statement will be sent using this automatic method.
Transaction Reversal Wizard
You can now Reverse Posted Transactions in UMS. Two new Transactions types have been added: Transaction Reversal and Deposit Transaction Reversal.
From the menu bar, select Miscellaneous>Transaction Reversal.
Figure 365: Transaction Reversal Menu
Page one of the Transaction Reversal Wizard
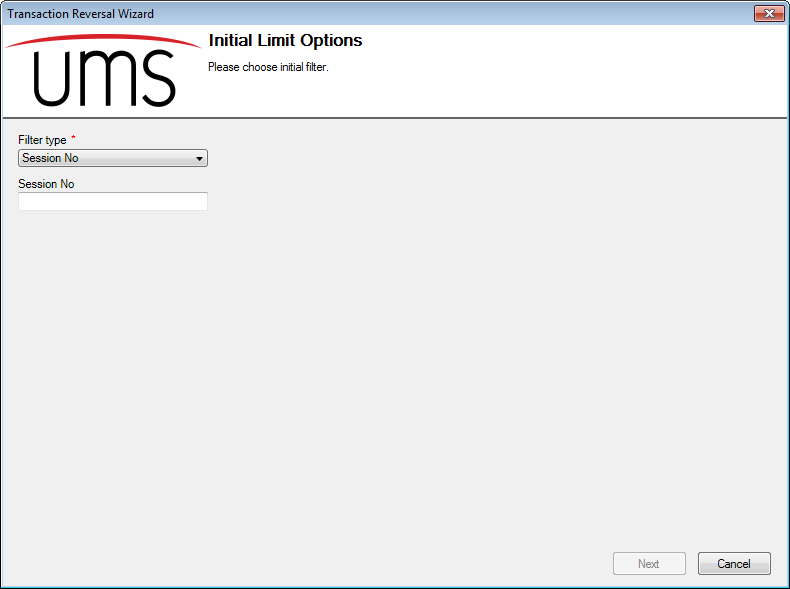
Figure 366: Transaction Reversal Wizard Screen 1
Filter Types
Session No
To locate the Session Number, double click on a line item in the Transaction History tab.
The Session Number is located to the right of the Detail Usage / Amount for Transaction screen
You can also you the Posting Totals Screen to locate Session Numbers
Go to Reporting > Financial Reports > Posting Totals
Tranmaster ID
To locate the Transmaster ID, double click on a line item in the Transaction History tab.
The Transmaster ID is located to the right of the Detail Usage / Amount for Transaction screen
Page Two of the Transaction Reversal Wizard
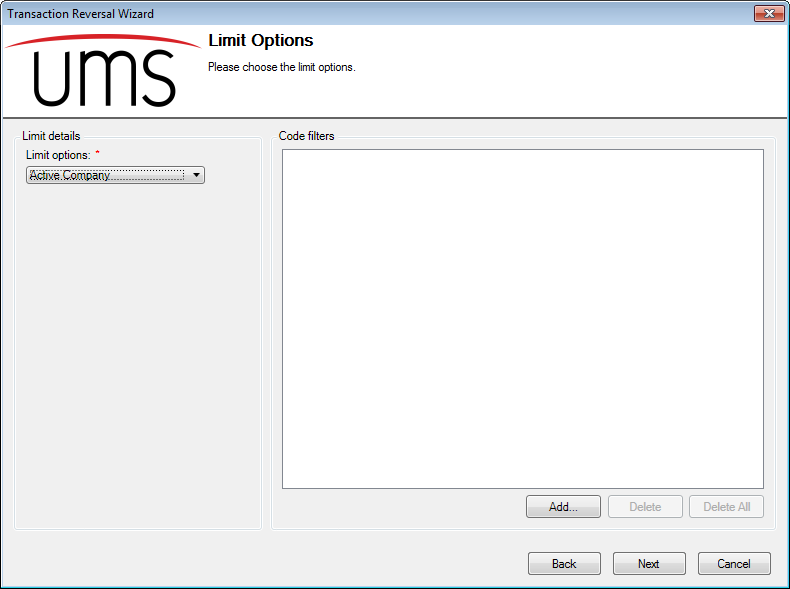
Figure 367: Transaction Reversal Wizard Limit Options
Limit Details
Active Company, Cycles, Routes, Communities, Location/Customer or Bill Group
After the Limit Options is set, click on the Next button to see all the transactions
Page Three of the Transaction Reversal Wizard
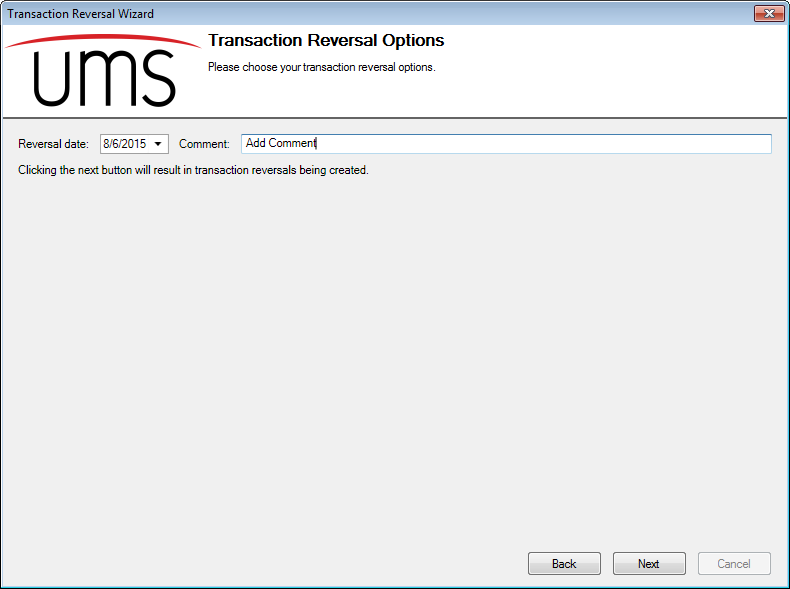
Figure 368: Transaction Reversal Date and Comment
Reversal Date: This date will automatically pull the current date. You have the option to change the date
Comment: The comment will be seen on the Transaction History screen under column heading Reason
Click Text to create the Transaction Reversal
Page Four of the Transaction Reversal Wizard
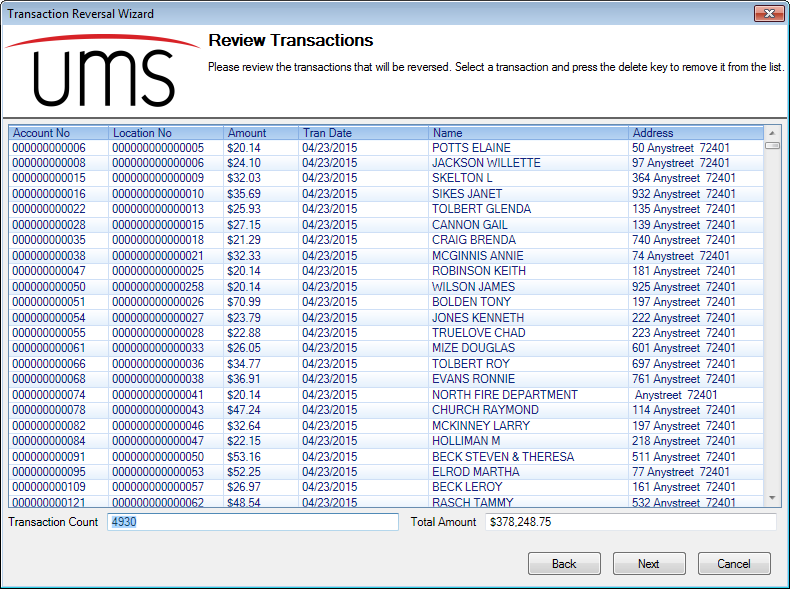
Figure 369: Review Reversal Transactions
Transaction Count
Total Amount of all the transactions
To Delete a transaction, click on the line and press the delete button on your keyboard
You can delete multible records by holding down the delete key
Page Four of the Transaction Reversal Wizard
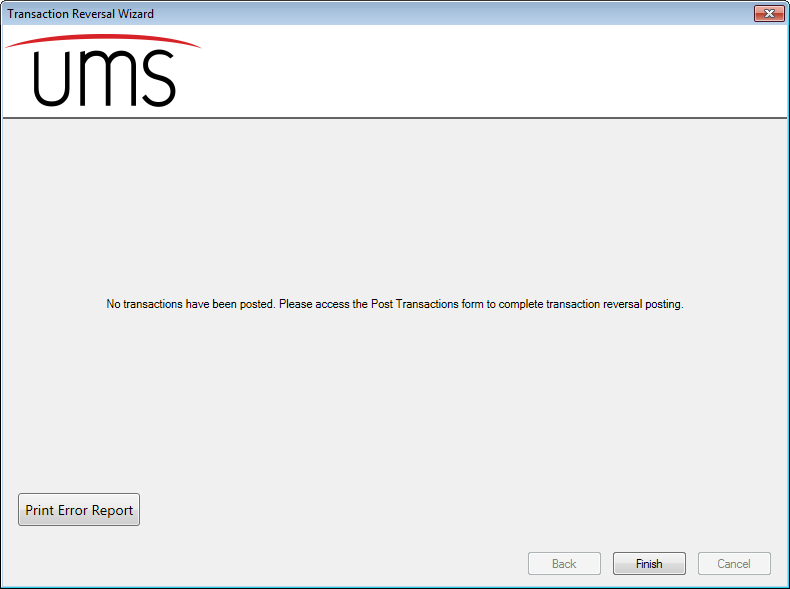
Figure 370: Transaction Reversal Wizard Final Screen
A message to remind you that the Reversed Transactions have not been posted
Print Error Report – These are transactions that cannot be reversed. The report will contain the information about the record that had the problem and the error message.
Warning Report - If an account has a shutoff transaction being reversed and has an open shutoff service order, a warning report will appear upon reversal. This report will inform the user that these open service orders will need to be handled manually as desired. Shutoff service orders will not be automatically closed or deleted when the shutoff transaction is reversed.
Possible error messages:
Transactions that cannot be reversed because of associated transactions
A Charge with an Adjustment or Adjust Bill Transaction – Reverse these items before reversing the charge
- You can make an adjustment to the charge after a Billing Adjustment –
Adjust Bill
A Charge with a posted or unposted payment – Delete the unposted payment or reverse the post payment before reversing the charge
PAYMENTS MUST BE RE-ENTERED
A Deposit Charge with a posted or unposted payment – Delete the unposted payment or reverse the posted payment
Charges with an Associated Applied Credit
The Charge will be Reversed and the Applied Credit will be Reversed as well
The Applied Credit will become an Open Credit – See Example
Date |
Transaction Type |
Posted |
Amount |
Balance |
|---|---|---|---|---|
4-23-2015 |
Open Credit |
YES |
($ 2.47)* |
($ 2.47) |
5-23-2015 |
Charge |
YES |
$ 29.04 |
$ 26.57 |
5-23-2015 |
Applied Credit |
YES |
$ 0.00** |
$ 26.57 |
6-1-2015 |
Transaction Reversal |
YES |
$ 29.04 |
($ 2.47)*** |
*An Overpayment of $2.47 against the balance of the account created the Open Credit
**The $ 0.00 amount adds the Open Credit ($2.47) and the Open Applied ($2.47) to create the zero amount. The $2.47 Open Credit has now been applied to the charge on 5-23-2015
***Because of the Transaction Reversal, the ($2.47) balance in now an Open Credit again that can be applied to the next charge
Charges CAN be reversed even when a penalty, interest, shut off, tax lien or service order fee has been added after the charge.
Transaction Types
A Payment will show up as transaction type – Payment Reversal
A Deposit Charge will show up as transaction type – Deposit Transaction Reversal
A Deposit Payment will show up as transaction type – Deposit Payment Reversal
All other Reversals will show up as Transaction Reversal
Note
IMPORTANT NOTICE ABOUT METER READS WHEN A CHARGE IS REVERSED
Meter Reads will be set back to the readings that where used to create the original charge.
The same will happen when there is a meter change out for that charge that is reversed.
Note
Posting of the transaction reversal associated with the most recent charge will cause the IsPrint flag to be set, so that the next statement will not include the reversed charge.