UMS System Security
Through this function, you manage all users (including Administrators) for your UMS system. This includes adding new Users, editing existing User information, and deleting Users. Once activity in the system is associated with a User, the User account can no longer be deleted. That account can only be made inactive. This is also where you specify user access rights for all areas of the program.
All security management tasks are managed through the Security Control Panel, and require Administrator permissions.
Security Control Panel
The Security Control Panel is located in the System section of the Application Setup Menu. If you do not have administrator permissions, you will not see this option in your UMS setup. If you do have the appropriate access, you will find the security setup the path Setup>System>Security. To open the Security Control Panel, either double click on the Security line item in the Application Setup window or select it and click the Configure button.
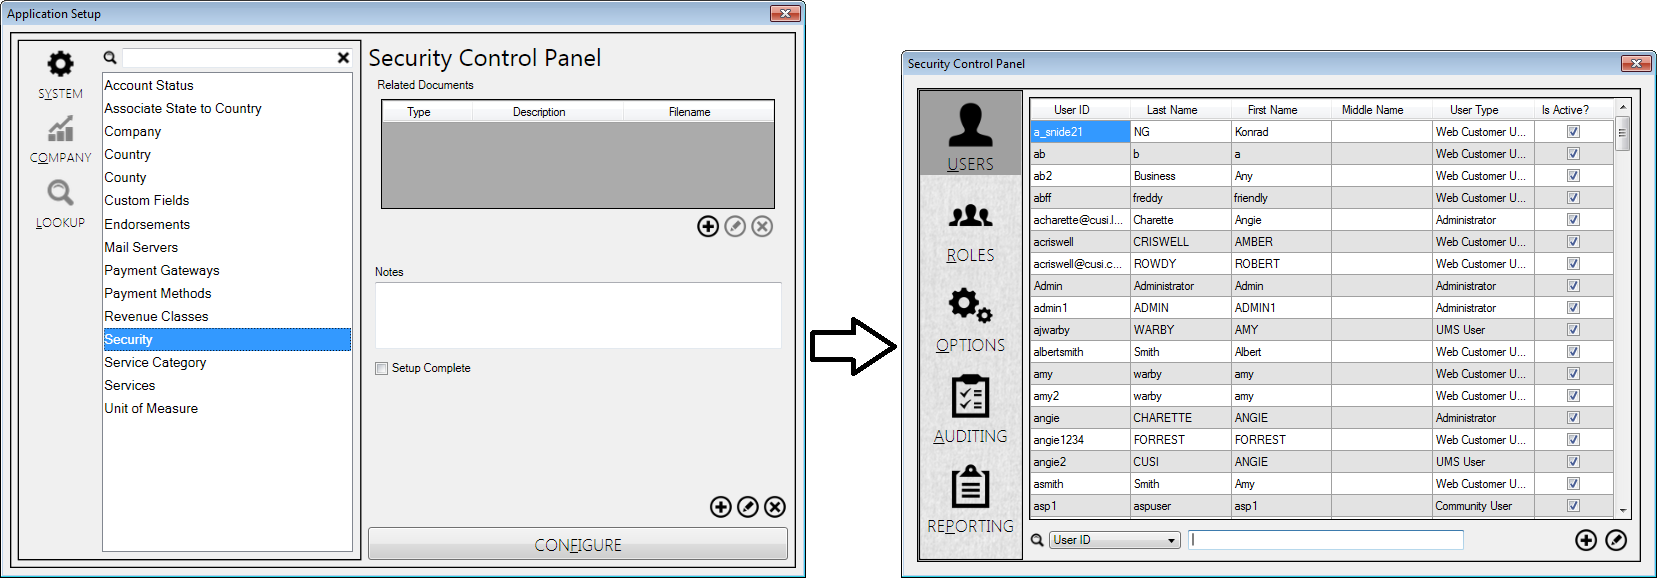
Figure 26: Security Control Panel Access
User Tab
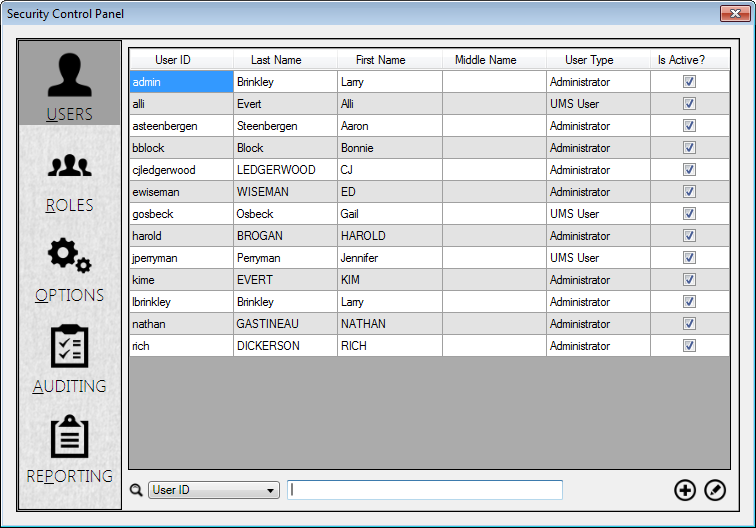
The User tab in the Security Control Panel is where Users are created and managed in the UMS system.
Figure 27: Security Control Panel Users Tab
When the tab is opened, all users currently in the system are displayed in a table. The table includes ID, name, type, and account status for each user. Right-clicking anywhere in the table will give you the option of copying the whole grid onto a clipboard for use in another program such as Microsoft Excel. You will also have the option of resetting the User password for the selected line. The buttons at the bottom of the window will allow you to add new users or edit existing users, and a search field is provided so that you can quickly find a specific user.
Reset User Password
User passwords can be reset from the Users tab, by right-clicking on the line in question (in any column) in the grid and selecting Reset user password from the pop-up menu.
Figure 28: Right-Clicking User Line
Note: The other option, Copy all values, allows the user to copy the information from the grid so it can be pasted into a report or spreadsheet for further review. See User Tab, above.

When you right-click on a User line and choose Reset User Password, the Reset Password dialog box will open for the selected User.
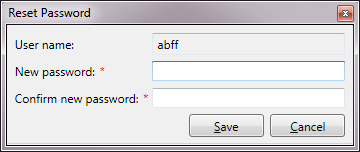
Figure 29: Resetting User Password
Enter and confirm the new password, then click Save.
Standard vs. Active Directory Users
Active Directory is available in UMS for user authentication. Standard UMS users have their passwords stored in the UMS database, but if the Active Directory option is enabled, UMS will authorize accounts using Windows Active Directory. This will enable you to link access to UMS to your company’s system access, so that UMS-specific passwords are not required.
Using Active Directory also allows you to manage users in groups to more quickly set permissions. Permissions can be assigned by user groups, and individual users can be assigned to one or more groups.
In order to enable the Active Directory option, you will need to temporarily move off the Users tab. From the Security Control Panel:
Click on the Options tab (below Users and Roles)
Check the Enable Active Directory box
Click the Apply button

Figure 30: Enabling Active Directory Option
Note: If Active Directory is later disabled, the existing Active Directory users will not be able to login until new User IDs are created, and no new Active Directory users can be added. See Security Control Panel>Options tab discussion (below) for more information.
Adding Active Directory Users
New UMS Users are created by clicking the Add (
) button at the bottom of the User screen and completing the form that opens.
Figure 31: Add User Form
Within this form, there are several steps.
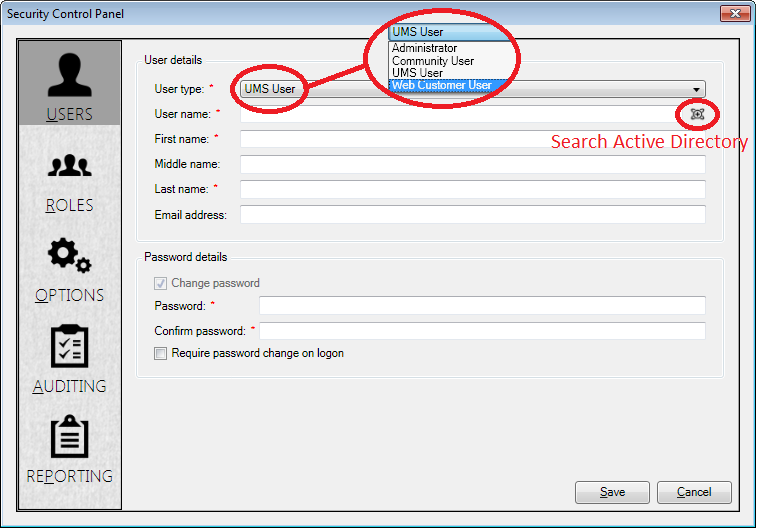
Select the User type.
There are four types of users:
Administrator. These users have full access to all UMS functions. They may not be added to groups, because they already have full access.
UMS User. This is the default user type. UMS User permissions are on the Company level.
Community User. Community user permissions are on the Community level.
Web Customer User. These are customers that have accounts on the Customer Web Portal (CWP). These users may not be added to roles.
Enter a Username.
If you are entering a standard user, enter a Username for the new User.
If you are entering an Active Directory user, and are working with pre-defined (Windows) users, search for the established username using the Search Active Directory icon (
 ) to the right
of the user name field. In order to link UMS to the Windows
credentials, the Windows and UMS usernames must match. When you click
this icon, the Select User dialog box will open, for Active
Directory User setup. This screen is actually a Windows function, and
this window enables the link between Windows and UMS.
) to the right
of the user name field. In order to link UMS to the Windows
credentials, the Windows and UMS usernames must match. When you click
this icon, the Select User dialog box will open, for Active
Directory User setup. This screen is actually a Windows function, and
this window enables the link between Windows and UMS.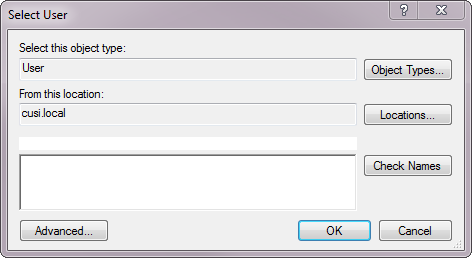
Figure 32: Active Directory User Setup
Assign a new Username as follows:
Type the domain for the name of the account you are adding.
Click Check Names
If the account is found, click OK and proceed with user setup
Type the user’s name and e-mail addresses into the boxes provided. Middle names and e-mail addresses are optional, but first and last names are required.
The password fields are not needed for Active Directory users. For standard UMS users, enter and confirm user login passwords here.
Note: The Change password option is grayed out for new users, as there was no previous password to change.
Once the form is completed, click Save to enter the User into the system.
When UMS is first opened by the new User, it will verify the User’s access rights and open UMS. If the User does not have the proper permissions, the Log In screen will appear and may display an error message.
Once UMS is opened, the user may use File > Logoff to open the login screen and let a different user access UMS. When UMS is first opened, holding down the CTRL key while the splash screen is visible will open the login form, bypassing the Active Directory automatic login.
Editing Existing Users
Find the user to be edited within the table. If necessary, use the Search fields at the bottom of the screen to locate the user.
Note: The Search window results can be sorted by column, ascending or descending, by clicking on the column header.
Then click the edit (
) button in the corner and the User Details screen will open.
Figure 33: Edit User Form
This screen is the same as the window used to add Users, except that a new checkbox (Account is disabled) appears below the E-mail address field. Edit the necessary information and click Save.
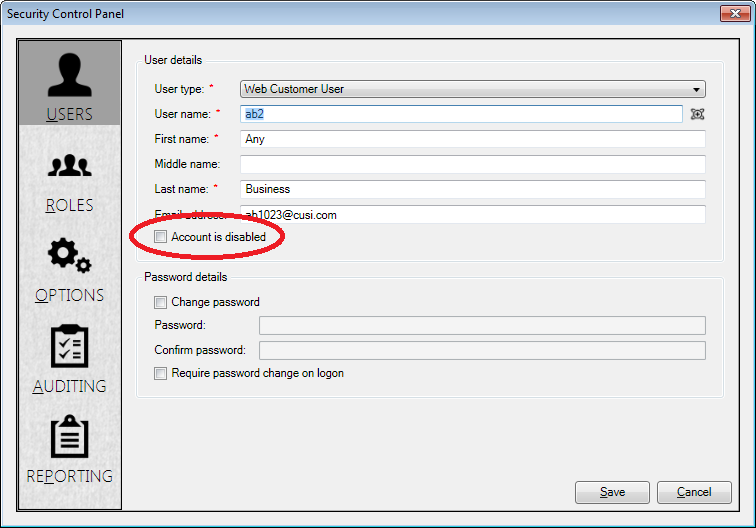
Deleting or Inactivating Users
Previously-entered users (standard or Active Directory) can be deleted, but only as long as there are no associated actions in UMS. It is highly recommended, however, that all created users remain in your UMS system. Users who are no longer needed in the UMS system can be made inactive.
To inactivate a User, open the edit screen as described in the previous section, and check the Account Is disabled box just below the E-mail address field. When you click Save, you will be returned to the User list, and the edited User will now have an empty check box in the Is Active? column.
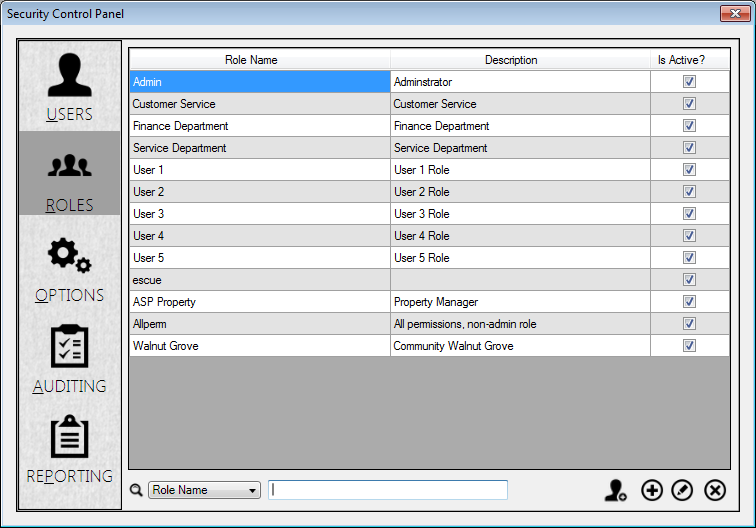
Roles Tab
Administrators automatically have all permissions within UMS. They therefore do not need to be assigned roles within the system. All other users need to be assigned rights and permissions to perform their various tasks. This is done through the Roles tab in the Security Control Panel.
Figure 34: Security Panel Roles Tab
Creating and Managing User Roles
Before Users can be assigned to roles, the roles need to be created. This is done using the icons at the bottom of the Roles tab:
Clone (
 ): creates a role identical to the selected, ready to
edit into a new one
): creates a role identical to the selected, ready to
edit into a new oneAdd (
): opens a new, blank role ready for editingEdit (
 ): opens the selected existing role for changes
Roles can also be deleted using the Delete (
 ) icon.
When you click the Clone, Add, or Edit icons, the Roles editing window opens. It has three tabs: Permissions, Users, and Options.
Note: For new roles (Clone or Add), the Options tab opens first, as the roles do not yet have names. For existing roles (Edit), this tab may also be used for renaming, but the window does not default to that tab.
Roles > Options Tab
This tab is where you begin creating your new role:
Type a Role name
Verify that the Active checkbox is selected
Type a Description (optional)
Move to Permissions tab.
Note: The Save and Cancel buttons are available on this screen. If you click Save at this point instead of moving to another tab, however, your new role will be saved but will have no permissions or users associated with it.

Figure 35: Add/Edit Roles Options Tab
Roles>Permissions Tab
This tab is where you manage the permissions associated with the role.
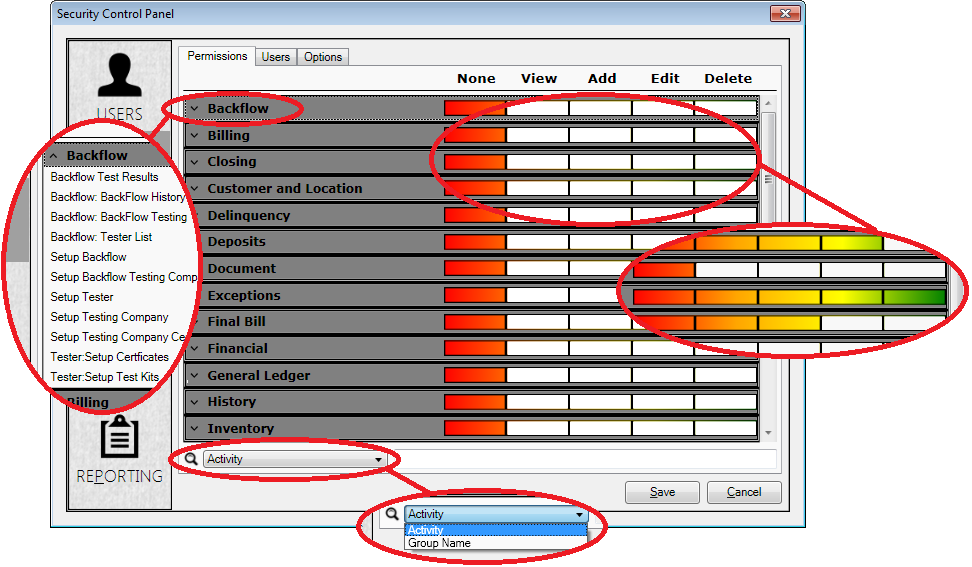
Figure 36: Add/Edit Roles Permissions Tab
The table includes all actions within UMS.
The list on the left contains all the items for which permissions can be set, organized in expandable categories, called Groups.
The right half of the screen shows the level of assigned permissions for each line, color-coded for at-a-glance recognition. The default position for all permissions is None (red) when you first create a role.
Below the table is a search bar that will help you locate a particular activity or group of activities. Activity refers to a single line, and Group Name refers to the entire group of activities within that category.
Tip: If a permission level is set on the Group Name line, it is automatically applied to each activity within that Group. Individual lines may then be edited separately.
There are five permission levels:
None: User has no access to this task.
View: User may see this item, but cannot add, edit, or delete it.
Add: User may view and add this item, but not edit or delete it.
Edit: User may view, add, or edit this item, but not delete it.
Delete: User has full access rights to this item, including all functions.
In order to select permissions for the role being edited, find the line for each relevant task (or group of tasks) and click in the appropriate column for the level of access to be granted.
Finally, move to the Roles > Users tab.
Note: The Save and Cancel buttons are available on this screen. If you click Save at this point instead of moving to the Users tab, the permissions you have entered will be saved but not applied to any users.
Roles>Users Tab
Now that you have created a role and assigned permissions for it, any users requiring that particular set of permissions need to be added. This is done through the Roles>Users tab.
Figure 37: Add/Edit Roles Users Tab
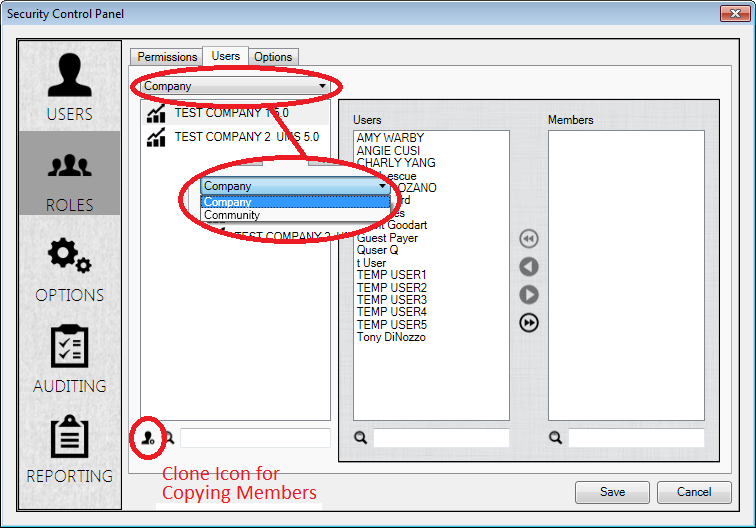
Copy/Clone Company or Community Members
In some cases, Users will need to be copied from one Company or Community to another in order to be selected for a Role. This is done using the Clone button (
Use the drop-down menu at the top of the Roles>Users window to select whether Company or Community members are to be copied.
Select the Company or Community whose members are to be copied.
Click the Clone (
) icon, and a dialog box will appear.Select the Company(-ies) or Community(-ies) to which the members are to be copied
Click OK
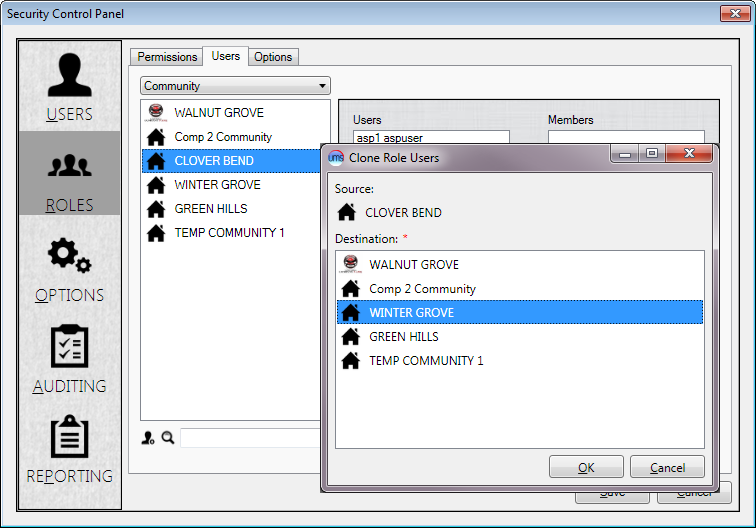
Figure 38: Copying Users from one Company/Community to Another
Adding Users to a Role
Individual Users may be added to more than one Role, and if the permissions in the assigned Roles differ, then the least restrictive permissions among the Roles will apply.
There are three steps to adding Users to a Role.
Limit the Users either by Company or Community
Use the drop-down menu at the top of the window to determine which limit (Company or Community) applies.
Select the applicable Company or Community
The available Companies or Communities, depending on which limit you selected, will appear in the box below the drop-down menu. Choose the one to which the role applies.
Tip: Use the filter field below the selection box to help locate a given Company or Community.
Select the User(s) who will be assigned to the Role
Once you have selected the applicable Company or Community, the available Users for that entity will appear in the Users box in the Center of the window.
Note: Only Users who were added as Community Users will be available when a Community is selected
Use the arrows to move them to the Members box. Single arrows move names in and out of the boxes, and double arrows moves all names from one side to the other.
Tip: Use the filter fields below the selection boxes to help locate a given User.
Once the Members list is complete, the Role will have both assigned permissions and members, and clicking the Save button will save the completed Role under the name assigned back in the Options tab. You will be returned to the main Roles tab of the Security Window, and your newly created (or newly edited) Role will appear in the list. The process of creating/editing Roles can be repeated as many times as required for your Company’s needs.
Options Tab
This tab is where User and password options are set. When the settings are applied (Apply button), a confirmation box will appear to show that they have been saved.
Figure 39: Security Panel Options Tab
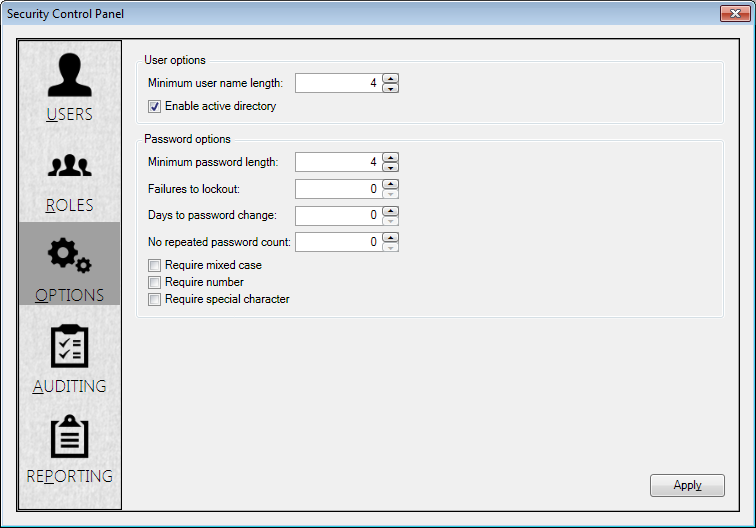
User Options
Most individual User settings are found in the User tab, while universal User settings are found here instead. There are two system-wide options:
Minimum user name length: This allows the Username length restriction to be edited. This applies to new Usernames only, and does not affect previously entered names.
Windows Active Directory: This checkbox enables or disables Active Directory for new Users. (This was previously described in the Security Control Panel>User tab discussion, above.) When not checked, users will be required to enter a User ID and Password to open UMS.
Note: If Active Directory is later disabled, the existing Active Directory users will not be able to login until new User IDs are created, and no new Active Directory users can be added.
For more information about Active Directory, please see Microsoft’s Active Directory site at:
http://www.microsoft.com/en-us/server-cloud/windows-server/active-directory.aspx
or the Active Directory information on TechNet at:
Password Options
This section of the Options window applies only for Standard UMS Users with internally-controlled passwords. Active Directory user passwords are controlled externally and are not affected by this section unless Active Directory is disabled (see previous section).
For Standard UMS Users:
Set the password requirements for your company by entering values or checkboxes in the available fields. In order to be PCI-DSS-compliant, passwords must:
Restrict direct access to the database to database administrators
Force user to re-authenticate if session is idle more than 15 minutes
Not be group, shared, or generic accounts and passwords
Be unique per user and changed on first use
This option is controlled using the Security Panel>User tab, on an individual User basis. See above discussion.
Expire at least every 90 days
This option is controlled by the Days to password change field.
If “0” is entered, the password will never expire.
Be 7 or more characters, both alphabetic and numeric
This option is controlled by the Minimum password length field.
Not match any of the previous 4 passwords
This option is controlled by the No repeated password count field.
If “0” is entered, any password may be re-used.
Not allow more than 6 login failures before user is locked out (≥ 30 minutes)
This option is controlled by the Failures to lockout field.
If “0” is entered, the User is never locked out for login failures.
Also, this section allows password complexity requirements. Three checkboxes are provided:
Require mixed case: Requires both upper- and lower-case letters.
Require number: Requires at least one number.
Require special character: Requires at least one non-alphanumeric character.
If the box(es) remain unchecked, the associated restrictions do not apply.
Auditing Tab
The Auditing tab lists recent user activity within the system, including the User name, Machine Name, Log Action, Date/Time, the Customer Account Number (if any have been accessed), and Limit Parameters.
Users with the proper permissions may view the audit table to determine what functions were performed by which Users, and when any changes were made.
Figure 40: Security Audit Logs
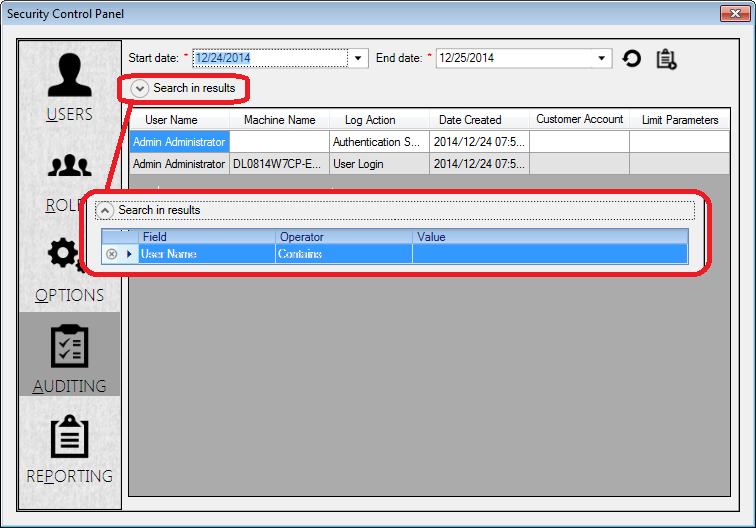
Use the Start Date and End Date fields at the top to limit the scope of the audit list.
Use the Search in results options below the date fields to further limit the results.
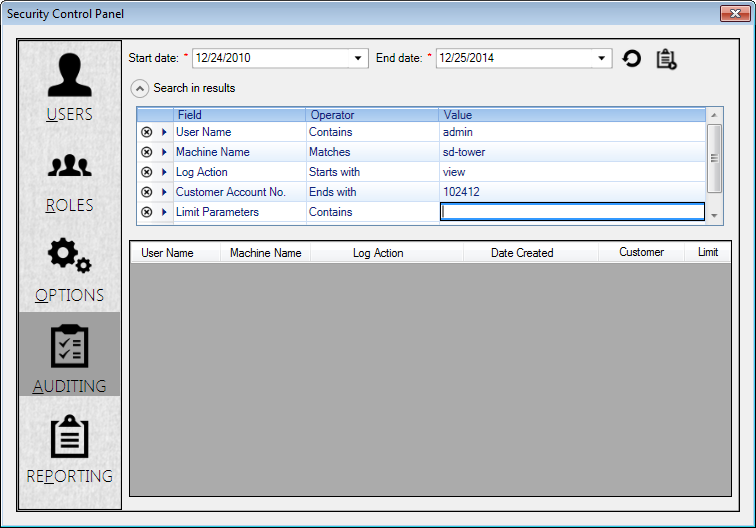
Figure 41: Search In Results Filters
Create a limit:
-Select a Field (User Name, Machine Name, Log Action, Customer Account No., or Limit Parameters)
-Select an Operator (Contains, Matches, Begins With, or Ends With)
-Enter the limit Value you want to use.
Create more limits as needed. A new line will open when you hit Enter after typing a limit value. A scroll bar will appear when you exceed the allotted space.
Use the Delete (
 ) button to remove a filter you no longer
need.
) button to remove a filter you no longer
need.Use the Export button (
 ) in the upper right corner of
the tab to view the log as a report. The log will open in a preview
window from which it can be printed or exported.
) in the upper right corner of
the tab to view the log as a report. The log will open in a preview
window from which it can be printed or exported.
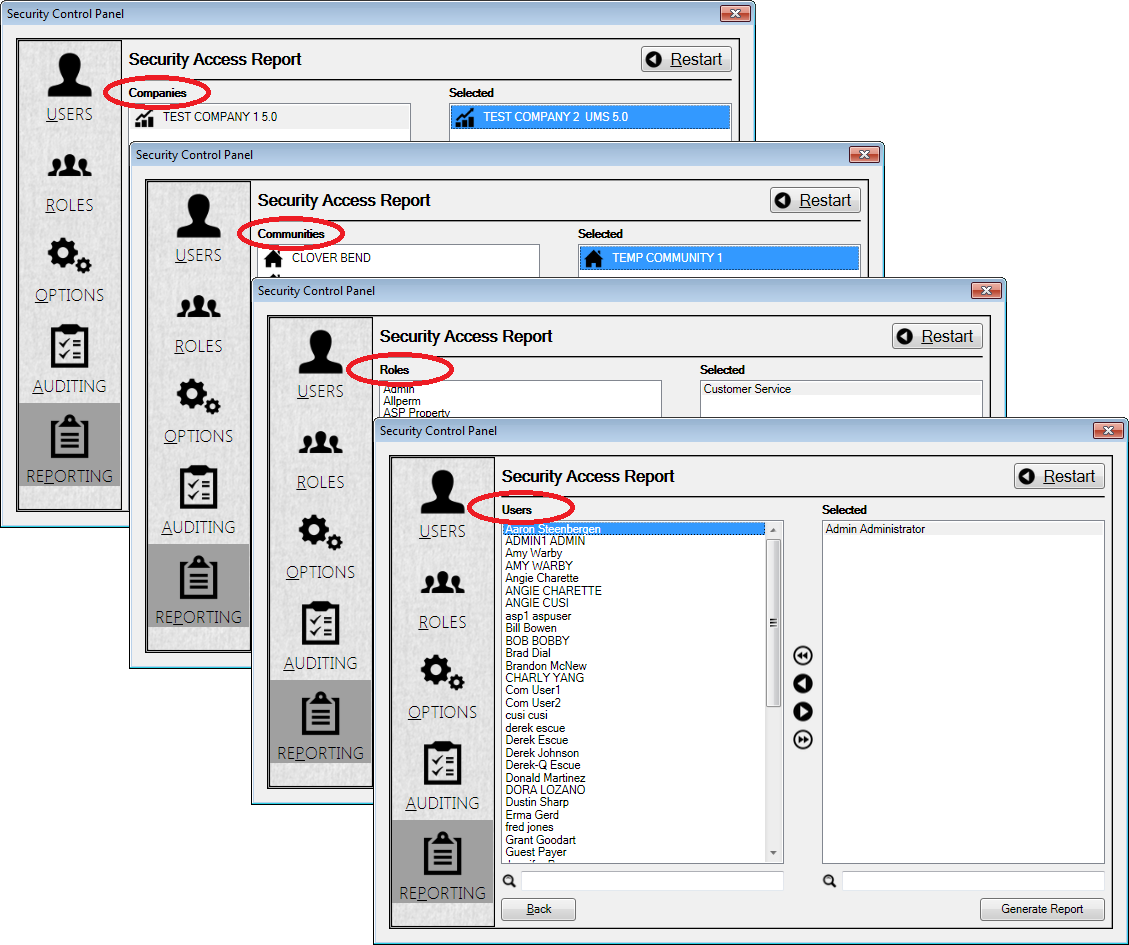
Reporting Tab
The Security Control Panel Reporting tab provides security reports, listing access rights and settings for groups and users. There are several types of reports (User Access, Role Access, and Security Access) and each has similar features and options.
Figure 42: Security Reporting

Report Options and Features
There are several common features for all reports:
All reports have at least one selection screen. You can define the scope of your report by selecting items (Companies, Communities, Roles, Users) from the left side of the screen and moving them to the right side of the screen into the Selected field.
The arrow buttons are used to move items from the left side of the screen to the Selected window on the right. Single arrows move highlighted items left or right. Double arrows move all listed items shown in a window (left or right) to the other side.
The Next button takes you form one selection screen to another. It is grayed out until at least one selection has been made in a given screen.
The Back button will return you to the previous screen.
The Generate Report button will appear on the final screen for each report selection type, and will become active once at least one selection is made. Clicking this button will create a report based on your selected criteria.
The Restart button will return you directly to the main reporting screen.
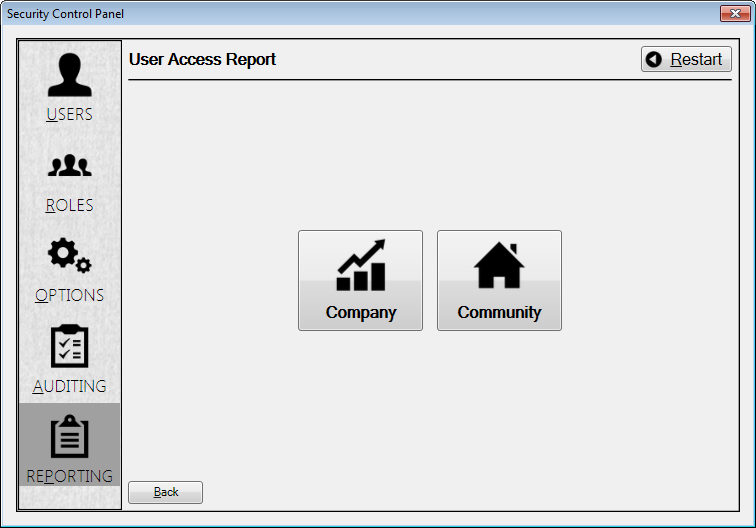
User Access
When you select User Access, The User Access Report window opens. It contains two further options, Company and Community.
Figure 43: User Access Report Options
For both of these, you will be prompted first to select which Company(-ies) or Community(-ies) you want to include in your report (labeled A in the figure), and then you will be able to select specific User(s) from a list of all Users within your Company/Community selection (labeled B in the figure).
Figure 44: User Access Report Selections. (A) Company or Community Selection and (B) User Selection
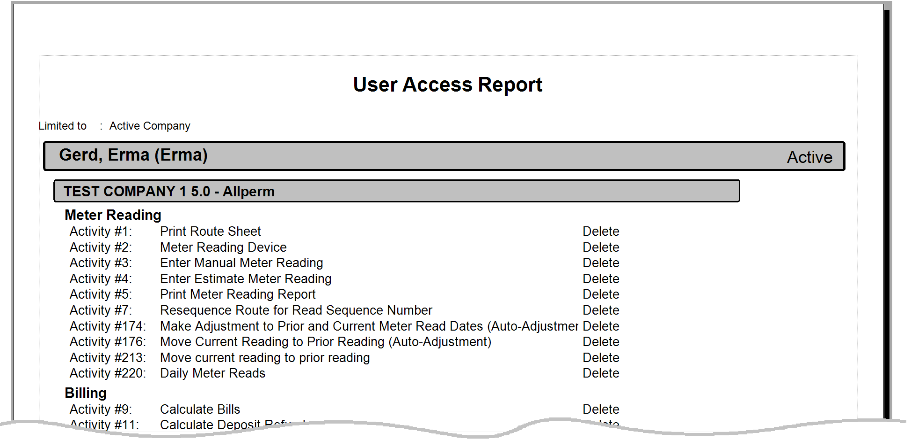
Once your selections have been made, click the Generate Report button to create the report.
Figure 45: User Access Report Output Example

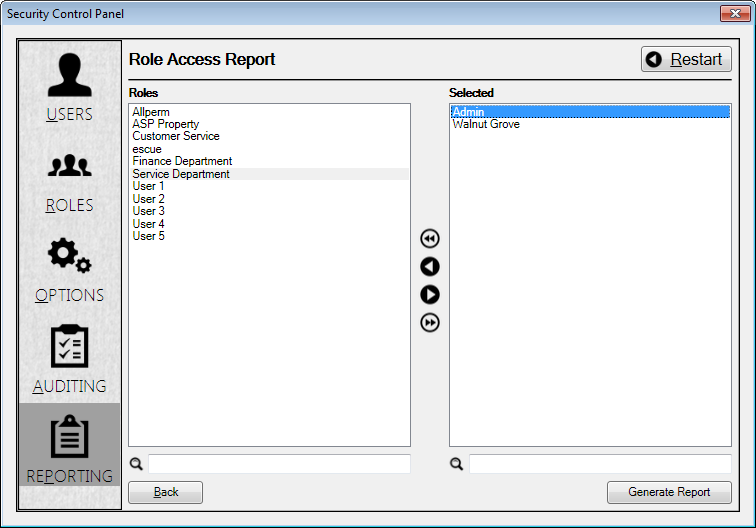
Role Access
This report will provide a list of all access levels assigned to selected roles. For this reporting option, Role is the only limiter. All roles for all available entities are listed in the selection window.
Figure 46: Role Access Report Selections—Role
Once you have selected the roles for your report, click the Generate Report button to create the report.
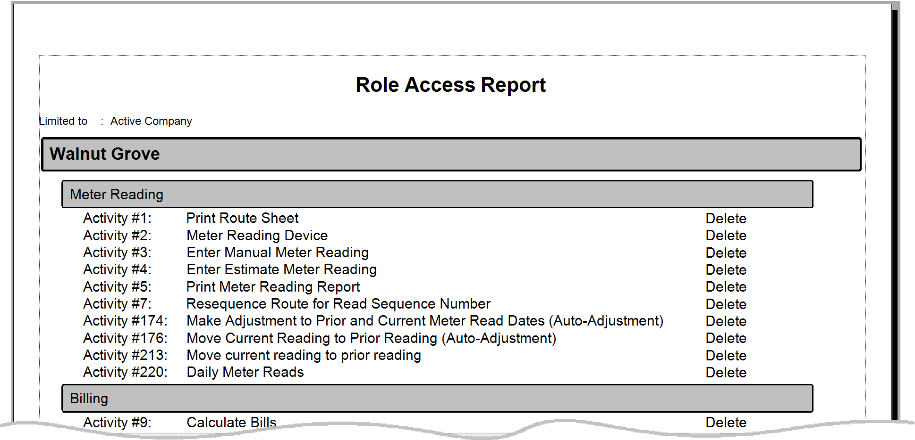
Figure 47: Role Access Report Output Example
Security Access
The Security Access report lists the permissions levels for selected groups and users. All four limit levels (Company, Community, Role, User) are available for this report.
Figure 48: Security Access Report Selections—Company, Community, Role, User.
Once you have selected the limit(s) for each level for your report, click the Generate Report button to create the report.
Figure 49: Role Access Report Output Example