Creating Statements
Regular Billing
From the menu bar, select Billing>Calculations>Process Bills. The Bill Process dialog box displays
Select the desired Limit options, such as Route or Cycle
Click the Add button and add the desired Code Filters to further limit the accounts that are being processed
On the right side of the Bill Process dialog box, open the Statements tab
Select an Action from the list
Create Statements. Create statements in UMS to be printed or sent to a third-party printing company
Preview Statement Edit List. Preview the Statement Edit List report to review details of the statements
Preview Statement Edit List & Create Statements. Combine the first two options in a single step. The Statement information will be generated to the database and a report is created and opens in a preview window
Print Statements. Print the statements that have been created
Send Statement Notifications. Send statement notifications through email, robocall, and text messages to customers who have opted into the relevant statement communication preferences.
Export Statements. Export the statement file as PDF, Microsoft Word, Microsoft Excel, RTF, or Crystal Reports RPT file
Preview Statements. Open the statement file in a preview window from which it can be printed, saved, and searched
Preview Bill to File. Open the third party printing export file to review the included records and layout
Compare Bill to File & Bill Register. Opens a report that lists the total current charges, prior balances, and total amount due for each account in the third party printing export. This report allows the user to verify that the export file contains the same information as was saved to the customer accounts
Export Bill to File. Select the billed services to be included in the export file and save the file to a local or network location
Export Bill to XML. Create an XML file containing the statement file information
Preview Zip Code Totals. View a report of totals by zip code
Create Statements
This option creates the statement file to prepare for printing, exporting, or e-mailing statements.
From the menu bar, select Billing>Calculations>Process Bills. The Bill Process dialog box displays
Select the desired Limit options, such as Route or Cycle
Click Add  and add the desired Code Filters to further
limit the accounts that are being processed
and add the desired Code Filters to further
limit the accounts that are being processed
On the right side of the Bill Process dialog box, open the Statements tab
Select Create Statements from the Action list
Select the Bill Types for which to create statements, Regular or Final
Set the Statement Date, Due Date, and Optional Date
Enter a Comment (optional)
Click Process
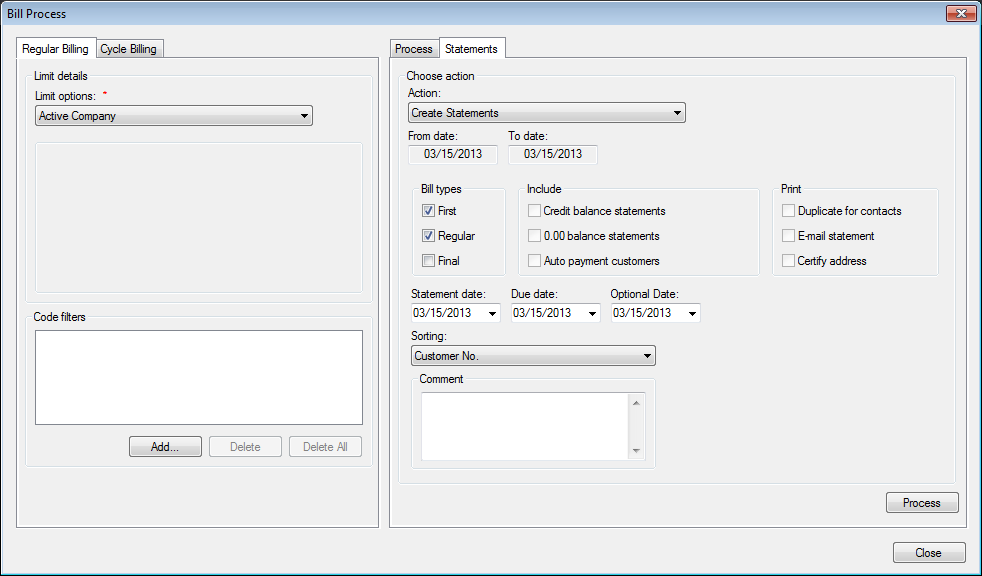
Figure 558: Creating Regular Billing Statements
Preview Statement Edit List
The Statement Edit List lets the user review details of the statement batch in a report.
Select Preview Statement Edit List from the Action list
Set the From and To dates for statements to include on the report
Select the Bill Types for which to create statements: First, Regular, and/or Final
Select which statements to Include: Credit balance, 0.00 balance, or Auto payment
Select the Sorting: Customer No, Location No, Name, Reading Sequence, Zip + Customer No + Location No, Zip + Location No + Customer No, CASS Sequence + Zip
Click Process
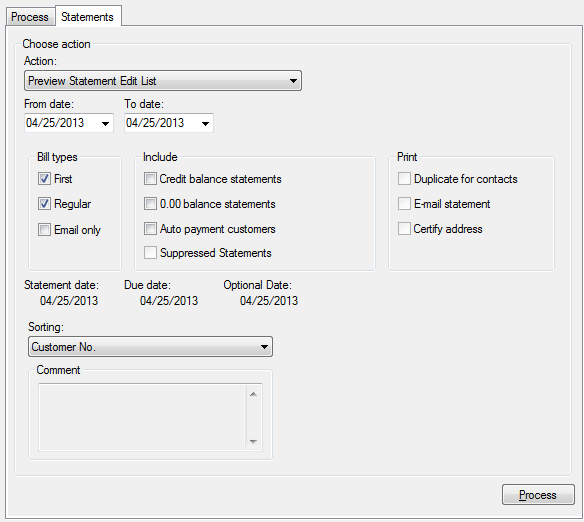
Figure 559: Preview Statement Edit List
Preview Statement Edit List & Create Statements
This option allows the user to Create Statements and review the Edit List report in a single step.
Select Preview Statement Edit List from the Action list
Set the From and To dates for statements to include on the report
Select the Bill Types for which to create statements: First, Regular, and/or Final
Select which statements to Include: Credit balance, 0.00 balance, or Auto payment
Set the Statement Date, Due Date, and Optional Date
Select the Sorting: Customer No, Location No, Name, Reading Sequence, Zip + Customer No + Location No, Zip + Location No + Customer No, CASS Sequence + Zip
Enter a Comment (optional)
Click Process
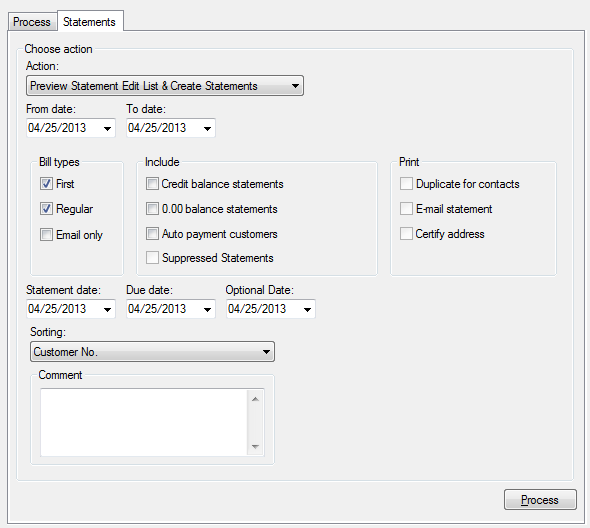
Figure 560: Preview Statement Edit List & Create Statements
Print Statements
Send the statements to a local or network printer to be printed in-house.
Select Print Statements from the Action list
Set the From and To dates for statements to include
Select the Bill Types to include: First, Regular, and/or Final
Select which statements to Include: Credit balance, 0.00 balance, or Auto payment
Select whether to Print Duplicates for Contacts, or E-mail statements; or whether to Certify Addresses if using the Coding Accuracy Support System (CASS) Interface
Select whether to mark the statement as Printed
Select the Sorting: Customer No, Location No, Name, Reading Sequence, Zip + Customer No + Location No, Zip + Location No + Customer No, CASS Sequence + Zip
Click Process
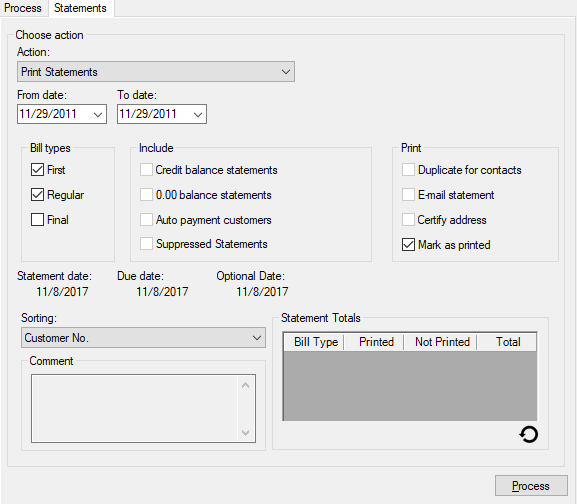
Figure 561: Print Statements
Send Statement Notifications
Send statement notifications through email, robocall, and text messages to customers who have opted into the relevant statement communication preferences.
Select Send Statement Notifications from the Action list
Set the From and To dates for statements to include
Select the Bill Types to include: First, Regular, and/or Final
Select whether to mark the statement as Printed
Select which statements to Include: Credit balance, 0.00 balance, or Auto payment
Select whether to Print Duplicates for Contacts or E-mail statements
Click Process
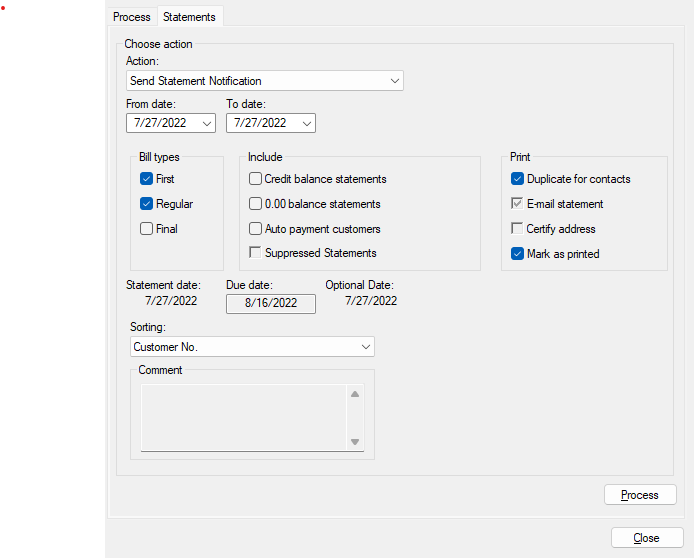
Figure 562: Send Statement Notifications
Export Statements
Save statements to a file on a local or network drive or attached storage device.
Select Export Statements from the Action list
Set the From and To dates for statements to include
Select the Bill Types to include: Regular, Final, or Email
Select which statements to Include: Credit balance, 0.00 balance, or Auto payment
Select whether to Print Duplicates for Contacts or E-mail statements
Select whether to mark the statement as Printed
Click Process
Preview Statements
View the statements onscreen.
Select Preview Statements from the Action list
Set the From and To dates for statements to include
Select the Bill Types to include: Regular, Final, or Email
Select which statements to Include: Credit balance, 0.00 balance, or Auto payment
Select whether to Print Duplicates for Contacts or E-mail statements or whether to Certify Addresses if using the Coding Accuracy Support System (CASS) Interface
Click Process
Preview Adjusted Statements
View Adjusted statements onscreen.
Select Preview Adjusted Statements from the Action list
Set the From and To dates for statements to include
Select the Bill Types to include: Regular, Final, or Email
Select which statements to Include: Credit balance, 0.00 balance, or Auto payment
Select whether to Print Duplicates for Contacts or E-mail statements or whether to Certify Addresses if using the Coding Accuracy Support System (CASS) Interface
Click Process
Preview Bill to File
Open the third party printing export file onscreen.
Select Preview Bill to File from the Action list
Set the From and To dates for statements to include
Select the Bill Types to include: Regular, Final, or Email
Select which statements to Include: Credit balance, 0.00 balance, or Auto payment
Select whether to Print Duplicates for Contacts or E-mail statements
Click Process
Compare Bill to File & Bill Register
View a report comparing the contents of the third party printing export file to the Bill Register for the selected group of statements.
Select Compare Bill to File & Bill Register from the Action list
Set the From and To dates for statements to include
Select the Bill Types to include: Regular, Final, or Email
Select which statements to Include: Credit balance, 0.00 balance, or Auto payment
Select whether to Print Duplicates for Contacts or E-mail statements
Click Process
Export Bill to File
Create and save the third party printing export file so it can be sent to the printing company.
Select Export Bill to File from the Action list
Set the From and To dates for statements to include
Select the Bill Types to include: Regular, Final, or Email
Select which statements to Include: Credit balance, 0.00 balance, or Auto payment
Select whether to Print Duplicates for Contacts or E-mail statements
Select whether to mark the statement as Printed
Click Process
Export Bill to XML
Create and save an XML file containing the selected group of statements.
Select Export Bill to XML from the Action list
Set the From and To dates for statements to include
Select the Bill Types to include: Regular, Final, or Email
Select which statements to Include: Credit balance, 0.00 balance, or Auto payment
Select whether to Print Duplicates for Contacts or E-mail statements
Select whether to mark the statement as Printed
Click Process
Cycle Billing
Statements
All statement options are the same for Cycle Billing Statements except the From Statement Date and To Statement Date, which has been replaced with Select Cycle Period.
The selected Cycle Period auto-populates the Statement Date, Due Date, and Optional Date, which can be overridden when Create Statements is the selected action.
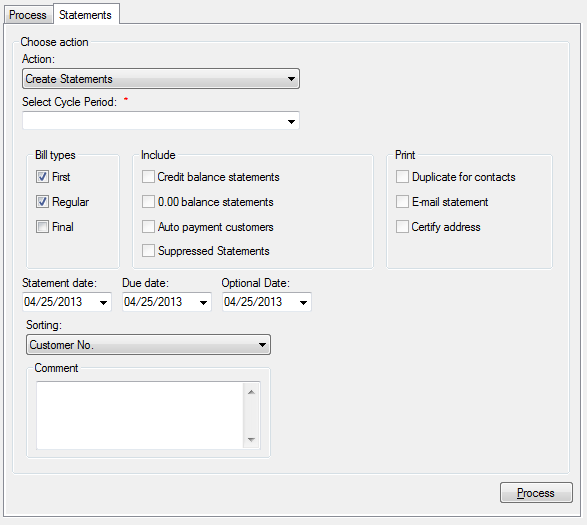
Figure 563: Creating Cycle Billing Statements