UMS Overview
Utility Management Solution (UMS) is the latest technology in Customer Information Systems and Utility Billing applications. It is comprehensive enough to be used for practically any service or group of services such as water, sewer, electricity, natural gas, storm water, refuse and more. With the easy-to-use interface, you can quickly perform the following tasks:
- Create and manage customers with details such as contact information
and location(s), recurring payments, payment plans, and any notes or exceptions
- Create and manage information for specific locations such as services
provided and devices present (meters, transmitters, remotes, etc.)
Create and manage work orders and meter tasks
- Manage administrative details such as billing schedules/rates, usage
variances, security settings, category codes, etc.
- Process bills and payments, including miscellaneous fees, NSF,
penalties, corrections, and other adjustments
Create templates and generate reports
Glossary
The following table provides a glossary of commonly used terminology throughout the training sessions and within the UMS applications.
Term |
Description |
|---|---|
CUSI |
Continental Utility Solutions, Inc. |
UMS |
Utility Management Solution software package |
Company |
Highest-level entity in the UMS hierarchy, generally the utility company using the system |
Community |
Logical grouping of locations or divisions which constitute sub-units of a Company in UMS |
Active Company |
Company that is currently open in the system |
Customer |
Individual, group, or business receiving the service being managed |
Location |
Physical location (home, business, or other) where the service is being provided |
Route |
Series of locations within a community with a common reason to be associated, grouped together to form more manageable subsets, usually for meter reading purposes |
Cycles |
Series of locations within a community with a common reason to be associated, grouped together to form more manageable subsets, usually for billing purposes |
Bill Group |
Feature which allows one group statement for multiple locations |
Limit Options |
Filtering options which may be used in creating custom forms or reports |
Code Filters |
Filtering options which narrow search results for data or transactions |
UDC |
User-Defined Codes; Codes which may be customized for specific requirements |
Service |
Any utility (Water, Sewer, Trash, Electricity, Gas, etc.) associated with a particular Location |
Posting |
Process of committing transactions to the history files |
Move In |
Assignment of a Customer to a Location within the system |
Move Out |
Removing a Customer from a Location within the system |
RUBS |
Ratio Utility Billing; Module which allows usage from a single meter to be divided among several customers |
Account Control Panel |
Main window from which most UMS functions may be easily accomplished or reached |
CASS |
Coding Accuracy Support Systems |
AMS Interface |
Advanced Messaging System interface |
IVR |
Interactive Voice Response |
UMS Workspace |
UMS desktop area where all functions are performed |
Account |
Unique combination of a Customer and a Location within UMS |
Delinquency |
Consequence associated with unpaid Accounts, including penalties or interest (late fees), shut-off, liens, bad debts |
System Login
You may access the application from the Program group on your computer, or by using the icon placed on your desktop at the time of installation.
Note: If Active Directory is enabled for your company, you will not need to log in to use UMS.
To log in, either click Start > All Programs > UMS Client > UMS Client or double-click the UMS desktop icon.
Once the UMS login dialog box appears, enter your assigned User ID and the corresponding password, and click Login.
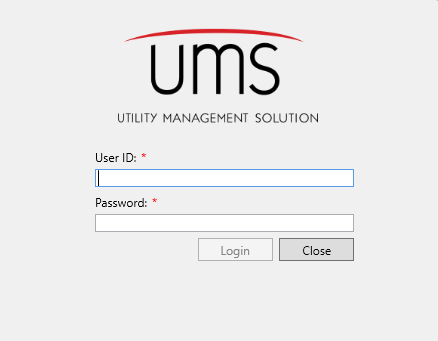
Figure 1: UMS Login Screen
Once you have successfully logged in, the UMS Workspace will appear:
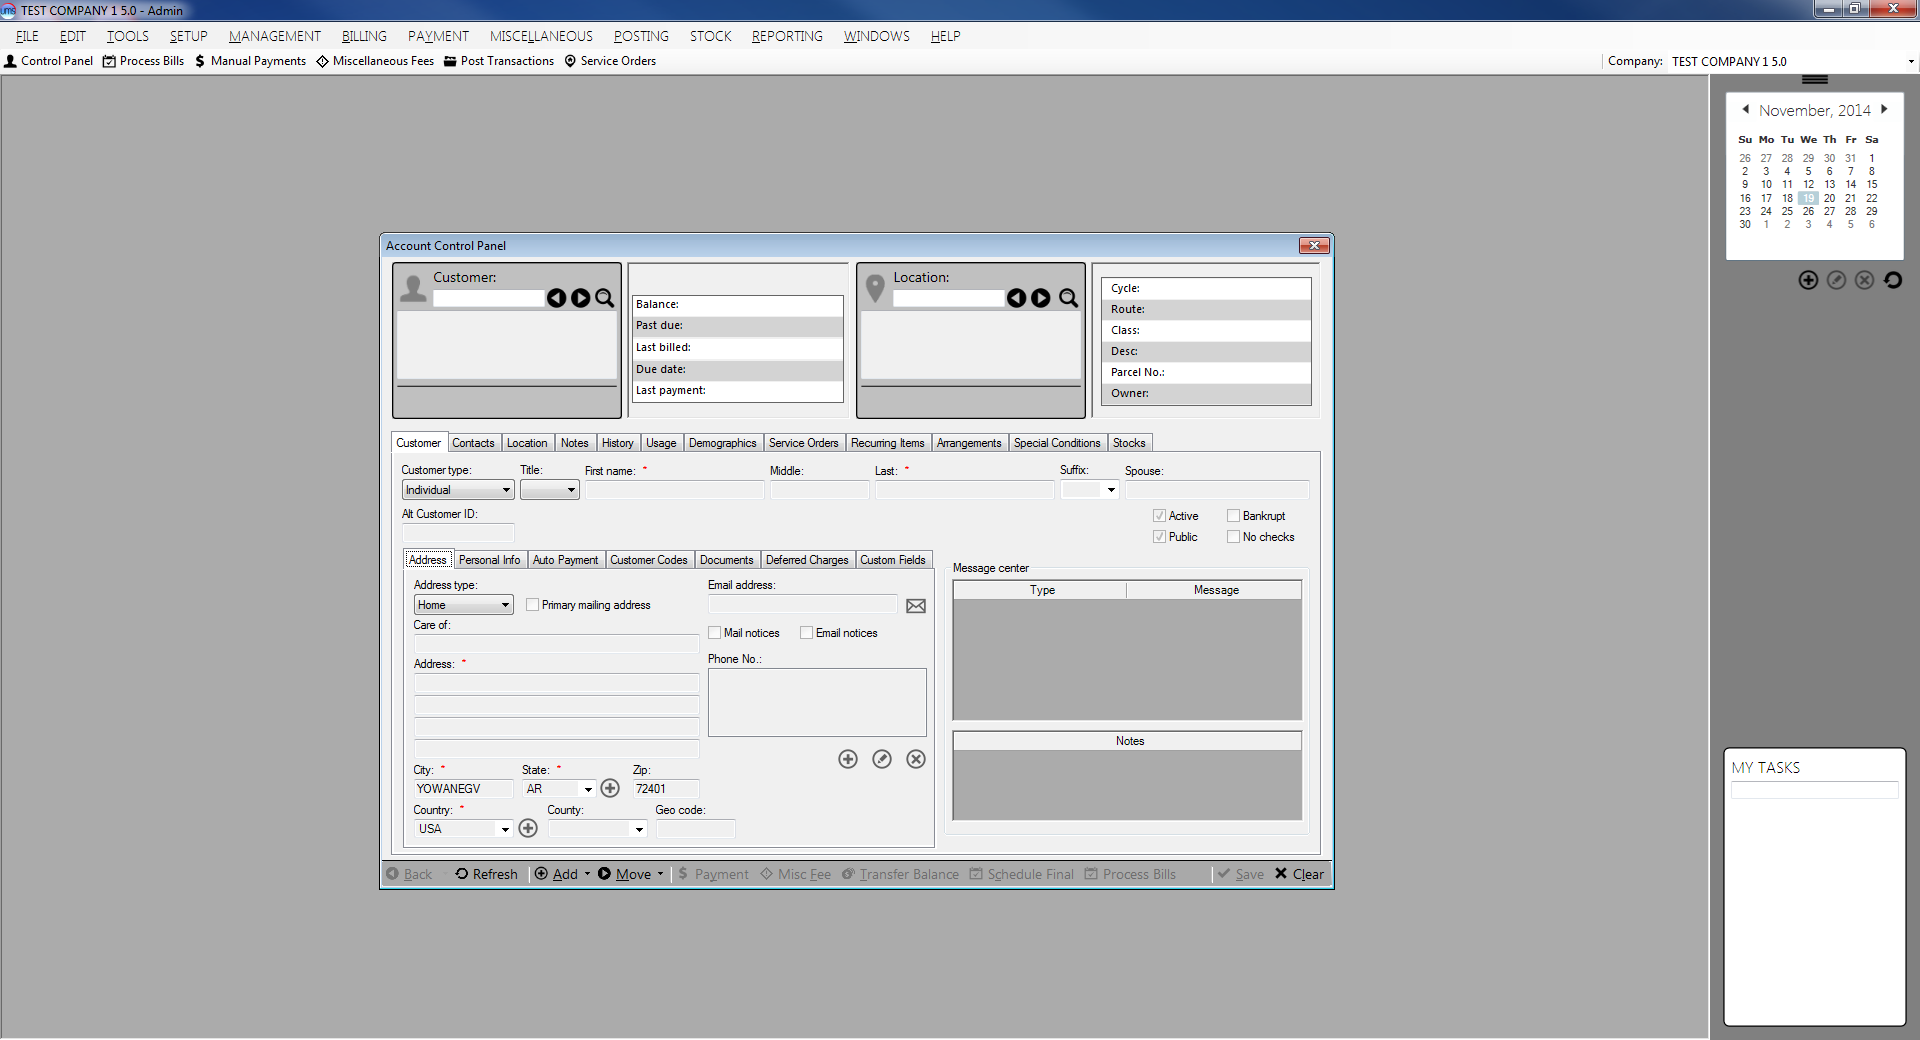
Figure 2: UMS Workspace
UMS Workspace Features
Workspace
Most UMS tasks are performed from windows and menus opened onto the gray workspace of the application main screen. The Workspace itself, however, contains several important features which help you navigate and manage these tasks.
Figure 3: Major Features of the UMS Workspace
The window at the center of the Workspace is the Account Control Panel, which will be described later. Other windows will open for the various tasks that follow in your use of UMS.
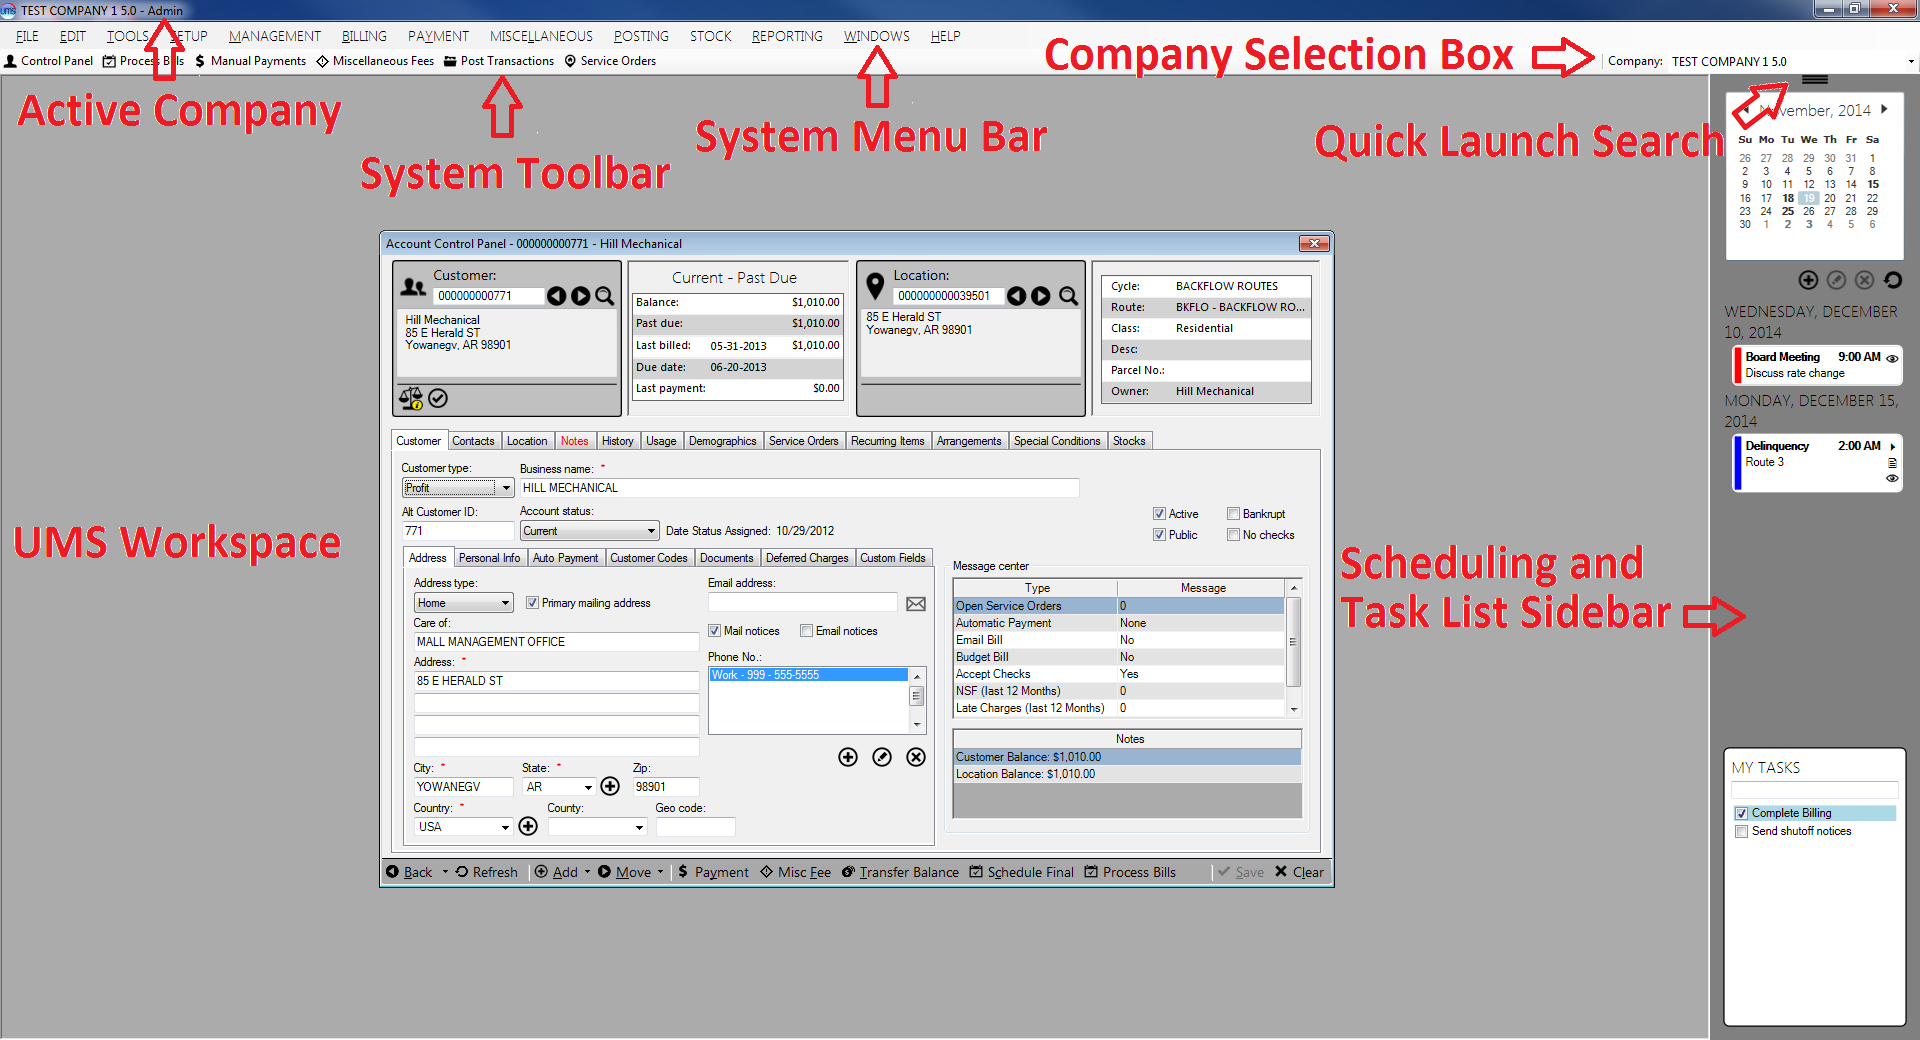
Active Company
All work in UMS is organized by Company. More than one Company may be set up in a given system, but only one Company may be active at a time.
If multiple Companies are set up in your system, you can switch to another Company at any time without having to exit the UMS application. Select the Company you need from the drop-down menu in the upper right corner of the screen.
When you change companies, a confirmation box will appear. Click Yes to indicate that you really do want to change companies.
System Toolbars
These quick access buttons provide easy access to common UMS tasks. These buttons pull up UMS task windows for the process, bypassing the pull-down menus for ready access to common tasks. The system toolbar is customizable, and can be made role-specific for your company’s users.
Scheduling and Task List Sidebar
UMS offers a built-in calendar with a task list and on-screen reminders. The calendar and task list are always visible, in a sidebar on the right side of the main UMS screen. Each event may be specified to display for a specific user role and/or individual users. More advanced features such as making events inactive or including attachments are also available but not mandatory for day-to day operation.
Scheduled events will show up as flags under the calendar, color-coded by priority: Red for High, Orange for Normal, and Blue for Low. Pop-up reminders will display on-screen within the UMS system. You can determine when they appear, and they will stay open until dismissed.
The scheduling sidebar also has a personal task list that allows users to create and check off tasks and personal reminders. Unlike calendar events, these entries are visible only to the user who creates them.
Figure 4 Scheduling and Task List Sidebar
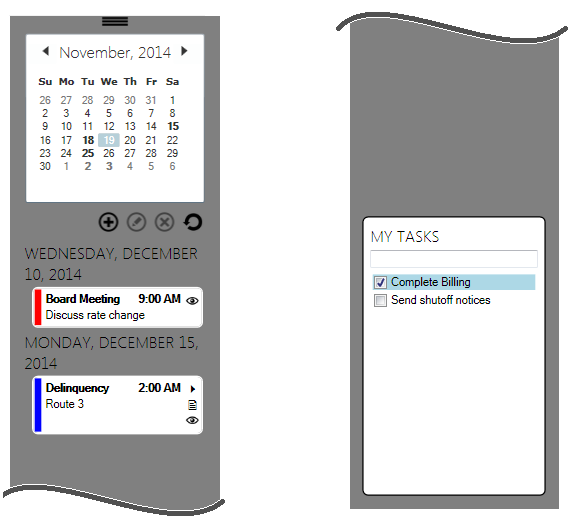
My Tasks
Type a short note into the box at the top of the My Task window and hit Enter. The typed text then appears as a list item with a check box next to it. Items will appear in the order they were entered, and a scroll bar will appear if the list is longer than the window. After a box is checked, that task will remain until you log out of the system. It will no longer be listed on your next login. If the box remains unchecked, the task/reminder will reappear at each login until checked.
Scheduling Events and Reminders
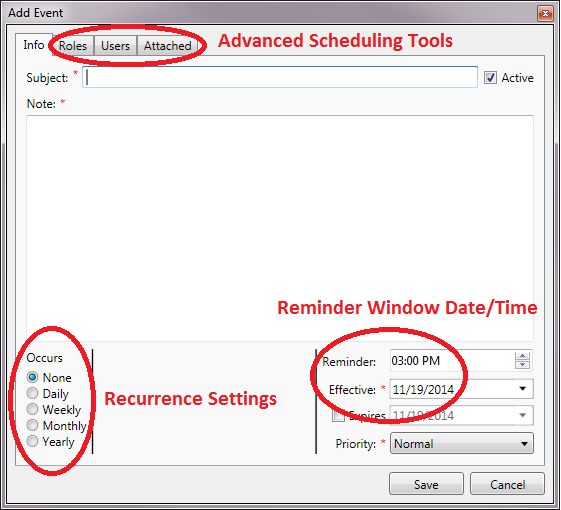
In order to add, edit, or delete an event in UMS, select the appropriate date on the calendar in the scheduling sidebar, and use the icons beneath the calendar. When you add a new event the Add Event window opens.
Figure 5: Adding a Calendar Event
You must enter both a subject and a note into the Info tab in order to save an event. Event timing, recurrence, and priority are entered in the lower half of the screen. This is sufficient to create an event, but additional tabs provide more advanced options.
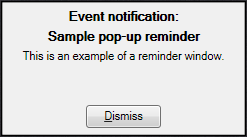
Event reminders will automatically pop up as UMS windows. The default reminder time that comes up when the window is opened may be edited by separately clicking/entering new hour and minute values.
Figure 6: Pop-Up Reminder Window
Note that the reminder window will appear on top of whatever tasks are open, but will then behave as the other windows in the foreground or background of the workspace. The reminder window will stay open until dismissed.
System Menus
File Menu
The File menu provides access to the main functions of the system and contains the following options:
- New. From File > New, you can add a New Company, Add a State,
Create a Miscellaneous charge or Create an Adjustment.
- Change Password. This option launches the Reset Password
dialog box.
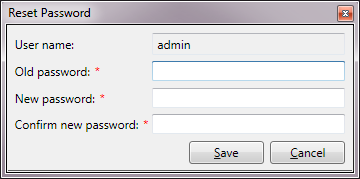
Figure 7: Reset Password
Enter your old password, and then your new password twice, then click Save to apply the new password.
Note: The Change Password option will not be available if your system logs you in using your Windows network password.
- Logoff. This option logs the current user out of the system
without closing the program. A confirmation window will open. If you confirm the Logoff, the system will close your session and return to the login screen, ready for the next User.
- Exit. This option closes the main window and exits the system. A
confirmation window will open. If you confirm the Exit, the system will log you out of UMS and completely exit the system.
Tools Menu
Email
UMS will allow you to open your email program and create a new message while working within the UMS application.
When you select this option, a blank message from your email program opens. Compose and send as you normally would.
Note: UMS is based on Microsoft technology, and it is therefore highly recommended that Outlook be used. Using other email systems may create conflicts.
Options
This menu allows you to set preferences for appearance, interfaces, and configurations. When you select this option, the Client Configuration dialog box opens. It has four tabs: Options, Interfaces, Printers, and Paths.
- Options. The Options tab allows you to enable/disable
notification of changes, set the name of the local machine, hide/show the task pane, and change the appearance of UMS.
- Interfaces. The Interfaces tab allows you to set and
configure AMS Interface, AMR Direct, and the Document Management Interface.
- Printers. The Printers tab allows you to set the
document/receipt printers and configure cash drawers.
- Paths. The Paths tab allows you to set default paths for data,
import, and export.
Customize
This selection allows creation of user-specific UMS menus and toolbars. The standard UMS menus and standard toolbar buttons are listed at the top of the workspace unless they have been replaced by customized setups. These customized menus and tools may be different for the various User levels you set up for your employees.
Selecting the Customize function opens a dialog box with a drop-down selection list and five tabs: Menu bar, Toolbar, Roles, Roles, Users, and Options.
When the software is installed, the selection box is populated with two options, Standard UMS and Classic CBSW. These schemes cannot be modified, and thus the tools are grayed out. However, to the right of the selection box are three icons (Add, Clone and Delete) which allow the User to create, name, edit, and define customizable menu and toolbar schemes. Once a User scheme is created, the tools in the five tabs become accessible, and all of the listed options may be customized.
Note: Search boxes are provided below the function windows to make customization easier.
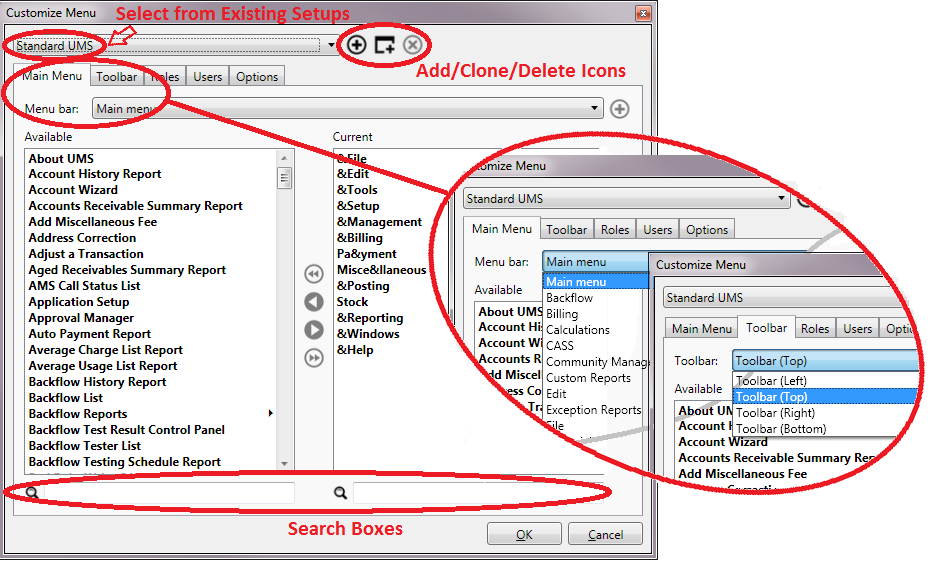
Figure 8: Customize Menus and Toolbars
Setup (Application Setup)
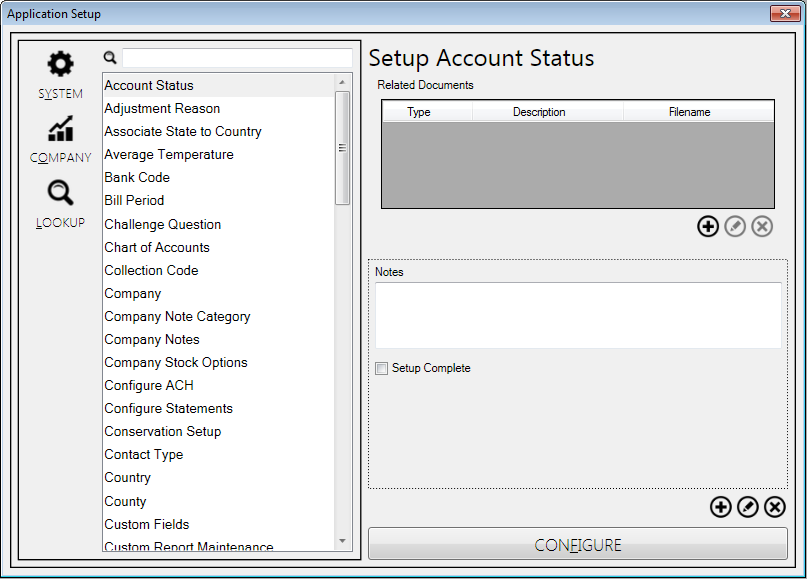
Setup is not a drop-down menu. When you select Setup, the Application Setup window opens. This tool is mainly used by Administrators in configuring the application.
Note: The Setup menu item will only be visible if the User has been granted access to this function. Permissions settings will also restrict which functions will appear within the menus for Users who have access to the menu.
Figure 9: Application Setup Control Panel
The setup items fall into three categories: System, Company, and Lookup. These are listed to the left of the option box, and the list of selectable options will change, depending on which category is selected.
Note: The System, Company, and Lookup buttons are independent toggles, and therefore more than one list can be selected at once. A search box is also provided for quick access to setup items.
Some of the items in each list may be grayed out, depending upon which modules are licensed to your particular system. In order to set up any listed item, either double-click on the item itself or select it and click the Configure button at the bottom of the screen. For each configurable item, a different dialog window will open for you to enter setup details.
Also, the User has the option of adding documents or notes for each setup item. The tools on the right side of the window allow the user to upload or manually add relevant information. Editable notes may be added as text boxes or check-box lists. When the Add (
) button is clicked, a window will pop up, asking if you want a note box or a check-box note item.
Common Functions
Throughout the UMS application, many functions operate in same manner from task to task. The following is a guide summarizing the way the major functions work.
Customer / Location Numbers
Data is generally retrieved by account, which means the account number must be selected. In most cases, this will be done by first retrieving the customer account by name or number, and then selecting the applicable location for that customer.
On the Account Control Panel, this information can be found/entered in the Customer and Location Information Cards, in the top part of the window (also called the Dashboard). Other UMS functions may have slightly different search areas or windows, but for all tasks involving individual customers, applicable Customer/Location information will need to be selected.
Figure 10: Customer and Location Information Cards
Customer numbers may or may not be the same as Location numbers, depending on your Company processes. Only one Customer may be associated with a Location, but multiple locations may be associated with a Customer.
Note: Each unique Customer-Location pairing constitutes an Account. This applies also to Customers associated with multiple Locations.

Search
Searches in UMS are generally conducted from search windows. Searches may be performed on either full or partial information, and the results usually may be further refined if too many items are returned.
If full or partial information is available, you can enter it into the appropriate field and hit Enter. If only one record exists for that information, the field will be populated. If no information is entered or if multiple records are present, a search window will appear.
Figure 11: Example of UMS Search Feature
Filters are available for all searches. In general, almost any information field can be used as a filter, but for efficiency, only relevant filters are available for specific search windows.
If your desired record appears in the search window, you can open it by double-clicking that record or by selecting it and clicking OK.

Once a search has been performed, the parameters are retained until cleared. The next time a search window is opened, the search will default to the last terms used.
Leading zeroes are not needed for searches.
Date searches default to the current date.
The Search window results can be sorted by column, ascending or descending, by clicking on the column header.
If the search yielded no results or too many entries, you can edit/refine the search:
- You can edit the search term to be more or less restrictive. For
instance, you can add/remove a digit from a number or a word from a name or address.
- You can select a different filter. Using a different filter will
allow you to search using other known associated information. For instance, using the Full Location Address filter can help you quickly locate unknown Account or Location numbers for a known (or partially known) address.
- You can enter wildcard parameters. By default, the wildcard in
effect when you begin the search will be Contains. You can change this to Matches, Starts With, or Ends With from the option box that opens when you click the Search options button just below the filter menu. An optional limit field is also available to further refine the search.
- You can search within the displayed results. A limiting filter
box appears at the bottom of the window when search results are returned. Select a filter from the menu below the results table and enter a refining term in the text box to the right. You do not need to re-click on the search icon for the results to be refined.
Edit
In most cases, any records added to the system can be edited. Open the appropriate function dialog box, and click the Edit button. The applicable Edit dialog box is then displayed, and the appropriate changes can be made. Note that any field that cannot be edited is grayed out.
Once the edits are saved, they are applied immediately throughout the system. Forms that are open when the edit is made will not show the change until they are refreshed.
Delete
All deletions are permission-based to protect the integrity of the system database. Even if you have permission to delete an item, this action cannot be performed if the item is referenced elsewhere in the system. This is because a historical record of all UMS activity is maintained for audit purposes, and data which has been used must be kept.
Dates
Dates within UMS can be selected either by typing a specific date in the field provided or by choosing the date from the pop-up calendar that opens when the arrow prompt is clicked.
The pop-up calendar has navigation features that allow you to quickly find dates.
Figure 12: UMS Calendar Features
By default, the calendar interval will be Month. The current month is displayed, and the current date is highlighted within the month. Use the left/right arrows at the top of the calendar to scroll forward or backward through the months. At any point, you can click the Today button at the bottom of whichever calendar view is open, to return to the current month and date.
The calendar interval can be changed for broader searches by clicking on the header. Clicking once expands the calendar to the current year, and the scroll arrows will move forward or backward through years instead of months. Clicking again will further expand the range to the current decade, and clicking once more will expand the range to a century (or partial century).
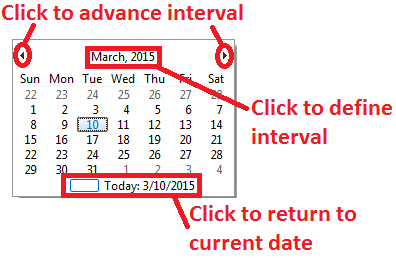

Figure 13: UMS Calendar Intervals
As each expanded interval is selected, the calendar will automatically skip to the next-shorter interval for you to narrow the date search.
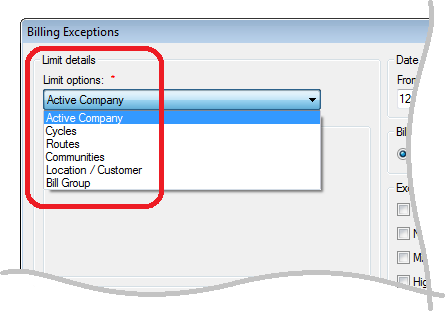
Limit options
Any time you want to retrieve data or perform other tasks which require you to choose or query a subset of the available information, data limit options will be available. For example, most reporting functions allow you to define the scope of the report by selecting specific groups or sets of information.
Figure 14: Limit Options Menu
The same six limits are available wherever this function appears, and the choices within each limit are consistent throughout the system. Note that these options are not exclusive, any or all may be used for the same query. The use of these options may be divided into three groups:
Active Company
There are no limit fields to select within this option. All reporting tasks or actions you perform are applied to the selected Company.
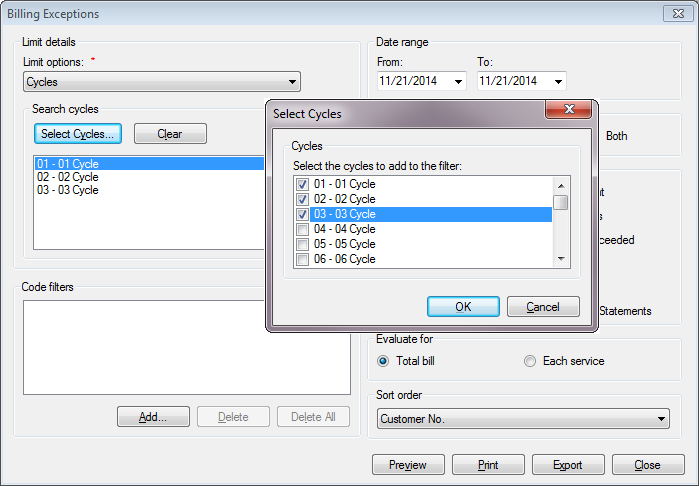
Cycles, Routes, and Communities
Limiting by Cycles, Routes, and Communities all follow one procedure. When one of these is selected from the drop-down menu, a new display appears below the menu. Each gives a Select button, a Clear button, and a window where the selected items will be displayed.
The Select button (Select Cycles, Select Routes, or Select Communities) opens a pop-up window containing all of the available groupings and check boxes for selection. When all selections are finished, click OK. The newly made selections will then appear in the limit details window. The Clear button will remove all previously selected cycles from the list.
Figure 15: Cycles (and Routes and Communities) Limit Option
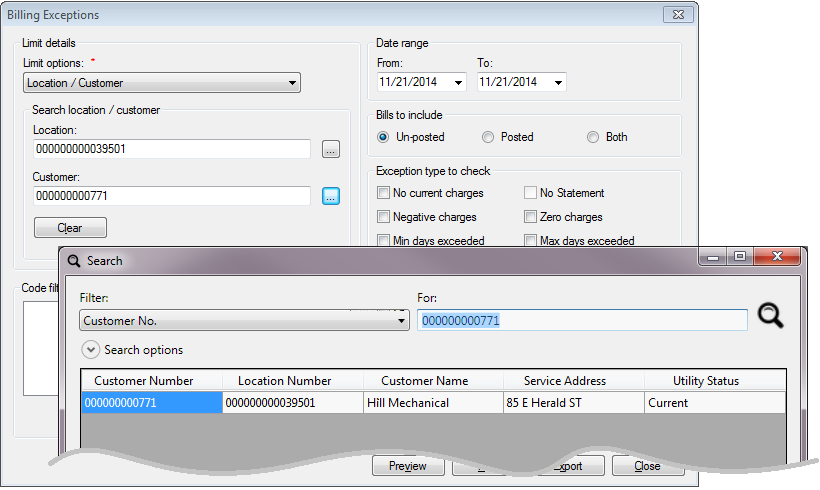
Location/Customer and Bill Group
These two filters are both search-based. Selecting the Bill Group option brings up a single selection box. Selecting Location/Customer brings up two selection boxes, Location and Customer. As in other screens, entering a value in one of these boxes brings up the linked information in both.
Figure 16: Location/Customer (and Bill Group) Limit Option
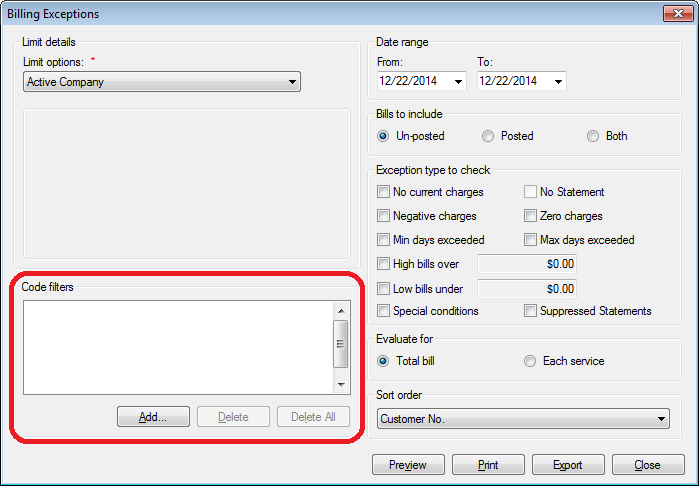
Code Filters
Like limit options, code filters are a way of narrowing search results for reports or other tasks involving data retrieval. Code filters are divided into four different groups: Customer, Locations, Services and Rates, and Revenue Class.
The process of selecting code filters is very similar for each of the code groups and for all tasks in the UMS system. Wherever code filters are applicable, a box like the one below will be part of your task window.
Figure 17: Code Filters Selection Box
The first step in using code filters is to click the Add button. At that point, a window with four tabs will open, one tab for each code filter category. Click each tab and make the desired selections based upon the requirements for your specific report or transaction.
Note: It is not necessary to make selections in every tab, or in every window within the tabs. Use only the codes which are applicable to your task.
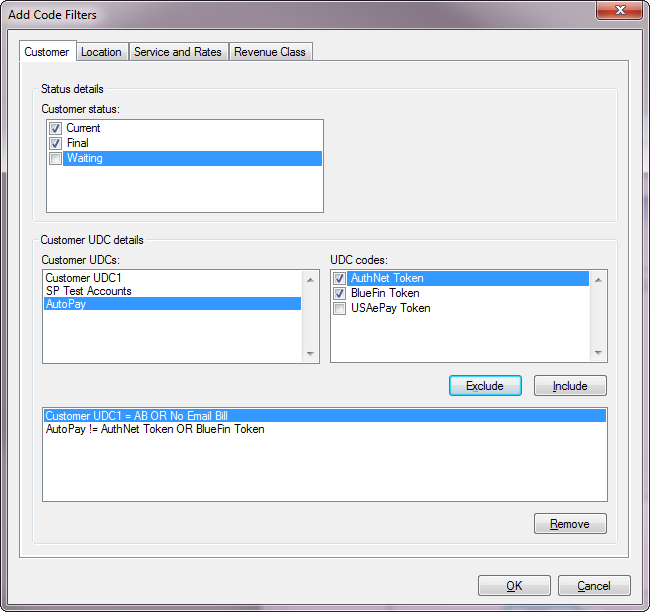
Customer Code Filters
In the Customer category tab, you can select Current, Final, and/or Waiting Customers, and you can also apply any User Defined Codes (UDC) that have been previously defined.
Figure 18: Customer Code Filters Selection Tab
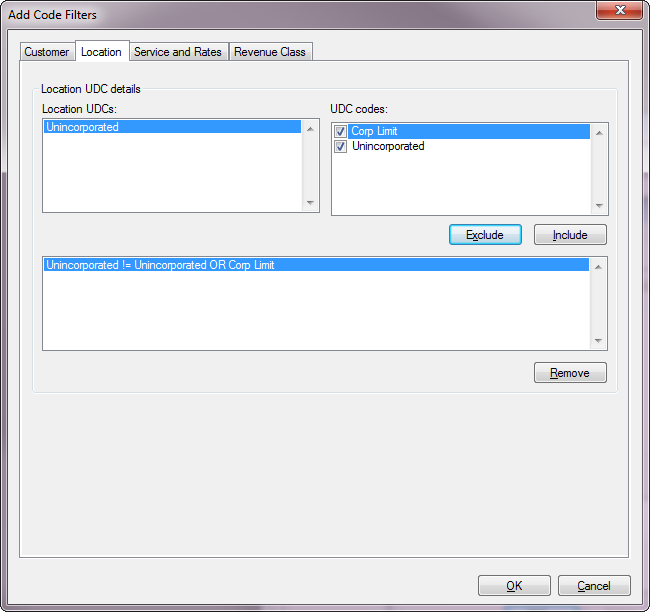
Location Code Filters
The Location tab allows you to select various Location UDCs, and the appropriate UDC codes within them. Again, inclusion/exclusion criteria are applied independently to each selected code, and several may be selected.
Figure 19: Location Code Filters Selection Tab
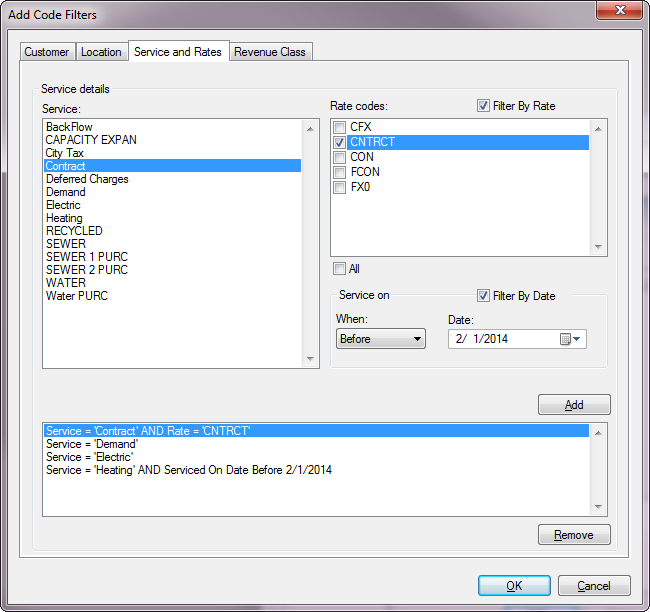
Service and Rates Code Filters
In the Service and Rates tab provides slightly more complex options. A list of available services is shown at the left and applicable rate codes for each service are displayed on the right, as each service is selected. Likewise, service dates may be used as filters, if the Filter By Date box is selected.
Note: By default, all rate codes are selected for each service, and therefore the check boxes are not automatically available. In order to filter instead by specific rate code(s), The Filter By Rate box needs to be checked.
Figure 20: Service and Rates Code Filters Selection Tab
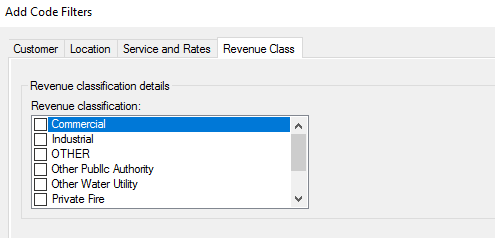
Revenue Class Code Filters
Customer revenue classification can be used as another filter. All revenue classes that have been set up for your company are available for selection in the Revenue Class tab. Any number of boxes may be checked in this category.
Figure 21: Revenue Class Code Filters Selection Box
The selections made in each of the above categories will be shown within the window in the lower part of the tab. Once you click OK, all selections from all tabs will be displayed in the Code Filters box on the main task screen. These may be edited by deleting items (Delete or Delete All buttons) and/or by re-opening the selection tabs (Add).
Figure 22: Code Filters Selection Box After Selection of Codes

Output Options
There are several options for handling system output, and these apply to any function within UMS. You can preview the results (Print Preview), send to a specified printer (Print), or export the generated information (Export) into another file type such as Crystal Reports, MS Excel, Adobe PDF, etc., for use by some other system.
Print Preview
The Print Preview option is available for all printing tasks, such as report generation and printing of statements and receipts. When you select Preview, UMS will create a Crystal Reports document that can either be saved for editing or printed to either a printer or PDF file (as available on your workstation). This preview will allow you to verify that the chosen parameters and format are as needed before printing or exporting.
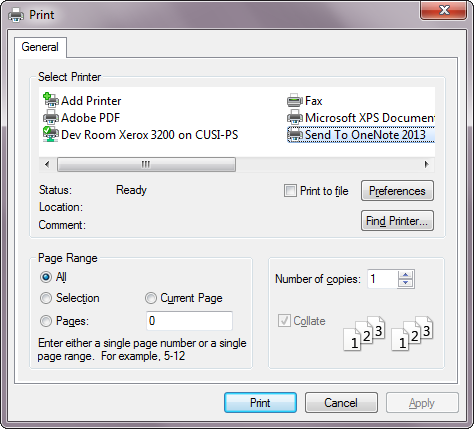
Print
When the Print button is clicked, the generated information is sent directly to the default UMS printer. If no default printer is setup in the Client Configuration, the report will open the Windows print dialog box, where you can select your printer (or program) and print options, just as for any other application.
Figure 23: Print Options
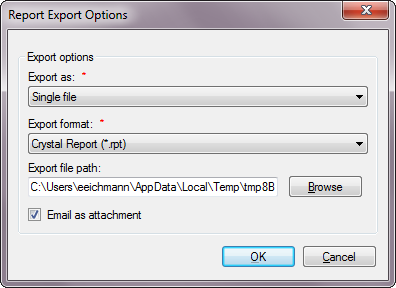
Export to File
Selecting Export will open a Report Export Options window, which provides multiple options for saving and sending the report output electronically.
Figure 24: Report Export Options
The options in this window will allow you to specify how you want the output to look, and where you want it to be saved and/or sent.
Export as. Select from the drop-down menu how the results should be grouped.
Single file. This option will result in one file with all the results, organized as specified in the report options sections.
Separate file for each group. This option will yield the same results, but separated into multiple files. This allows you to take a larger data set and divide it out by specified criteria without running multiple reports.
If this option is selected, clicking OK will open the Export Grouping Selection box, allowing you to select and order the grouping criteria for the export files.
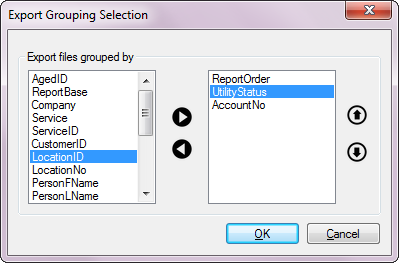
Figure 25: Report Grouping Selection
Move the item(s) by which you need to group results from the list on the left to the box on the right. Highlight the items in question and use the left/right arrows to move them back and forth between the boxes. Use the up/down arrows next to re-order the selected criteria.
Export format. Select the applicable format from the drop-down menu. The available file types include:
o Adobe Acrobat (.pdf) |
o Rich Text Format (.rtf) |
|---|---|
o Microsoft Excel (.xls) |
o Crystal Report (.rpt) |
o Microsoft Excel Data Only (.xls) |
o XML (.xml) |
o Microsoft Word (.doc) |
o CSV (.csv) |
Export file path. Either type the location for the file or click Browse to open an Explorer window to enter the correct location. You may select an existing location/folder or you can create a new one.
Email as attachment. If this box is checked on, clicking OK will open a new message in your e-mail program, with the created file(s) attached. You can then enter the recipient(s) for the file, and send the message as you normally would. Note that this is in addition to creating the files in the specified location.