Inventory Setup and Configuration
UMS Inventory Item Type
An Inventory Item Type describes the characteristics and properties of an item in inventory. The configuration of the Inventory Item Type determines how individual items of the type are used by UMS.
Setup>Company>Setup Inventory Item Type
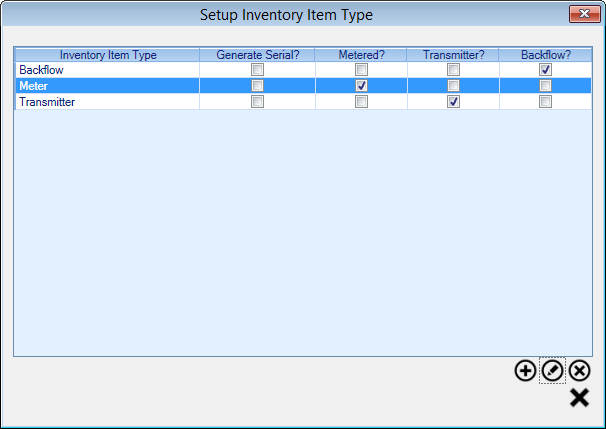
Figure 227: Setup Inventory Item Type
The Setup Inventory Item Type screen displays the Inventory Item Types that are setup for the current company. From this screen you can add a new Inventory Item Type, edit or delete an existing Inventory Item Type using the buttons below the grid.
Click on the Add Icon to create a new Inventory Item Type
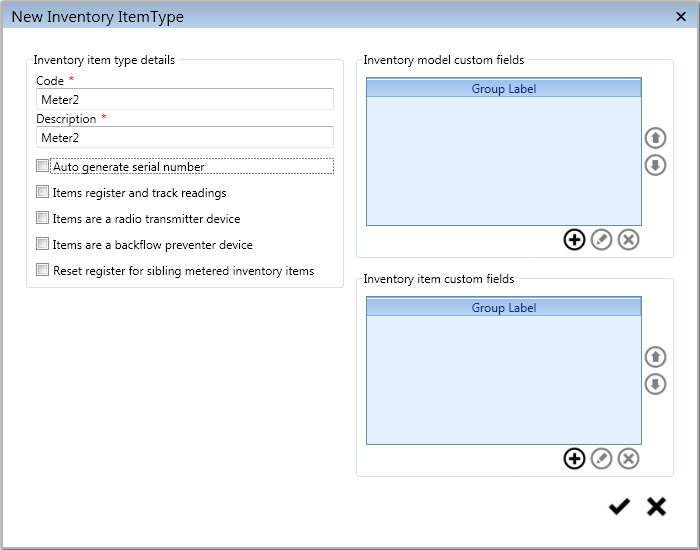
Figure 228: New Inventory Item Type
Code |
|
||
|---|---|---|---|
Description |
More descriptive name for the Inventory Item Type. Allows up to 25 characters. |
||
Auto generate serial number |
When checked, individual item serial numbers are automatically generated when adding new items to inventory. This is especially useful when you have inventory items that do not contain their own serial number from the manufacturer. The generated serial number is a combination of the Code and a counter for the Inventory Item Type left padded with zeros to 12 characters. Example auto generated serial number: MTR000000123456 When unchecked, the serial number for individual items is keyed in when the item is added to inventory. |
||
Items register and track readings |
When checked, the inventory items associated to this type act as a metered device and additional settings are enabled for inventory models and items to track meter specific information such as meter size, dials, unit of measure and multipliers. |
||
Items are a radio transmitter device |
When checked, the inventory items associated to this type behave as a transmitter and additional settings are enabled for inventory models and items to track additional transmitter information such as transponder and frequency. |
||
Items are a backflow preventer device |
When checked, the inventory items associated to this type act as backflow prevention devices. Additional inventory model and item settings related to assembly type, testing, hazard level and isolation condition become enabled. |
||
Inventory model custom fields |
Allows you to define extra custom fields to track additional information about inventory models that UMS does not track out of the box. The Add and Edit buttons will launch another screen for managing a set of custom field. The delete button will remove the set of custom fields from this Inventory Item Type. See the Custom Fields article for additional details. |
||
Inventory item custom fields |
Allows you to define extra custom fields to track additional information about inventory items that UMS does not track out of the box. The add and edit buttons will launch another screen for managing a set of custom field. The delete button will remove the set of custom fields from this Inventory Item Type. See the Custom Fields article for additional details. |
||
Reset register for sibling metered inventory items |
When checked, changeouts of this item will require that meters in the same inventory location (or box) be read and have a “reset value” entered. The “reset value” reads will not register any usage, they simply reset the meter to a new starting point. |
UMS Inventory Model
This series of forms allows the user to setup Inventory Models that correspond to UMS Inventory Item Type. Go to Setup>Company>Setup Inventory Model to access the Setup Inventory Model screen.
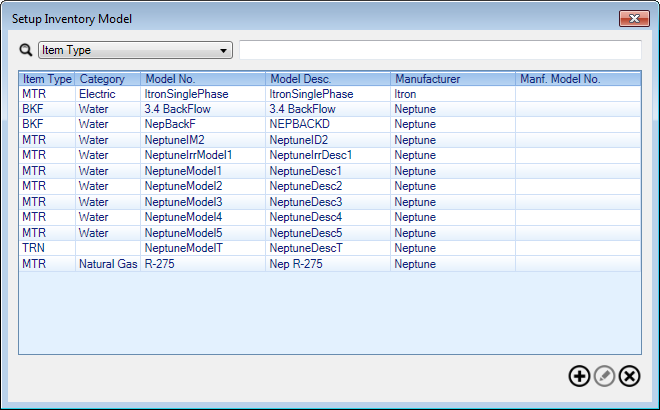
Figure 229: Setup Inventory Model
Click on the Add Icon
 to add a new Inventory
Model
to add a new Inventory
Model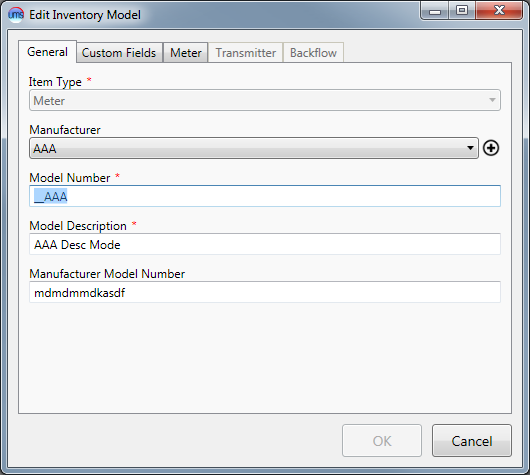
Figure 230: Edit Inventory Model
General tab
Item Type: Select Item Type
Manufacturer: Select/Add Manufacturer
Model Number: Edit Model Number
Model Description: Edit Model Description
Manufacturer Model Number: Edit Manufacturer Model Number
Custom Field tab
Custom field(s) can be added when you Setup Inventory Item Types
Enter information into the field, if available and as needed
Meter tab
This tab is only available when the Item Type on the General tab is set to Meter.
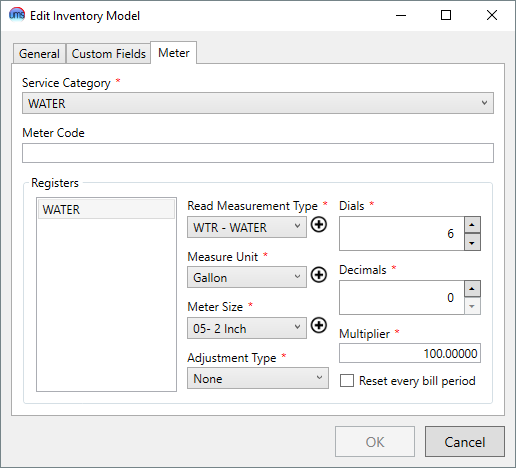
Figure 231: Edit Inventory Model – Meter
Service Category: Select Service Category
Meter Code: Edit Meter Code (not required)
Register: Add/Remove Registers
Read Measurement Type: Select/Add Read Measurement Type
Measure Unit: Select/Add Measure Unit
Meter Size: Select/Add Meter Size
Adjustment Type: Select Adjustment Type
None – The standard will be the number 1.00000
Multiply – The Adjustment will multiply the usage by this number
Barometric Pressure – The calculation is (Barometric Adjustment Factor=14.4+(Meter Adjustment Number/10000/14.65
Dials: Edit Dials (1 to 10)
Decimals: Edit Decimals (0 to 5) – Only if the meter reads with decimals
Multiplier: Edit Multiplier – The usage will be multiplied by this number
Reset every bill period: If checked, readings will go back to 0 after each bill
Transmitter tab
This tab is only available when the Item Type on the General tab is set to Transmitter.
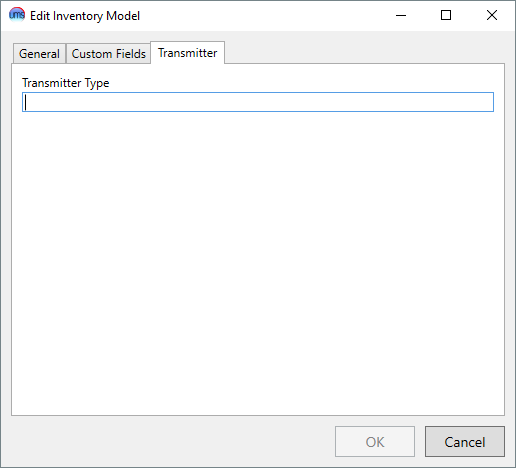
Figure 232: Edit Inventory Model - Transmitter
Enter Transmitter Type as needed
Backflow tab
This tab is only available when the Item Type on the General tab is set to Backflow.
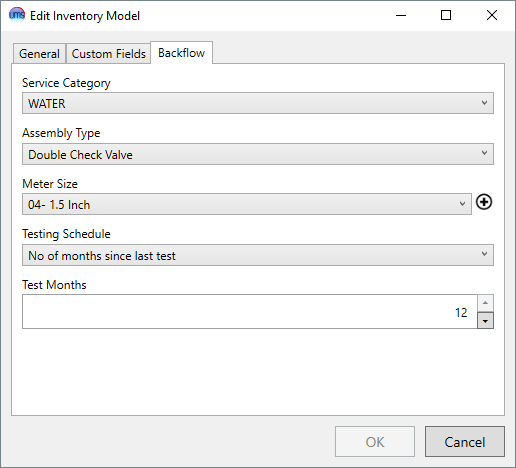
Figure 233: Edit Inventory Model - Backflow
Service Category: Select Service Category
Adjustment Type: Select Adjustment Type
Meter Size: Select/Add Meter Size
Testing Schedule: Select Testing Schedule
Test Months: Select Test Months
Create Inventory
A new workflow has been added to the Mass Add Inventory Item Wizard that allows users to import inventory items via a CSV file. This will help save time for users that receive a list of transmitters/meters from a manufacturer in CSV format.
Go to MANAGEMENT Menu>Inventory
Figure 234: Inventory Management Screen

Filter or Search the meter inventory with Item Type, Manufacturer, Manufacturer Model No., Manufacturer Serial No., Model Description, Model No. or Serial No.
Add, Edit or Delete Icons 
Add will open the Mass Add Inventory Item Wizard screen
Edit will open the Edit Inventory Item screen
Delete will allow an individual item to be deleted if it is not attached to a location
Configuration
As part of this new workflow, a configuration has been added to UMS that will allow users to import transmitters and meters, meters-only, or transmitters-only.
The default format supports a CSV file that has a list of transmitter serial numbers in the first column and a list of meter serial numbers in the second column. The names of the CSV columns do not matter; however, the configuration file must have a mapping name of “TransmitterNo” for the first field and “MeterNo” for the second field.
In order to modify the default configuration to support a transmitter-only import, the section (indicated by ums:Section in the configuration file) must have a Length property of 1. The default configuration has a Length of 2 to support the two column format. There should also be only one field nested under the section (indicated by ums:Field). This field should have a MappingName of “TransmitterNo” and a StartingPosition of 0.
A meter-only import configuration will be set up exactly as the transmitter-only import configuration above, with the difference being the field MappingName being set to “MeterNo”.
Welcome Screen
A welcome screen has been added to the Mass Add Inventory Item Wizard to allow the user to select one of two workflows.
The user can choose the Manually Add Item option in order to proceed with the original workflow of the Wizard. This involves selecting an inventory item type, selecting properties of the item, and finally entering a sequence of serial numbers.
Choosing the Import Inventory Items option will walk the user through importing a list of serial numbers via a CSV file. Depending on the type of configuration that is set up, the user will be required to set up transmitter and meter properties, meter-only properties, or transmitter-only properties.
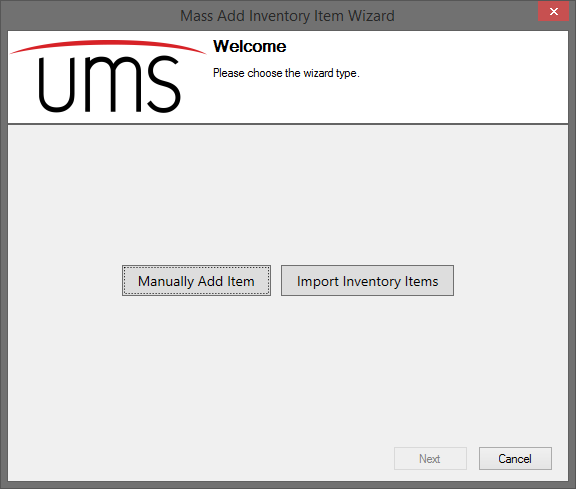
Figure 235: Mass Add Inventory Item Wizard Welcome Page
Import Start Screen
The Import Start screen allows the selection of pre-defined types for both the transmitter and meter setups that are to be used in creating the inventory items from the CSV import file. Types that have the transmitter flag checked from the Setup Inventory Item Type screen will appear in the Transmitter Item Type selection. Types that have the metered flag set will appear in the Meter Item Type selection. The Date Received is the date that the inventory items were given to the user. This date will be applied to both transmitters and meters that are imported from the CSV import file.
If a transmitter-only configuration is used in when importing inventory items, the Meter Item Type selection will no longer be shown. A meter-only configuration will likewise hide the Transmitter Item Type selection.
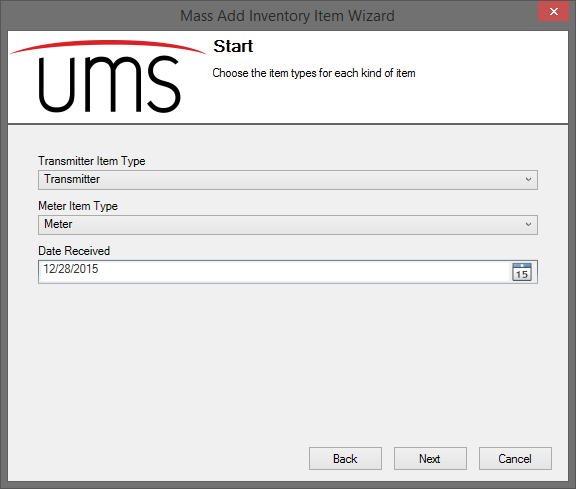
Figure 236: Mass Add Inventory Item Wizard Import Start Page
Common Setup Screens
The Import Inventory Items workflow will go through the following screens that behave exactly as in the Manually Add Item workflow. The common setup screens for the three supported configurations are as follows:
The default configuration (transmitter and meter) will go through the Transmitter Model, Transmitter Specific Info, Transmitter Notes, Meter Model, Meter Register Info, and Meter Notes screens.
The transmitter-only configuration will go through the Transmitter Model, Transmitter Specific Info, and Transmitter Notes screens.
The meter-only configuration will go through the Meter Model, Meter Register Info, and Meter Notes screens.
Import File Screen
The Import File screen has been added to the Wizard to allow the user to select the path to the CSV file to be imported. Clicking the Browse button will open a file dialog where the user can select one CSV file to be imported. Currently, only CSV format is supported by the import process. The user can also indicate via the My file has headers option whether or not the selected CSV file has column headers. By default, this option is checked and will ignore the first row in the CSV where the headers are located.
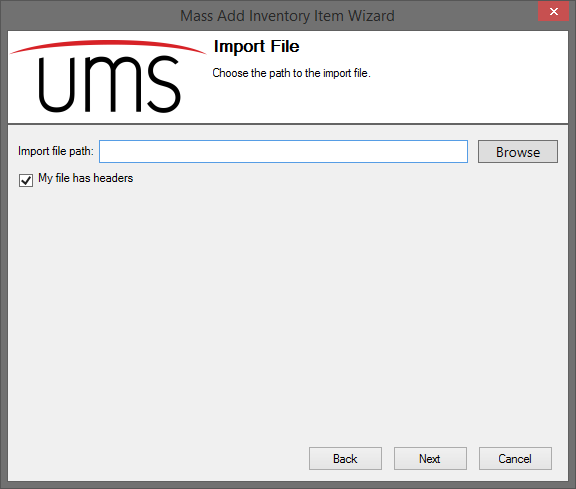
Figure 237: Mass Add Inventory Item Wizard Import File Page
Finalize Screen
The Finalize screen of the Wizard has been modified in order to support both the Manually Add Item and Import Inventory Item workflows. Following the manual workflow, this screen will behave as it did prior to the new import feature. Following the Import Inventory Item workflow will display the following changes:
The Quantity field will be disabled and will instead display the number of records that were pulled from the selected CSV file.
The Sequence Generator section is removed to allow more room to display the imported records.
Users can modify serial numbers directly as they were able to do in the previous workflow. However, adding and removing inventory items on-the-fly has been disabled while following the import workflow due to having mixed inventory item types (transmitters and meters). In order to add/remove items from the list, the user has the option to go back to the previous screen (Import File screen) and either select a new CSV that has the new records added/removed or to modify the same CSV to have more/fewer records. Moving back to the Finalize Screen will re-import the CSV with the modified records.
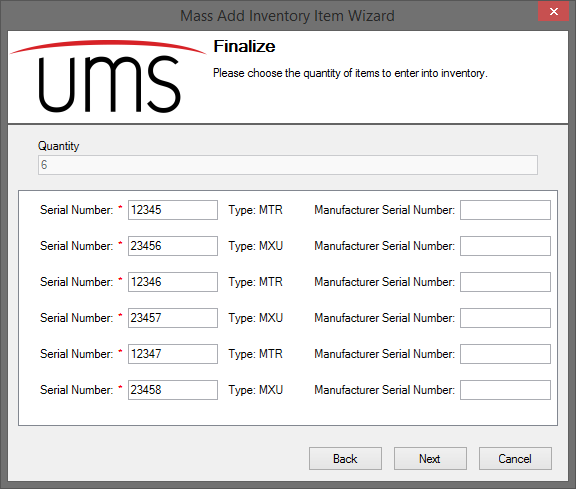
Figure 238: Mass Add Inventory Item Wizard Finalize Page
Success Screen
The Success screen has been modified to better display the list of inventory items that were created during both workflows. By default, this screen will display a collapsed list of inventory items with the inventory item type and the items serial number.
In order to see details of a given inventory item, the user can click the expand icon next to the left of the item’s description. To expand all of the items at once, the user can click the plus icon (+) located under the list of imported items. To collapse all of the items, the user can click the minus icon (-) located under the list of imported items.

Figure 239: Mass Add Inventory Item Wizard Success Page - Collapsed
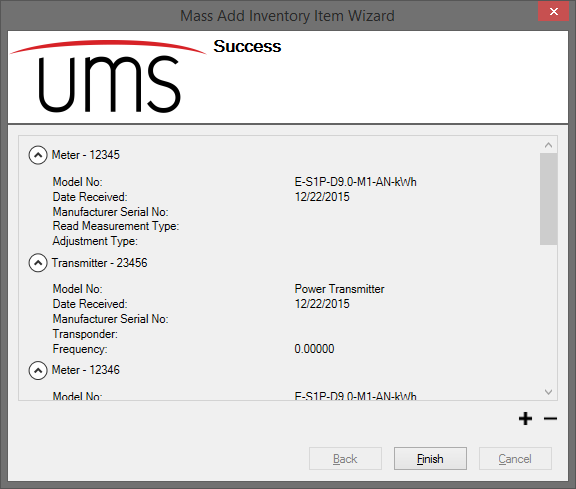
Figure 240: Mass Add Inventory Item Wizard Success Page - Expanded