Scheduled Task Automation
The Automated File Exchange provides the ability to schedule tasks, allowing users to automate Import/Export tasks from UMS.
Security Permissions
In order to schedule the Automated File Exchange, users need to have Administrator privileges.
Setup
This feature is accessed by going to MANAGEMENT>Automated File Exchange.
Configuration
The Setup Scheduled Task screen allows users to add, edit, and delete scheduled tasks. The setup screen lets the user know the type of scheduled task and whether it is export or import.
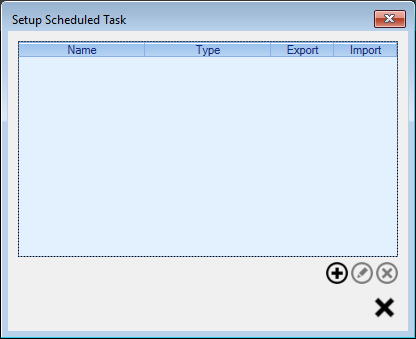
Figure 625: Setup Scheduled Task
A new task may be added by selecting the
 icon
iconAn existing task may be edited by selecting the task from the list and clicking the
 icon or by double clicking the task
An existing task may be deleted by selecting the task from the list and clicking the
 icon
iconOnce you click the
or the icon the Edit
Scheduled Task screen will display.
The top section of the Edit Scheduled Task screen includes task type information.
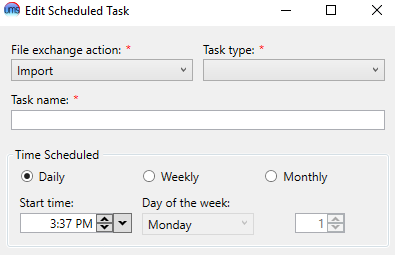
Figure 626: Scheduled Task Edit
File exchange action: Select Import or Export
Task type: Options differ based on the File exchange action.
Import options:
Lockbox
Readings
Export options:
Database Query
Once these are set users cannot edit them.
Task name: Enter the desired task name.
Time Scheduled: Select the desired frequency for the Scheduled Task to run.
Daily
Weekly
Monthly
Start time
Day of the week (if Weekly)
Number of occurrences (if Monthly)
The Task Details section allows users to configure the source or destination of the import/export file, as well as task-specific configurations.
General tab
Exchange Method: Users select from the following file exchange methods
File: Users are prompted to provide a file path.
FTP, FTPS, SFTP: Users are prompted to provide Host Name, User Name, Password and the File Path in the FTP server.
Test Connection button allows users to test Host Name and credentials
With Export as the File exchange action, the Create Timestamp check box allows users to create export files with timestamp appended. The timestamp suffix is formatted as yyyyMMddHHmm-A-B, where A is the unique ID of the file exchange, and B is the sequential number of the exported table.
Configuration Tab
Options will differ, based on the selected task type.
Import tasks:
Lockbox: Select the Lockbox Format and Import payment as from the drop downs.
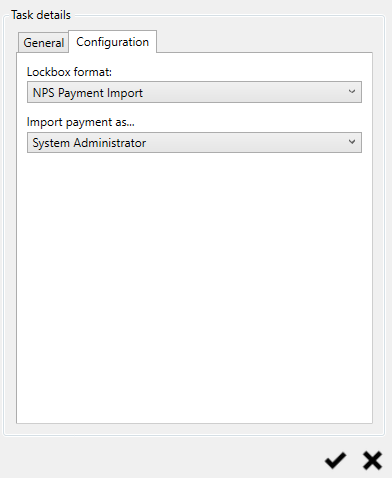
Figure 627: Scheduled Task Configuration – Import/Lockbox
Readings:
Export tasks:
Database Query:
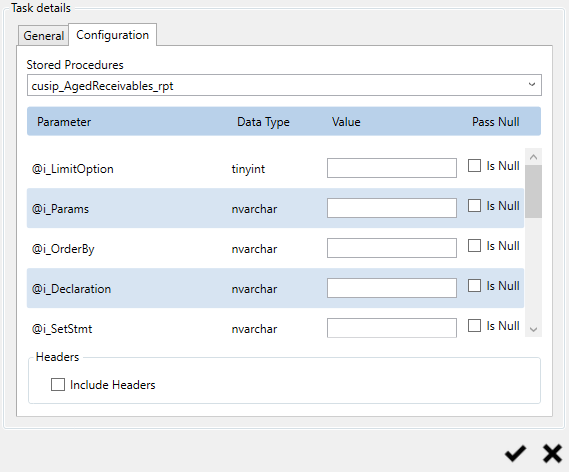
Figure 628: Scheduled Task Configuration – Export/Database Query
Select the desired stored procedure to execute in the Stored Procedures field.
Enter parameter values for the selected stored procedure in the Value column of the list.
Select the Is Null checkbox to pass NULL as the parameter value.
Select "Include Headers" to include the column headers on the export file.
Input custom "Delimiter" if another delimiter is desired. Example pipe delimiter "|".
Select "Unix End of Line" if Unix end of line character is needed.
Click the
 icon in the bottom right of the Edit Scheduled
Tasks screen once the task information is complete.
icon in the bottom right of the Edit Scheduled
Tasks screen once the task information is complete.Reports:
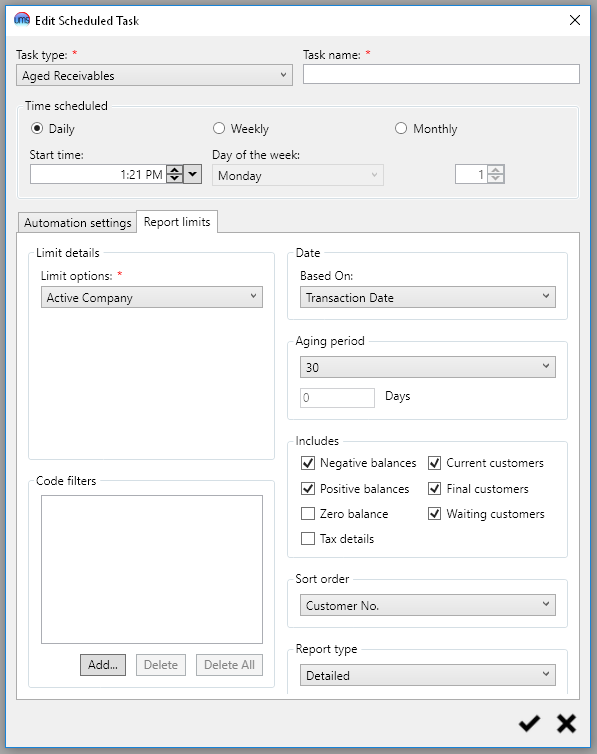
Figure 629: Scheduled Task Configuration - Aged Recievables
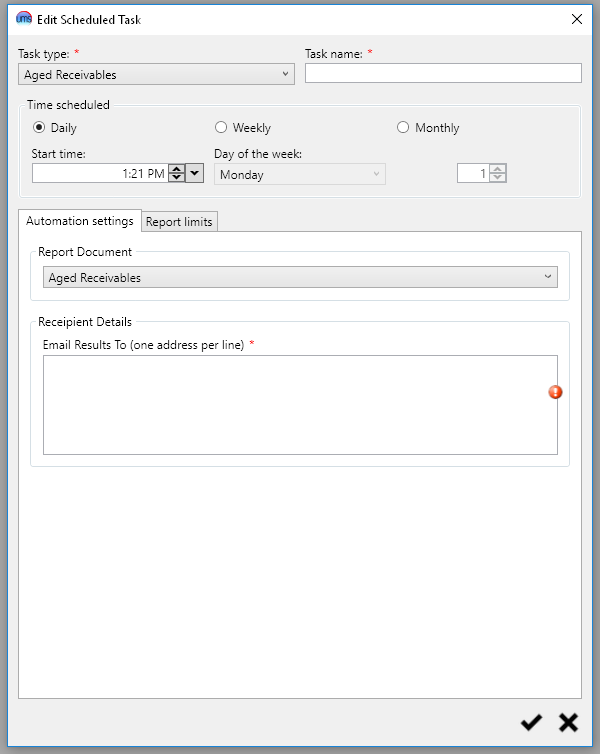
- Select the desired report type.
- Current Support Types
Aged Recievables
Enter recipient email addresses (one email address per line).
- Click the Report Limits tab and select the desired report form limits.