Payment Management
Payment Form
The Payment entry form is recently redesigned to allow users to enter payments to multiple accounts using multiple payment methods.
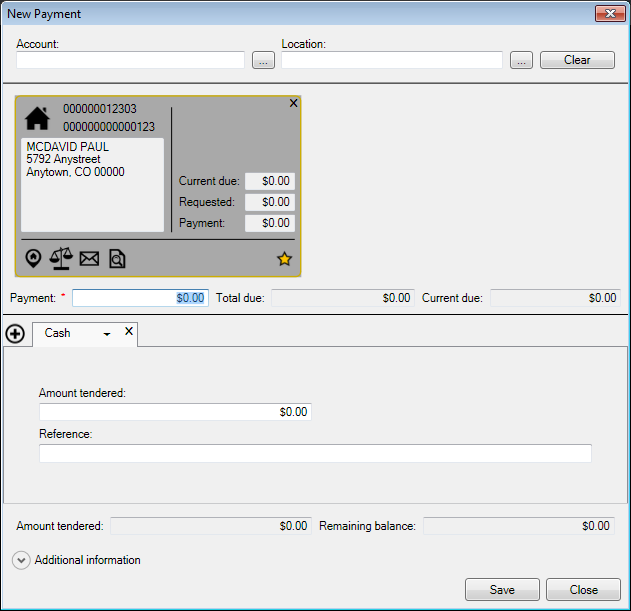
Figure 483: Manual Payment (New Payment) Form
Payment Definitions
Customer/Account Information Card - Because multiple accounts can now be paid in a single transaction, each customer account’s information is displayed in a card format, similar to a contact card in Outlook.
Information Card IconsSeveral icons may appear on the Customer/Account information card.
In the upper left corner:
 Individual/personal account
 Business account
On the lower left side of the card footer:
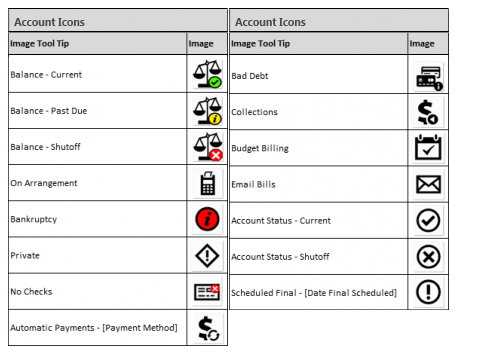
Figure 484: Account Card Icons
On the lower right side of the card footer:
 Payment source accounts
Example Information Cards
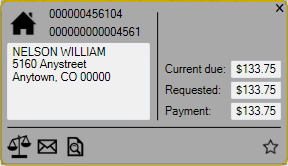
Figure 485: Customer Information Card with Unposted Payments
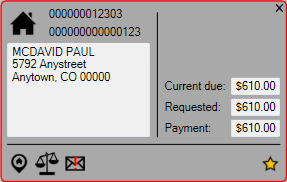
Figure 486: Customer Information Card with Payment Center Notes
Example Payment Notes
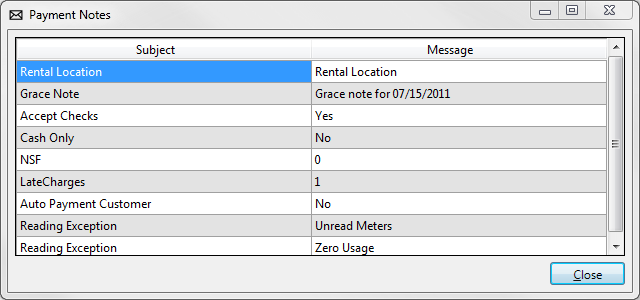
Figure 487: Example of Payment Center Notes
Payment Application Mode - Defines how the total payment gets applied to each account and/or service balance in the payment transaction. ‘Automatic’ applies the payment based on the defined payoff order, and is the most commonly used application mode. ‘Manual’ allows the user to determine which balances are being paid.
Payment Method - The type of payment instrument used. For example: Cash, Check, Money Order, or Credit Card.
Payment Source Customer - Identified by a gold star in the lower right hand corner of the Customer Information Card. The Payment Source Customer represents the account making the payment and is the first account to which payments are applied when using the Automatic Payment Application Mode. The first account added to the payment transaction is flagged as the Payment Source Customer, but the user may change the payment source by clicking the star on one of the other account information cards.
Payment Form Keyboard Shortcuts
Several keyboard shortcuts are available to maximize the amount of time a user’s hands can remain on the keyboard.
ALT + Combinations:
ALT + A - Open the Additional Information section
ALT + C - Close the New Payment entry form
ALT + L (or ESC) - Clear the New Payment entry form
ALT + S - Save the payment transaction
CTRL + Combinations:
CTRL + (1 - 9) - Focus on a specific Payment Method; the number refers to the payment method’s place in the selection list
CTRL + SHIFT + 1 - Select existing Cash payment method or add a new Cash payment method to the transaction.
CTRL + SHIFT + 2 - Add a new Check payment method to the transaction
CTRL + SHIFT + 3 - Add a new Credit Card payment method to the transaction
CTRL + N - Add a new payment method to the transaction
CTRL + S - Save the payment transaction
CTRL + W - Delete the selected payment method from the transaction
CTRL + Delete - Delete the first customer information card from the payment transaction (left-most card)
CTRL + SHIFT + Delete - Delete the last customer information card from the payment transaction (right-most card)
Function Keys:
F2 - Place focus on the Account Number field
F3 - Place focus on the Location Number field
F4 - Place focus on the Payment Amount field
F5 - Reload the customer information cards
F6 - View the service balance of the Payment Source Customer
F7 - View system notes of the Payment Source Customer
F8 - View unposted payments of the Payment Source Customer
F9 - Open the Customer Control Panel to the Payment Source Customer’s account
Space Bar:
When an area label is in focus, such as the Additional Information section, use the Space Bar to open that area to tab through and edit the additional fields.
Tab Order:
Tabbing moves the focus from one field to the next in logical order. When a button is tabbed onto, it is highlighted and pressing Enter will press the button.
Payments to Multiple Accounts
Payments can be created for multiple accounts in a single transaction.
Launch the New Payment form from Payment> Manual Payments
Enter the first account number, or use the  button to search
for the customer
button to search
for the customer
The Customer Information Card will appear, with the basic account information
Focus will shift to the Payment Amount field beneath the Customer Information Card. Do not enter a Payment Amount until all accounts have been added to the transaction
Press F2 to return focus to the Account No field, or F3 to return focus to the Location No field
Enter or search for the next customer account
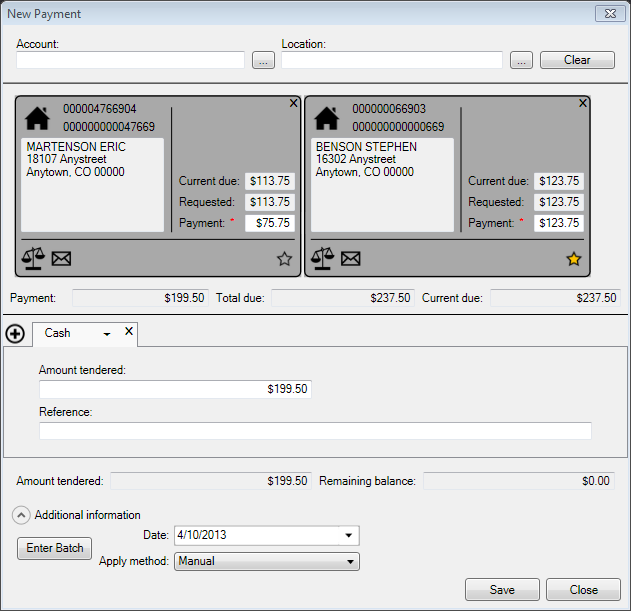
Figure 488: Payments to Multiple Locations
Press CTRL + A to open the Additional Information section
Click Enter Batch to open Batch Management for batch selection
Change the Apply Method to Manual. This will open the Payment Amount fields on each Customer Information Card
Press F4 to move focus to the Payment Amount field on one of the cards
Enter the Payment Amount and tab to the Payment Amount field on the next form
Pressing Tab in the Payment Amount field of the final Customer Information Card will move focus to the Payment Method selection list
Use the Up and Down Arrows to scroll through the list of Payment Methods. Tab or Enter to move to the next field
Enter the Amount tendered for this payment method
Enter a Reference (optional)
To add another Payment Method, click the Add button and repeat steps 6 through 8
The total amount tendered and the Customer’s change will appear in the fields near the bottom of the form
Press CTRL + S or click Save to save the payment transaction
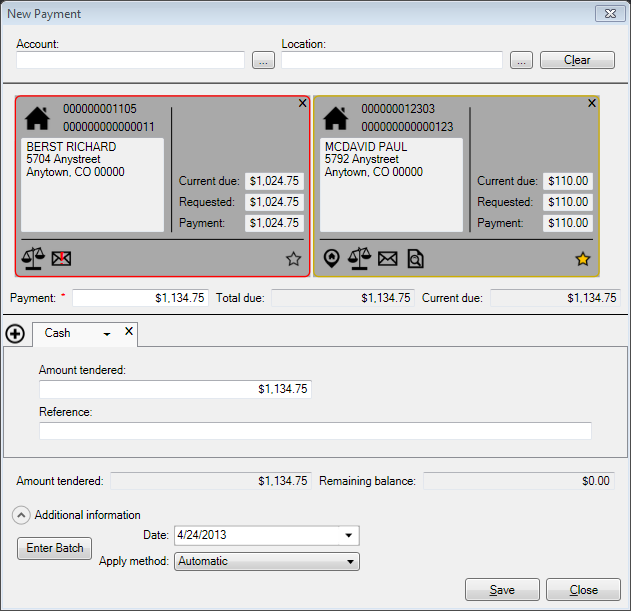
Figure 489: Payments to Multiple Accounts - Additional Information Section
Payment Distribution
This feature allows for one transaction for multiple bill locations by a Bill Group. With this enhancement, users can distribute payments at the transactional level, show location number on bill group payments, pay/clear buttons and keyboard shortcuts to make common actions easier, enter key during applied amount edit moved to next row while maintaining column, total applied shows running tally of how much money has been applied, and location totals for bill group payments.
To utilize this feature, click Payment on either the CCP (bottom center of the panel) or at the top of the main Menu bar. Set the Apply Method to Manual then click the Service Balance icon on the payment card.
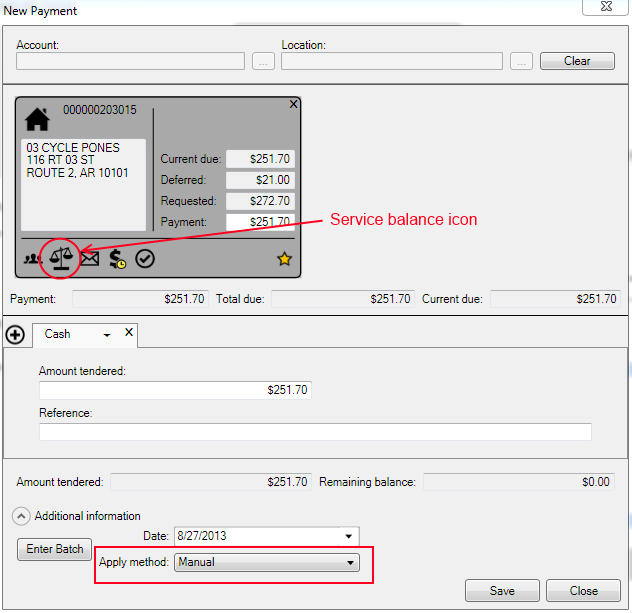
Figure 490: Payment Screen for Payment Distribution
Editing the Payment Distribution Screen:
Users can edit the how the payment will be distributed among the charges. When using Manual or Transaction methods, an additional column appears with two buttons—Pay (the check mark) and Clear (the X). Clear resets the applied amount to zero. Pay sets the applied amount to the lesser of the row’s Current Due and Total Applied.
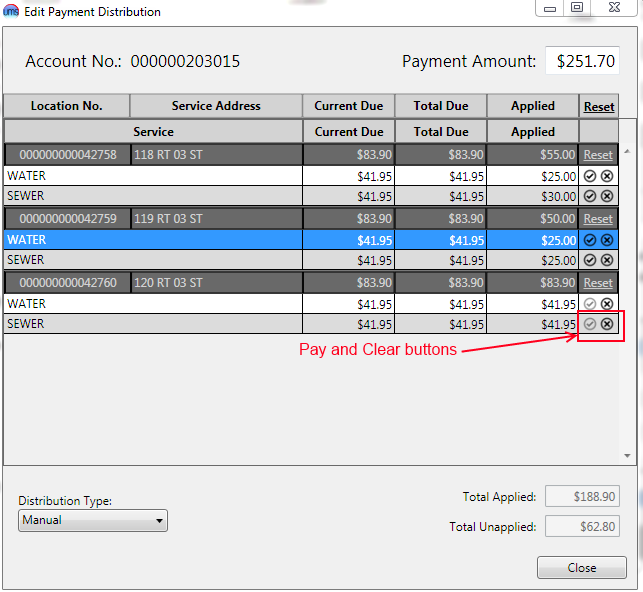
Figure 491: Edit Payment Distribution
Distribution Types:
There are four methods of applying a payment on UMS; Automatic, Manual, Percentage, and Transaction. Transaction is the most recent addition and will be featured here. To access the Transaction method, select Transaction from the Distribution Type drop-down menu.
Transaction Distribution: Allows the most flexibility in distributing a payment. Transaction Distribution gives access to apply payments to individual transactions so that payments can be applied, or spread around, with the greatest level of control.
Transactions cannot be overpaid
Any unapplied amount will be automatically distributed according the payoff order
Payment by Credit Card
One Time Credit Card Payment
Open the New Payment form from Payment> Manual Payment
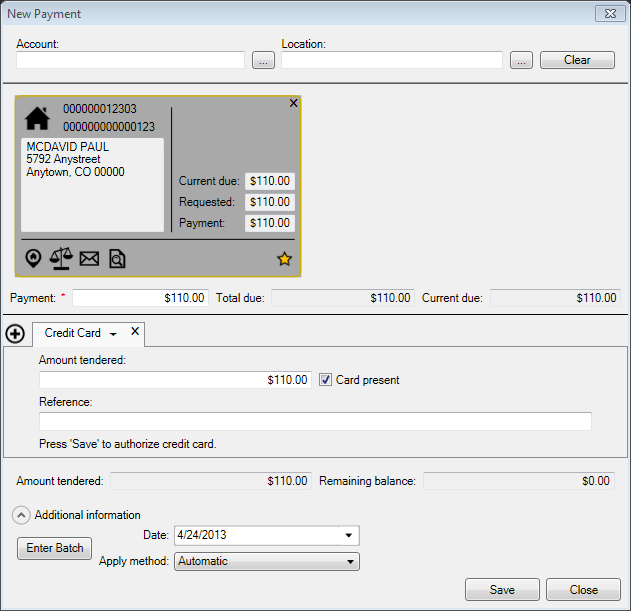
Figure 492: Making Payment with a Credit Card
Enter the payment details - billing account, amount, reference, payment method - in UMS
Click Save, the hosted payment form will open in a browser window displaying the payment amount
For Card not present transactions, enter the required card details directly to the hosted payment form. For Card present transactions, approved swipe devices submit card details directly to the form
Click Process Payment
If the payment is approved, the hosted payment form will close and focus returns to the New Payment form in UMS
If the payment cannot be processed, an error message will be returned. Often, the user will have an opportunity to try again from the hosted payment form
To cancel the payment attempt, close the hosted payment form using the X in the upper right corner of the browser window. Focus will return to UMS and a message that “Payment has been canceled” appears
Recurring Card Payments
Use the CUSI Card Tokenization Conversion Tool to replace card data with tokens in the database
Process recurring payments from the Payment Wizard. See the Recurring Card Payments section of this document
Payment Reversals
Reverse and NSF transactions have been updated to work with the recent changes to payment.

Figure 493: Payment Reversals from the Customer Control Panel
Both functions are still accessible from the control panel toolbar while reviewing a customer’s Transaction History.
Creating NSF’s
To initiate an NSF transaction, select the Payment transaction to be reversed, and click NSF. The Select Payment Methods screen will display.
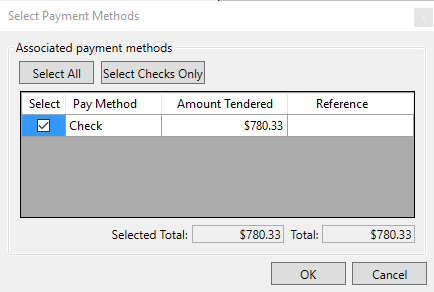
Figure 494: Creating NSF’s
Select the payment method. A reference can be entered, but is not required.
Click OK
The Add NSF screen will open.
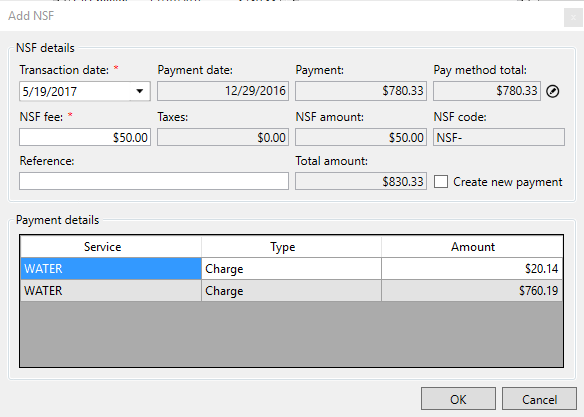
Figure 495: Add NSF
Select the Transaction Date
Verify the NSF Fee. This can be edited if necessary
If taxes apply, they will appear in the NSF Tax field (labeled ‘NSF Code’ in the graphic).
Enter a Reference
In the Breakdown of NSF, the payment is displayed as it originally applied to the account. Specific parts of the payment can be deselected if they are not being returned
Click OK to save the transaction
Creating Payment Reversals
To create a payment reversal, select a payment transaction and click the Reverse button. The Reversals Wizard will open.
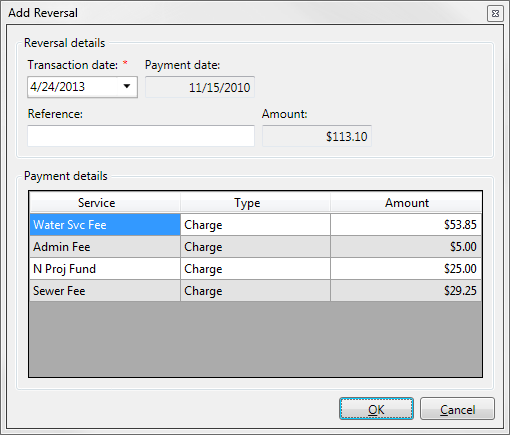
Figure 496: Add Reversal
Select the Transaction date of the reversal
Enter a Reference for the transaction
The Payment details grid will show how the payment originally applied
Click OK to save the reversal transaction
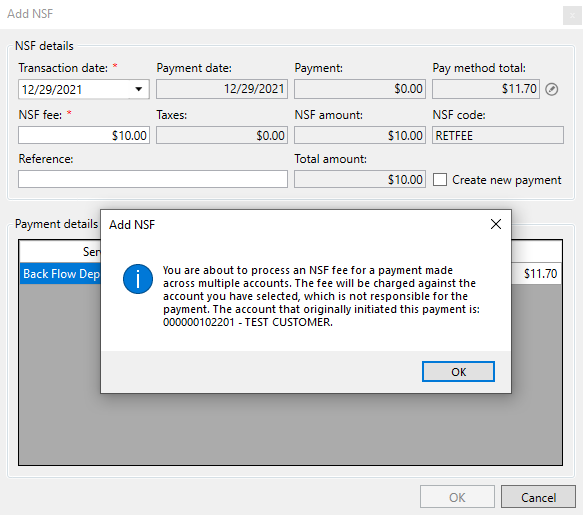
Reversals of Multiple Account Payments
NSF transactions against a multiple account payment will create an NSF fee to the account from which the NSF transaction was generated. For example, if a payment is created to accounts 1, 2, and 3 as part of the same transaction and account 1 was selected as the Payment Source Customer:
If an NSF transaction is created from account 1, then the NSF fee will be charged to account 1
If an NSF transaction is created from account 2, then the NSF fee will be charged to account 2
If an NSF transaction is created from account 3, then the NSF fee will be charged to account 3
If all three accounts are paid via the same pay method, all three payments will be reversed
If each account is paid via a different pay method, the user may select which pay method totals to reverse
Note: In the event that the NSF fee is being processed on an account that was not responsible for creating the original payment (like accounts 2 and 3 in the example above), a dialog will be displayed stating that the account being charged the fee is not responsible for the payment, along with account information for the customer that initiated the associated payment.
Reversals of Multiple Method Payments
When an NSF is processed accessed a payment that used multiple methods, the user may select to NSF any or all of the available pay method portions of the payment.
Select the multiple-method payment from transaction history, and then click NSF to launch the NSFs Wizard. The first form will ask the user to Select Payment Methods
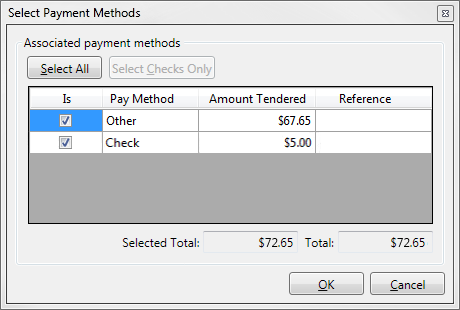
Figure 497: Select Multiple Payment Methods for NSFs
Select All flags all available portions of the payment as NSF
Select Checks Only will deselect any portion of the payment that was not made via (personal) Check
The user can also manually select or deselect additional portions of the payment
Once the selections are made, click OK. The Add NSF form will open
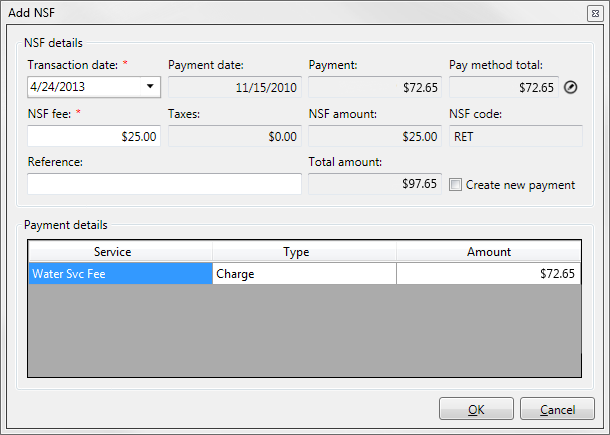
Figure 498: Add NSF - Payment Details
Set the Transaction Date
The Payment Date displays the day on which the payment was originally recorded
The Payment Amount shows the total amount of the payment
The Pay Method Total shows the amount of the payment that is being returned NSF
The NSF Fee shows the default NSF Fee amount. This can be manually edited if necessary
Taxes display the amount of tax for the NSF Fee
NSF Amount is the total amount being charged - Fee plus Taxes
NSF Code is the code or abbreviation of the NSF fee setup
Enter a Reference if needed
Total Amount should display the total amount of the NSF Reversal being created and applicable Fees and Taxes
Select Create New Payment to open the payment window when the NSF is saved
If only a portion of the total payment is returned, the user MUST create a new payment and this option will be selected and not editable. The payment window will open with the remaining payment methods in place so only the returned portion must be re-entered, or the total payment amount edited to reflect the loss of the check portion of the payment. In Transaction History, the Payment Reversal will be for the full amount of the original payment, and a new Payment will be posted at the same time to offset the non-returned portion.
Recurring Payments
Several changes were made to the Recurring Payments (ACH and Credit Card). Companies may now have multiple ACH configurations, the configuration setup has been separated from the file processing, and the file processing now uses a wizard.
ACH Configuration
Company ACH details are now configured from the Setup menu, at Setup>Company>Configure ACH. Additional profiles for specific Communities are added in the same location.
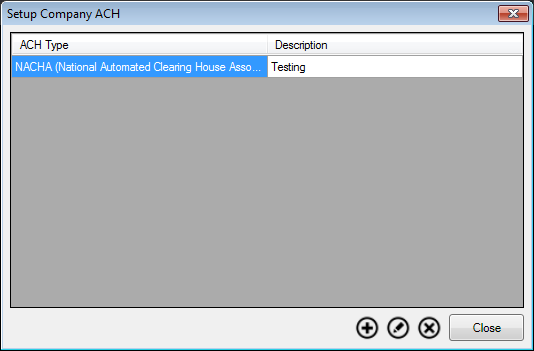
Figure 499: Setup Company ACH
Click Add
 to add a new ACH profile to the Company
Select whether the format is NACHA or NPS
Enter a Description for the profile; this is how it will be listed in the Payment Wizard for ACH processing
Enter the File Information:
For NACHA: ACH Operator Routing Number, ACH Operator Name, Sending Bank Routing Number, Sending Bank Name, Reference Code, Billing Company Tax ID, and Company Name. Deposit Record Information is only required if a deposit record should be created in the ACH File
For NPS: Control ID, Satellite ID, File Type, Merchant Number, Merchant Name, Transaction Type, Transaction Method, Control ID
If additional Header and/or Footer information is required, use the Optional File Information tab to set the additional information
Click OK to save the profile. Repeat for each profile to be used for this company
ACH Processing
ACH and Recurring Card payments are now processed via the UMS Payment Wizard. Access the wizard from Payment>Payment Wizard.
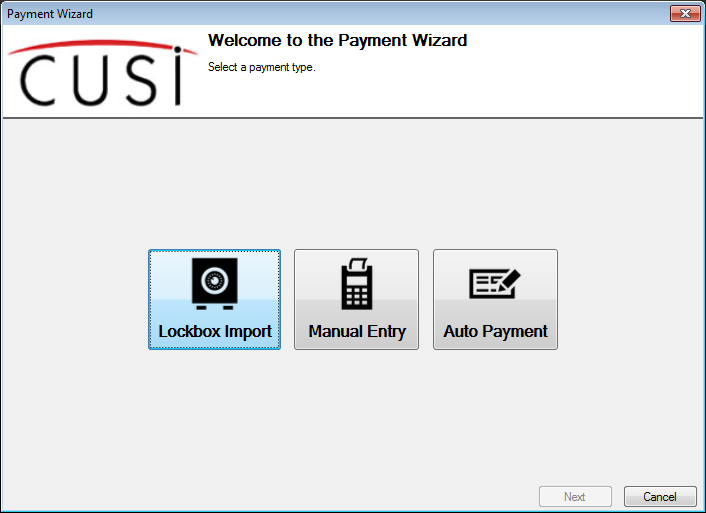
Figure 500: UMS Payment Wizard
Open Payment Wizard
Click Auto Payment
Click Next

Figure 501: Auto Payment Wizard - Bank Drafts
Use the
 button to open Batch Management and create or
select a batch for the Auto Payments
button to open Batch Management and create or
select a batch for the Auto PaymentsFrom the Action list, select Bank Drafts
Click Next
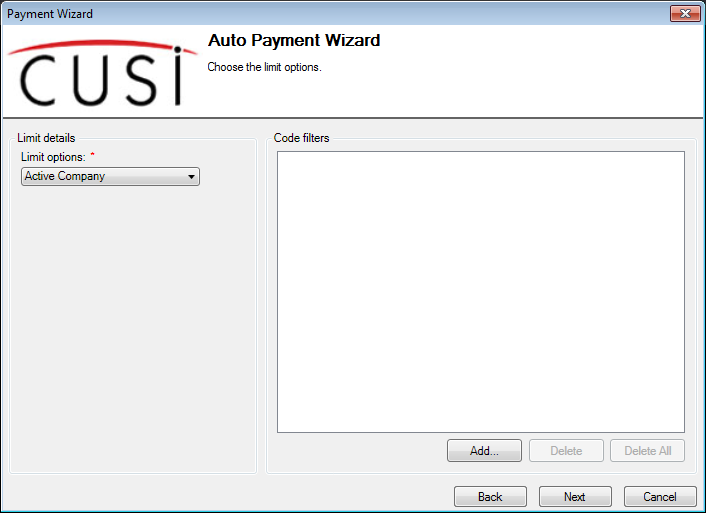
Figure 502: Auto Payment Wizard - Limit Options
Set the Limit Options and apply any necessary Code Filters for this batch of Auto Payments
Click Next
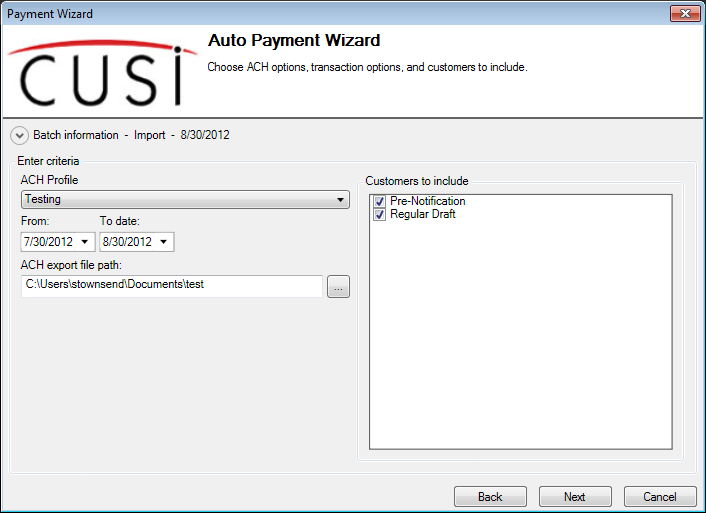
Figure 503: Auto Payment Wizard - Batch Information
Select the ACH Profile to use for this payment batch
Enter the From and To date
This limits the returned accounts to only those which have had a charge transaction within the date range
These dates can be used to help limit a batch of auto payments to a particular set of final-billed accounts
Enter or browse to the ACH export file to set the file path
Select which Customers to include - Pre-Notification, Regular draft, or both
 Click Next
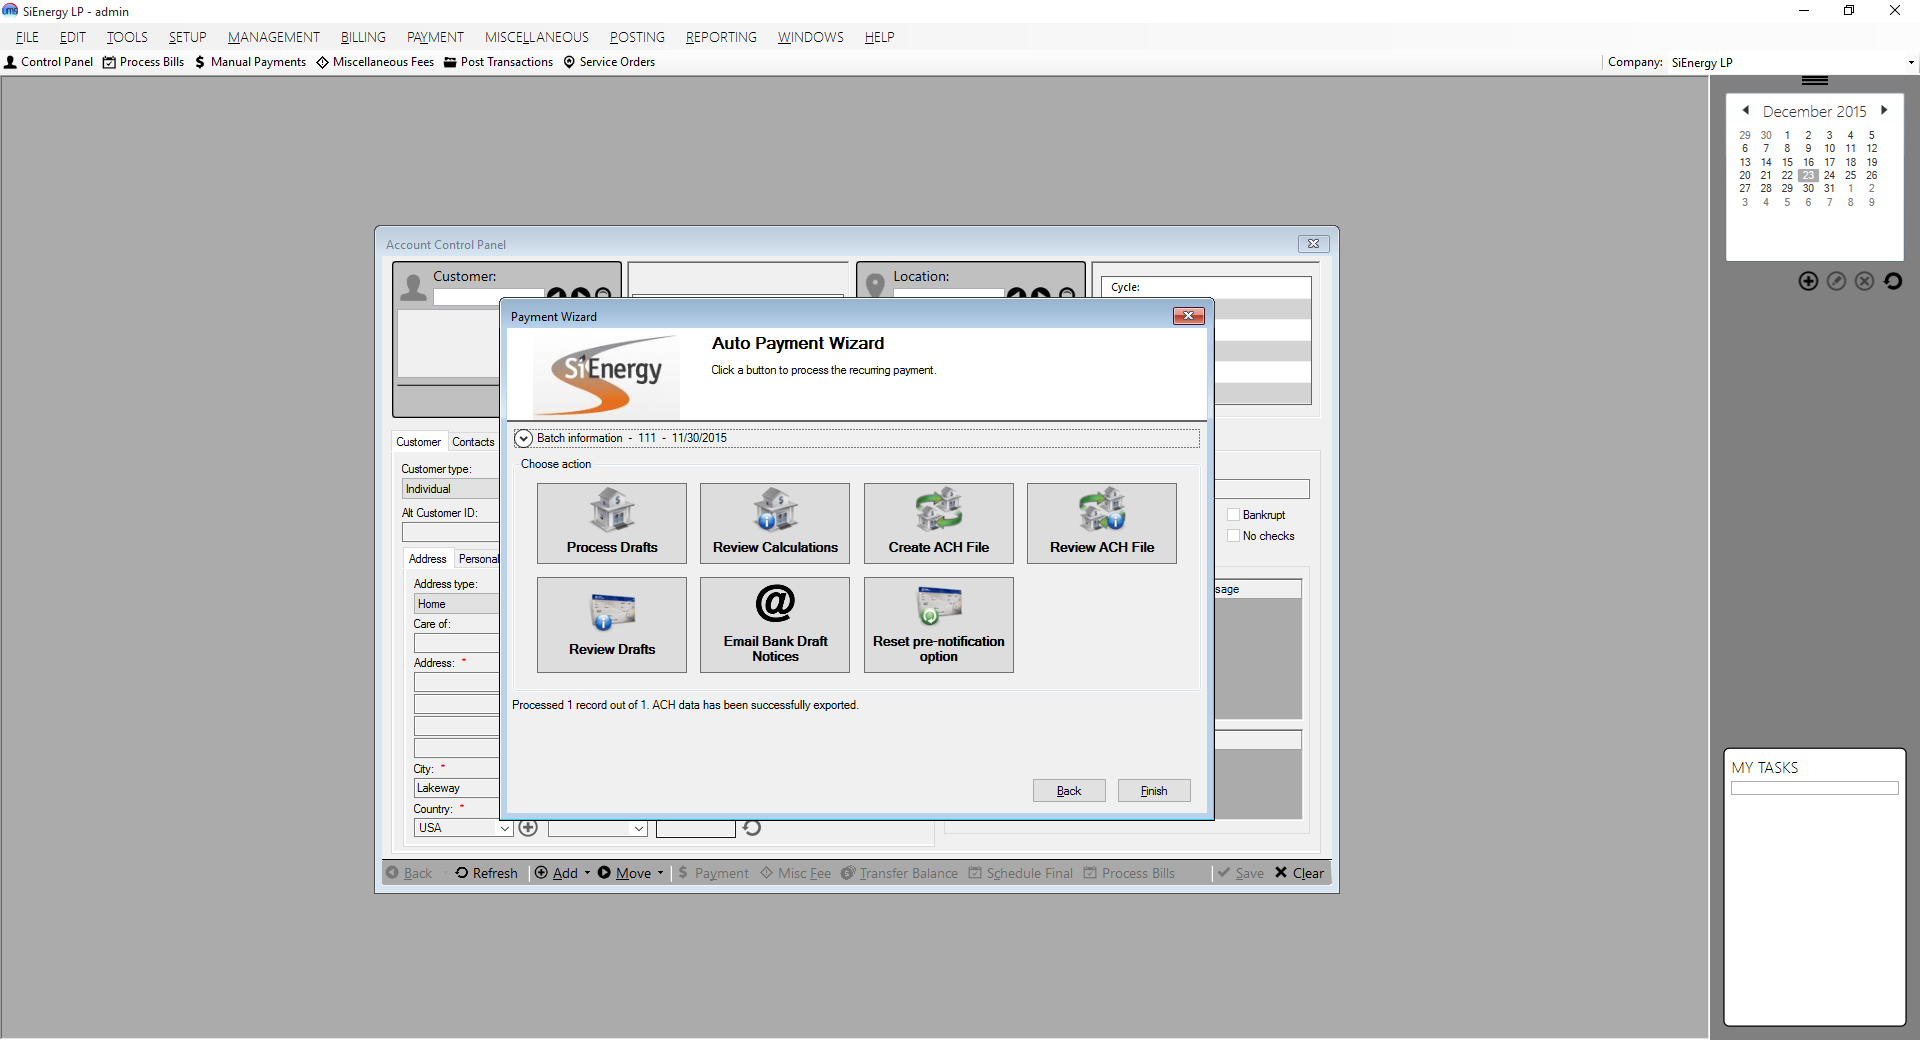
Click Process Drafts to create the ACH payment transactions
Click Review Calculations to view the created ACH payments
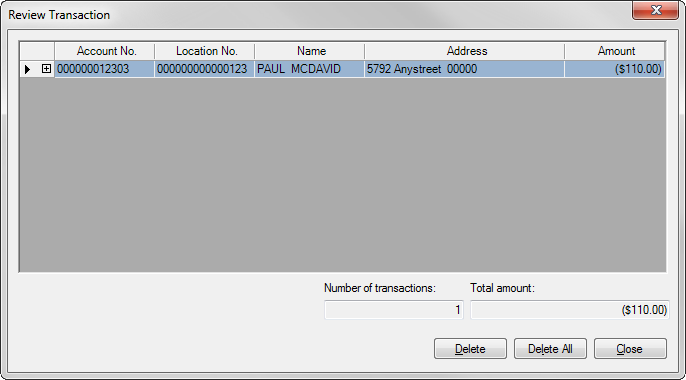
Figure 504: Auto Payment Wizard - Review Calculations
Click Create ACH File to create the export file to be sent to the bank for processing. A message will appear when the file is successfully created
Click Review ACH File to open the created file for review

Figure 505: Example of ACH File
Click Review Drafts to print the Draft Review List Report. This is a printable report listing each ACH transaction in the batch
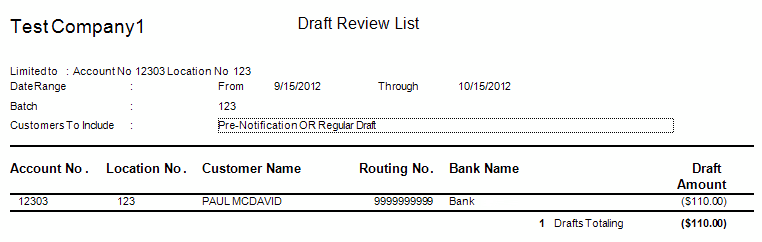
Figure 506: Example of Draft List
Click Email Bank Draft Notices to email notice of the payment to the customer(s) with an email address. Note that this option may be disabled. To enable email notices:
The Process Drafts and Create ACH File functions must have been completed, and at least one bank draft record must have been generated as a result. This ensures that valid bank drafts have been generated and reviewed prior to notifying the customer.
UMS must be configured to email draft notifications. To enable this setting, go to Setup > Company and click to edit the desired company. Select the “Payment Options” tab, and then check the “Send bank draft notification” option.
Click Reset Pre-notification Option to remove the ‘Notify in Advance’ flag from the pre-notification accounts so ACH payments will be created the next time auto payments are processed for this batch of customers
The Notify in Advance flag can be set on customers entered into the system between a billing and the processing of auto payments so they will not have a payment withdrawn until they have a billing charge and statement on their account
Notify in Advance can also be used to verify account information in advance of processing payments for new customers to allow time for corrections
Click Finish to close the Auto Payment wizard
Close the batch of payments from Posting - Post Transactions
Recurring Credit Card Processing
ACH and Recurring Card payments are now processed via the UMS Payment Wizard. Access the wizard from Payment>Payment Wizard.
Open the Payment Wizard
Click Auto Payment
Click Next

Figure 507: Auto Payment Wizard - Recurring Credit Card
Use the
button to open Batch Management and create or
select a batch for the Auto PaymentsFrom the Action list, select Credit/Debit Cards
Click Next
Figure 508: Auto Payment Wizard - Limit Options
Set the Limit Options and apply any necessary Code Filters for this batch of Auto Payments
Click Next
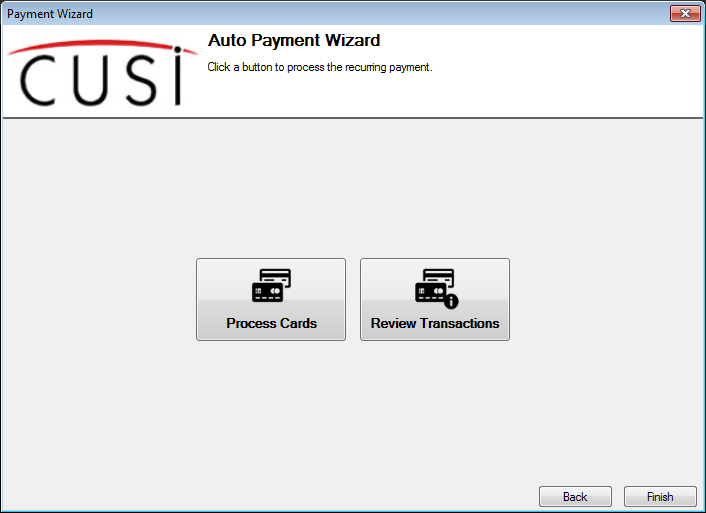
Figure 509: Auto Payment Wizard - Select Action
Click Process Cards to create the card payment transactions
Click Review Transactions to review the created card payments
Payment Reporting
The following reports can be utilized during the payments processing and payment reconciliation procedures.
Pre-Posting Edit List
The Pre-Posting report is a verification report that can be used for reconciliation purposes prior to the actual posting of transactions.
Posting Totals Report
The Posting Totals report lists transaction details and totals for posting sessions matching the limit criteria. This report can be used to see all transactions posted with a specific session.
Customer Payment History
The Customer Payment History report details the previous payments made by each customer throughout a defined time period. The date and amount of each payment are listed. The report can be filtered by specific payment methods. The summary section provides a total by each payment method.
Transactions List
The Transaction List is a powerful report, allowing the user to generate a list of individual transaction types or any combination thereof. Included are charges, adjustments, taxes, payments, and deposit charges, in addition to several others. One or many of the types can be selected to create a completely customizable transaction report.
Batch Totals Report
The Batch Totals report lists the details and totals of payment batches. It also lists totals broken down first by payment type (such as Cash, Check, or Charge), then by Service. If each cash drawer enters payments within their own batch, the Batch Totals report can be used to balance the drawer.
Balance Cash Drawer Report
This Balance Cash Drawer report shows reconciliation details to provide assistance in balancing the cash drawer against total payments received. It provides functionality to limit the report to a specific batch or user, include posted payments, un-posted payments, or both. Users may enter standard deductions such as voids and payouts or define new deduction types. The sum of the deductions is subtracted from the starting cash on hand. The difference indicates a shortage, an overage, or an in-balance status.
For further details regarding the above mentioned reports please consult the UMS Reporting section or the UMS help system.
Deposit Payment Transfer
Payments mistakenly applied to a Deposit Charge on one account can now be transferred to a different account and applied to charges other than a Deposit Charge.
The following illustration has a Deposit Charge and Deposit Payment
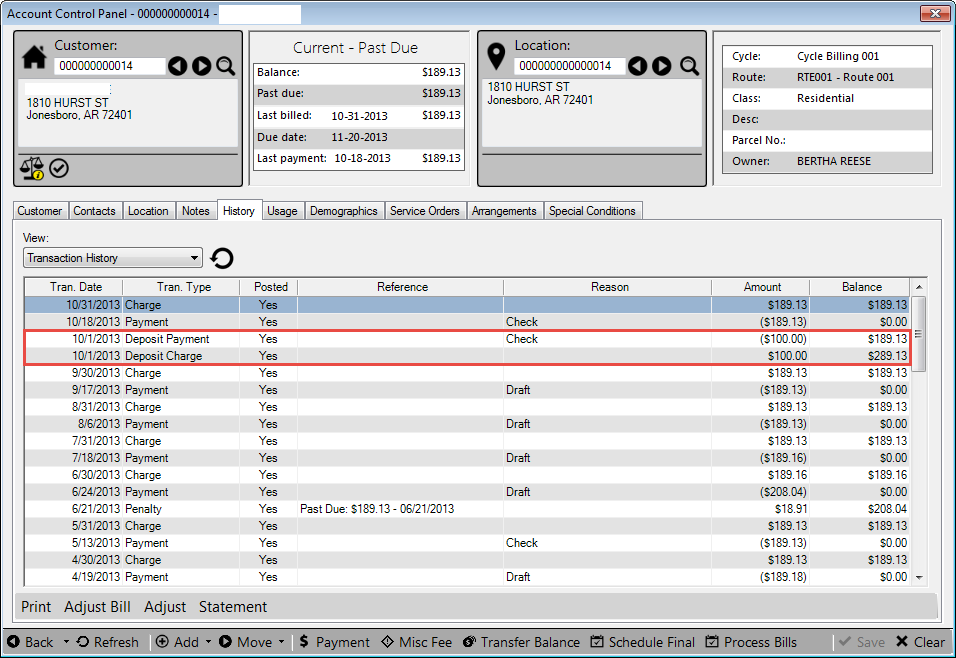
Figure 510: Deposit Charge and Payment
Highlight the Deposit Payment line on the History Tab and click on the Transfer Payment label at the bottom of the screen
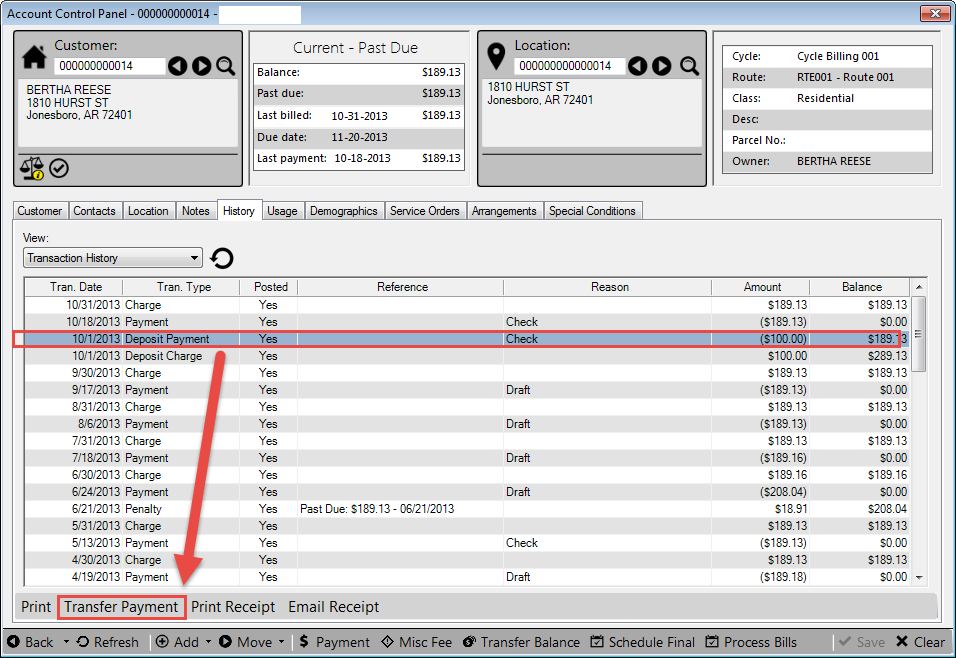
Figure 511: Transfer Payment
You now have a Transfer Payment screen
Enter the New Customer no. that should receive the Payment Transfer
Change the Transfer date if necessary
Click on the OK button to move the payment
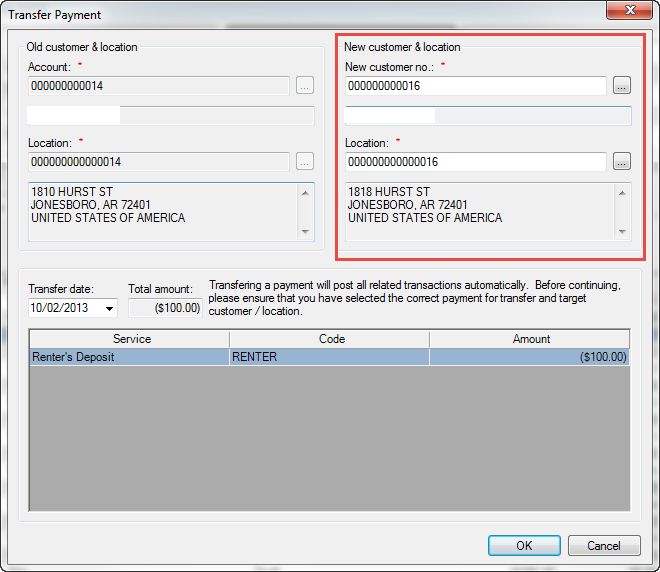
Figure 512: Payment Transfer Screen
The History now shows the Deposit Payment has moved to another account
Transfer to AccountNo: 16 – LocationNo: 16
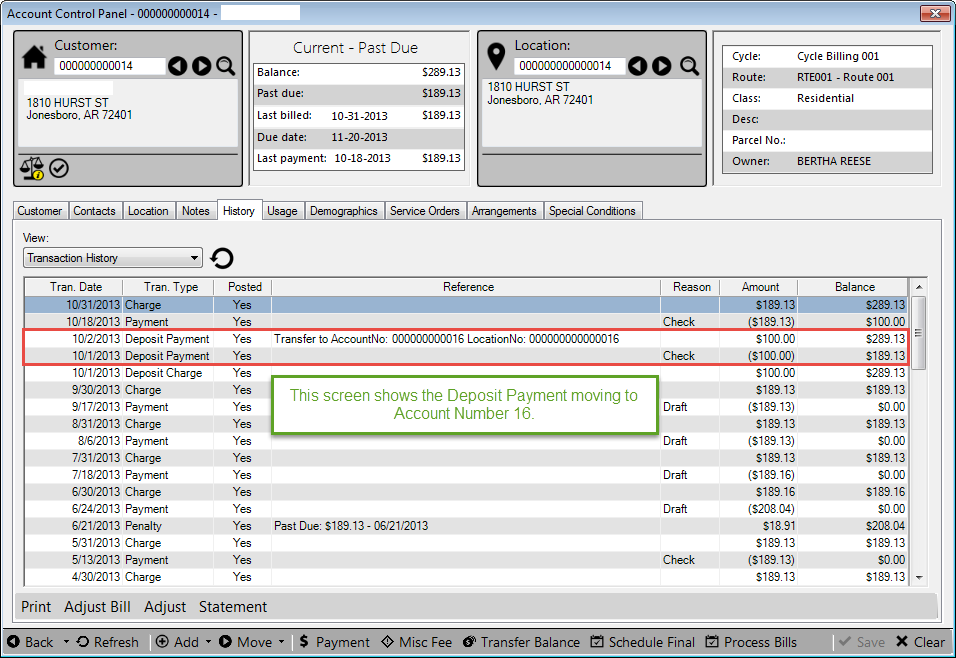
Figure 513: Payment Moved
Account No: 16 has a History transaction showing the payment came from Account No: 14
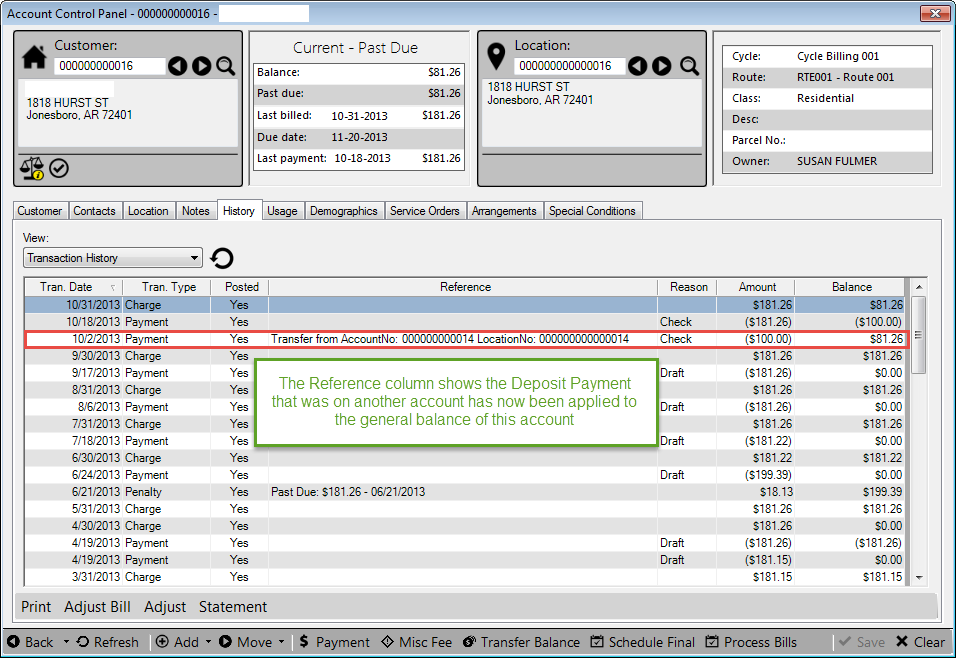
Figure 514: Moved Payment
Payment Gateway Reconciliation
The Gateway Reconciliation Form is designed to reconcile charges against the selected payment gateway. All values in the table can be copied and pasted into a spreadsheet or into a word document. To access go to Payment>Gateway Reconciliation.
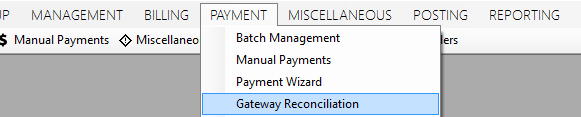
Figure 515: Gateway Reconciliation location
The Gateway Reconciliation screen will display.

Figure 516: Gateway Reconciliation screen
Use the Gateway selection to choose the vendor used for transaction reporting.
Select the date range of transactions you want to reconcile from From and To date pickers. Note: The Authorize.Net gateway will only provide reporting for the past 30 days of transactions.
Click the Search button in the bottom right corner of the screen to view transactions within the set date range.
Note: Only the service provider Bluefin will display the Credit Cards and eChecks options in the top right corner. These will not be displayed for other providers.
The column headers displayed may vary by gateway vendor.
The Status Column provides information regarding the transaction. This varies by vendor.

Figure 517: Gateway Reconciliation – Transaction List
Transaction Quantity (total number of transactions) and Transaction Amount (total dollar amount of the listed transactions) are displayed on the left below the transaction list box.
By checking the Show Declines box, on the right below the transaction list box, only the Declined transactions.
You can filter the transaction list by clicking the down arrow in the drop-down menu in the bottom left corner of the screen by the following options:
TransactionID
AuthCode
Name
Last 4
Amount
Trans Type
Transaction Date
Type desired filter information into the text filed and click the Search button.
You can print the displayed transactions by clicking the Print button in the bottom right corner of the screen.
Reverse/Void Payments
The Reverse/Void Payment enhancement upgrades the way payments are reversed—or voided—so the user can perform a single action through UMS. Previously, certain payment gateways required users to reverse payments in UMS and then manually through the payment gateway. Only the entire amount of that payment can be reversed/voided. No partial reversal is possible with this feature.
This feature is on the ACP and can only be viewed when a payment has
been selected within the History screen. The History tab and Reverse
option are highlighted in red below.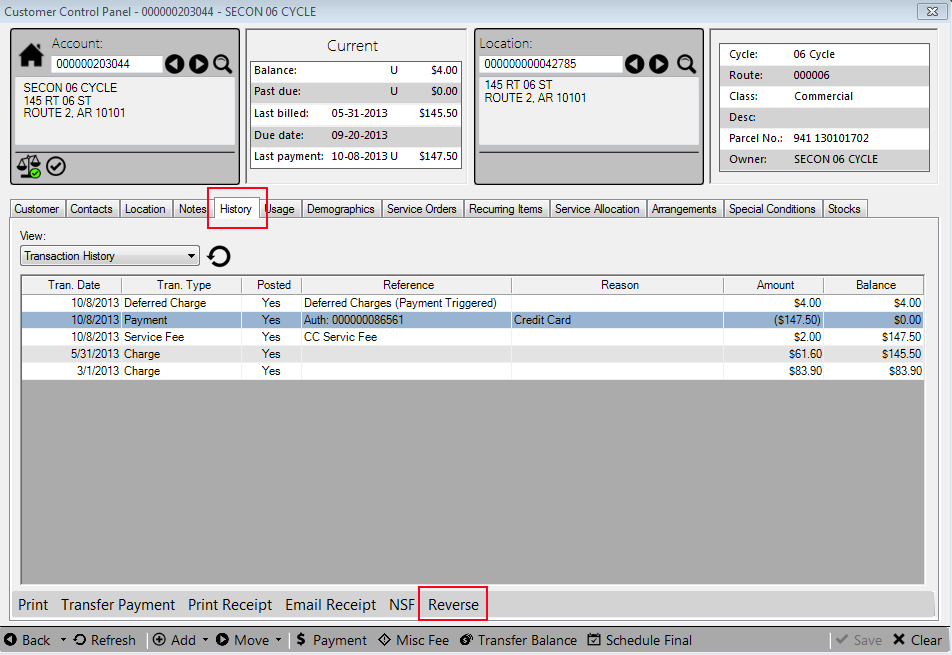
Figure 518: Reverse/Void Payment
Select the payment that needs to be reversed/voided. Note that this can be done with any type of payment (credit card, check, cash, echeck).
Click Reverse.
The Add Reversal screen will appear
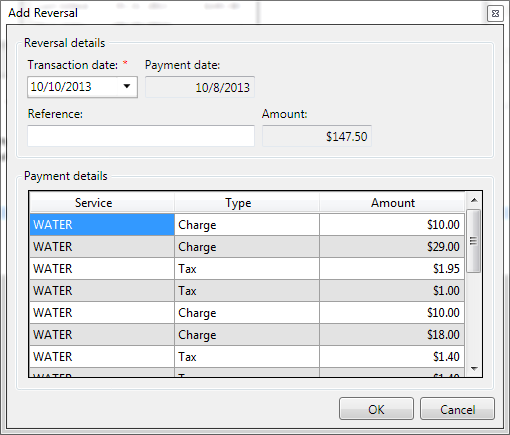
Figure 519: Add Reversal Screen
In the Reversal details section:
Transaction date should be the current date and is a mandatory field
The Payment date should be the date the payment was accepted originally into the system and is automatically populated
Reference is an optional documentation field
Amount should be the total amount of the reversed/voided payment
In the Payment details section:
All services, types of charges, and the amount of each charge is itemized but can’t be adjusted in this screen.
Click OK.
A message should appear asking if you also want the transaction voided at the payment gateway. Click Yes. If you receive a message that not all transactions could be reconciled at the Payment Gateway, you may need to go into the Payment Gateway itself and manually reverse/void the payment.
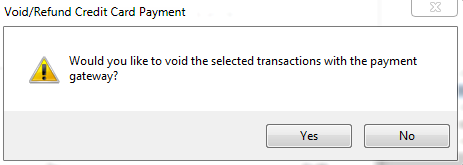
Figure 520: Void/Refund Gateway Message
If the Void/Refund Credit Card Payment error is displayed asking if you want to void the transaction at the payment gateway, click Yes.
When completed, the History tab should be displayed.
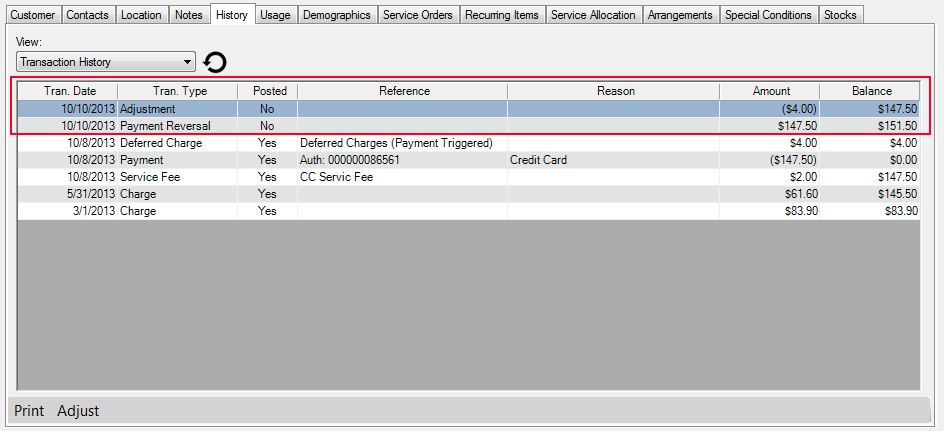
Figure 521: Voided Payment Final
In the Tran. Type field of the History tab, there should be a notice that says “Payment Reversal”
Also in the Tran. Type, another notice should state “Adjustment”, which is the total amount voided. The amount will be held within parentheses ( )
The reversed/voided payment is ready to be posted. From a UMS perspective, the reversal is immediate however there is still a delay in refund from the payment gateway perspective.
Expiring Recurring Credit Cards Process
The Expiring Recurring Credit Cards Process helps the user identify the credit card auto payments that are set to expire, and proactively communicate with the customers to help them update the payment details.
To access the feature, go to Payment>Expiring Recurring Credit Cards .
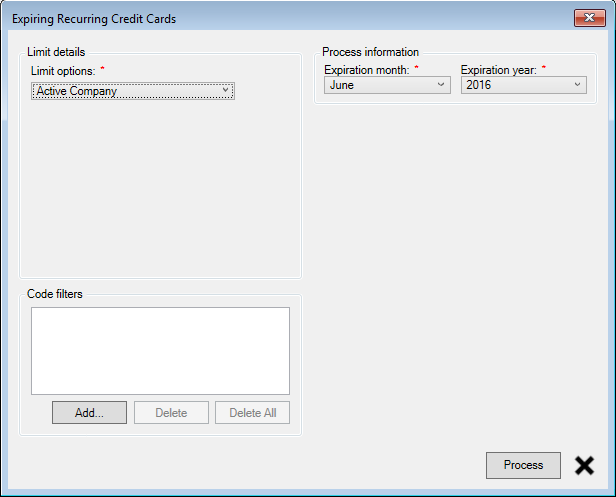
Figure 522 Expiring Recurring Credit Cards - Limits
The process takes the expiry month and year in addition to the standard limit options. Select the applicable limits and click on the “Process” button to find the list of customers that meet the criteria.
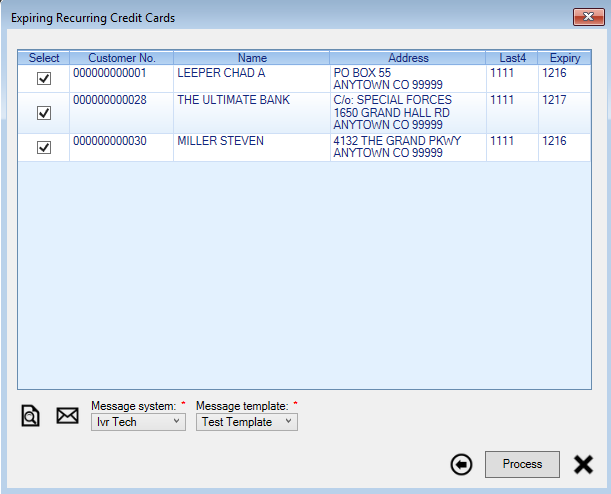
Figure 523 Expiring Recurring Credit Cards - Review/Call
The list allows the user to select the customer(s) to communication with or to include when viewing/printing a report.
To call the selected customers using IVR, select the IVR provider from the “Message system” list and select a template from the “Message template” list and click on “Process”.
The “Preview” image button opens a report of the selected customers to view or print.
To email the selected Customers, click on the “Email” image button.
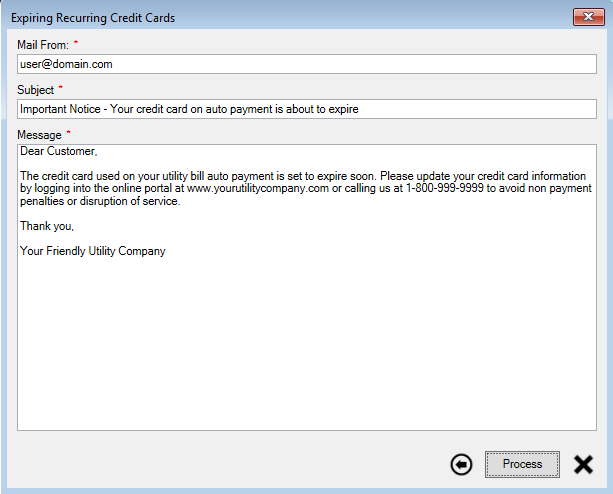
Figure 524 Expiring Recurring Credit Cards - Email
Compose the email by providing a Subject and typing the Message, and then click on “Process” to send out the email to the selected customers.
Scheduled Payments
Overview
The scheduled payments feature allows customers to use the payment portal to schedule a one-time payment to be automatically drafted from their bank account at some future date. This allows customers the convenience of an automatic payment without the long-term commitment of autopay.
Scheduled payments requires both UMS and CWP (a.k.a. payment portal) components. Consult with your sales manager if you do not currently have CWP.
Requirements
UMS 6.5+
An already-configured and tested ACH setup
An e-check payment gateway is not required since these payments process as drafts
CWP 2.0.1274+ (2020-12-15)
Turn on the feature "Enable ACH Scheduling"
Definitions
Scheduled payments are not real payments until the scheduled payments process runs and completes. They are structures that contain the data to be "converted" into real payments, but the rest of the system does not recognize them as payments or transactions of any type. They do not affect balances, are not considered pending payments, and are not included in reports. After processing, however, payments created through this method are indifferentiable from "normal" payments.
UMS
Requirements
Besides a working ACH setup, the only remaining requirement is to add a scheduled task. In order to set that up, there are a few pieces of information to know beforehand.
- Schedule.
As with other scheduled tasks in UMS, this task can be set to repeat daily, weekly, or monthly. The typical best use case will be daily. A monthly schedule may result in a customer receiving penalties if the process happens at a poor time. A weekly schedule may be useful in specific circumstances. Regardless of the period selected, the suggested time is overnight so that a prepared file can be ready to send to the bank the following morning.
The recommended schedule is daily at midnight.
- "Act as User".
Payments will appear as if they were created by this user.
- Name of the configured ACH profile.
From Setup >> Configure ACH.
- ACH file export path.
This path should be to an easy-to-locate folder on the workstation of the user responsible for monitoring the scheduled exports and sending the ACH files to the bank (or delivering those files to the party responsible for communicating with the bank). For daily exports, the "Include time stamp on export file" setting is strongly recommended in order to prevent previous unhandled export files from being overwritten.
- Email addresses of users to notify.
The process will send notifications of successes/failures by email when complete.
Scheduled export setup
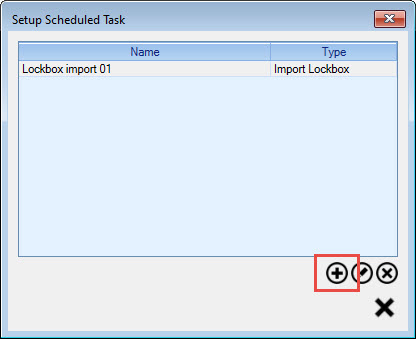
To create the scheduled task in UMS, go to the Management menu and select Scheduled Tasks.
Add a new task.
For the task type, choose "Export Scheduled ACH Payments".
Give the task a name to identify it.
In the "Time scheduled" block, create the schedule that will work best for your use case.
In the "ACH information" block, select the settings appropriate for your installation.
In the "Result communication" block, add email addresses (one per line) for individuals who should receive email notifications.
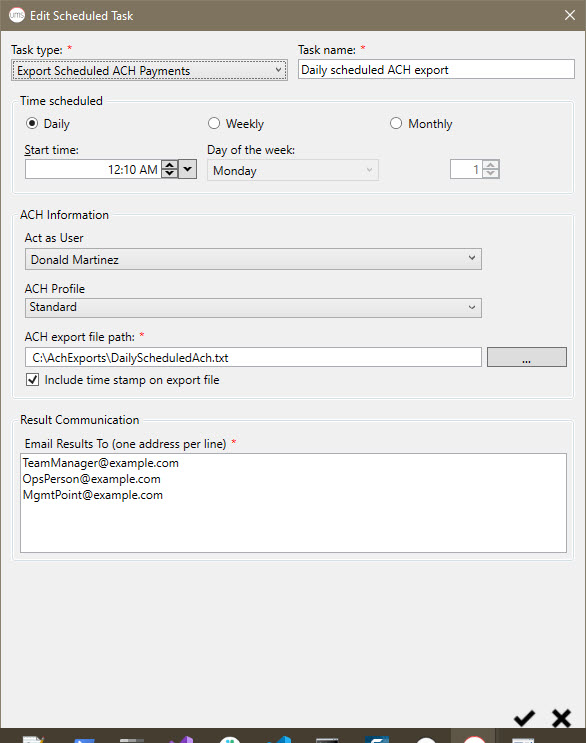
Warning: If the task is scheduled to be run outside of business hours, the workstation setting up the task must still be powered on in order for the task to actually run. If there are special conditions preventing this in your environment, the task can instead be set up on the server.
Process
When the scheduled task runs, any scheduled payments having a scheduled date on or earlier than the time the task executes will be processed. Real payments will be created from these scheduled payments and an ACH export file will be generated. Payments apply automatically - just the same as a payment taken in-house when the apply method is not changed from the default setting of Automatic. Payments may post automatically depending on the company setting "Auto-post external payments". Communications will be sent on payment creation to those customers having the Payment Received communication preference set.
At this point, users can step into their established internal processes as if a "normal" ACH was just created. Review payments/totals/batch, review export file, and adjust as needed before sending the file to the bank.
View/review scheduled payments
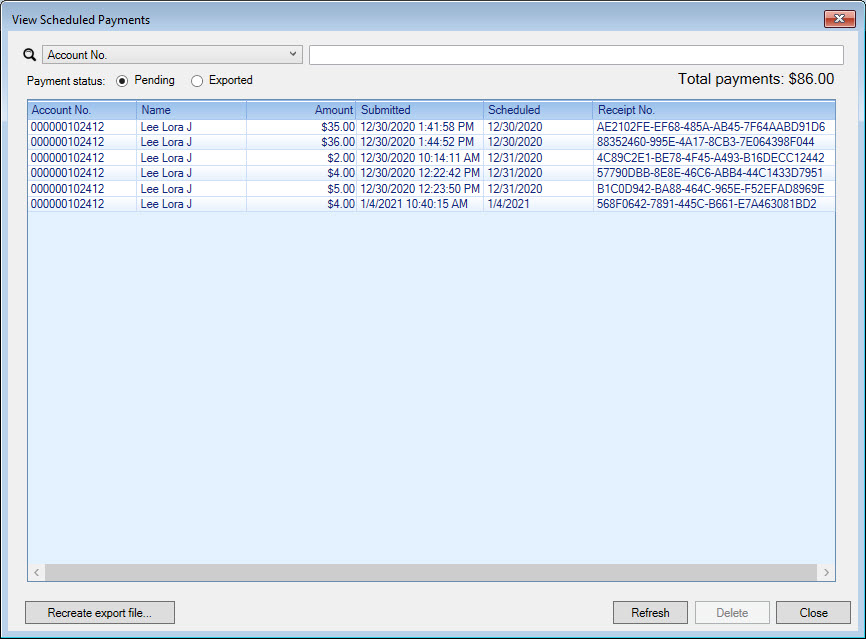
Scheduled payments are not real payments until processed by the scheduled task. To view pending scheduled payments or already-exported scheduled payments (scheduled payment data that has already been "converted" to real payments), visit the Payment menu and select View Scheduled Payments. To track down specific payments (to help with customer service calls, for example), additional filtering is available for customer account number, customer name, payment amount, processing date (scheduled date), and receipt number (the "temporary invoice number" provided to customers on the portal as part of their receipt).
Individual scheduled payments can be deleted from the View Scheduled Payments window. Warning: These cannot be "undeleted".
If, after reviewing information the morning after export, changes are necessary before sending the exported ACH file to the bank, previous exports can be re-exported using the "Recreate export file..." option. Any scheduled payment records exported on the selected date will be used to create a new export file. Warning: the same date will be used again, so be aware that previous files having the same time stamp will be overwritten, so back up export files as needed before re-exporting.
Options
Scheduled payment export will automatically batch these payments together if the company option "Batch electronic payments automatically" is enabled. No other settings for auto-batching are used for scheduled payment export - the process only cares about whether that company setting is enabled. If it is, a unique batch is automatically created for these payments.
Automatic posting of scheduled payments during the scheduled process is controlled by the company setting "Auto-post external payments". Scheduled payments are external by definition (coming from the payment portal), so their posting is inherently tied to this setting.
Service fees can be applied to these payments. If desired, add a fee through the Setup menu's Service Fee tool by selecting the "Scheduled ACH" payment method.
CWP
Requirements
Once the feature is turned on, no other changes are required.
Setup
After settings are enabled, no additional setup is required to accept scheduled payments. The "Scheduled Bank Draft" option will appear on the payment page followed by an an icon that will display a tooltip on click/tap with brief help text to explain the payment option.
As with most other phrasing on the portal, an administrator can use "Configure Portal Wording" to customize the displayed wording for a specific implementation.
- LabelScheduledAch
Used on: payment page
Description: the displayed name of the payment method
Default: Scheduled Bank Draft
- LabelScheduledDate
User on: payment page
Description: label for the desired payment date
Default: Schedule For:
- ToolTipScheduledAchHelp
Used on: payment page
Description: the helptext displayed in the payment method selection tooltip
Default: Schedule a one-time payment to automatically draft from your bank account on or after the scheduled day.
- ToolTipScheduledAchDateHelp
Used on: payment page
Description: the helptext displayed in the date selection tooltip
Default: Your payment will be processed on or after this date.
- TextScheduledPaymentWalletPromptWrapper
Used on: payment page
Description: text directing the user to enter a bank or select a saved bank. This text contains a placeholder that will be automatically replaced by the next item.
Default: Enter new bank information or {TextScheduledPaymentWalletPromptLink}.
- TextScheduledPaymentWalletPromptLink
Used on: payment page
Description: the link text that will trigger the saved bank selection popup. Automatically replaces the placeholder used in the previous item.
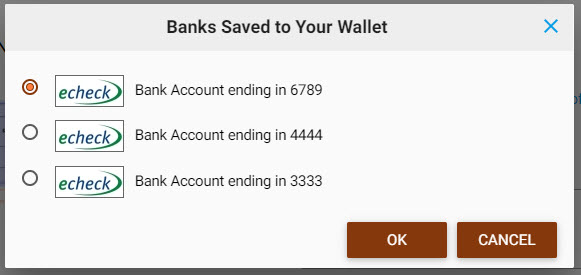
Default: select one of your saved bank accounts here
- TitleScheduledPaymentWalletPrompt:
Used on: payment page
Description: the heading of the saved bank selector popup.
Default: Banks Saved to Your Wallet
- LabelReceiptScheduledPaymentDate
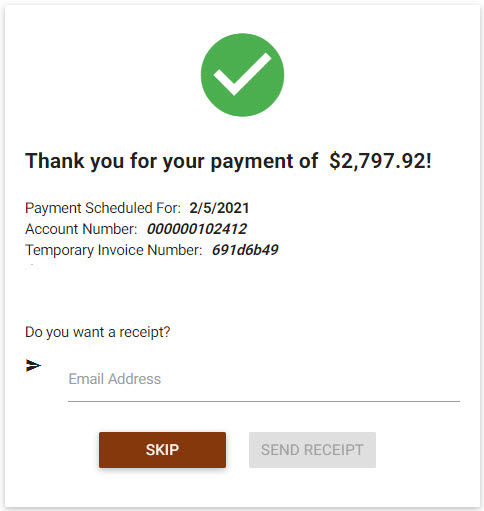
Used on: receipt page
Description: label for the date scheduled
Default: Payment Scheduled For:
- LabelTemporaryInvoiceNumber
Used on: receipt page
Description: label for the payment confirmation number
Default: Temporary Invoice Number:*
- TextScheduledPaymentReceiptError
Used on: receipt page
Description: text indicating a problem saving the scheduled payment.
Default: There was a problem getting this scheduled payment receipt. Please contact us to verify the payment has been scheduled.
- ErrorScheduledPaymentWalletSaveProblem
Used on: receipt page
Description: text indicating a problem saving the payment method to the user's wallet. This is the generic text. The specific error, if available, will be displayed after this message.
Default: Your payment has been successfully scheduled, but there was an error while saving payment method for future use.
Process
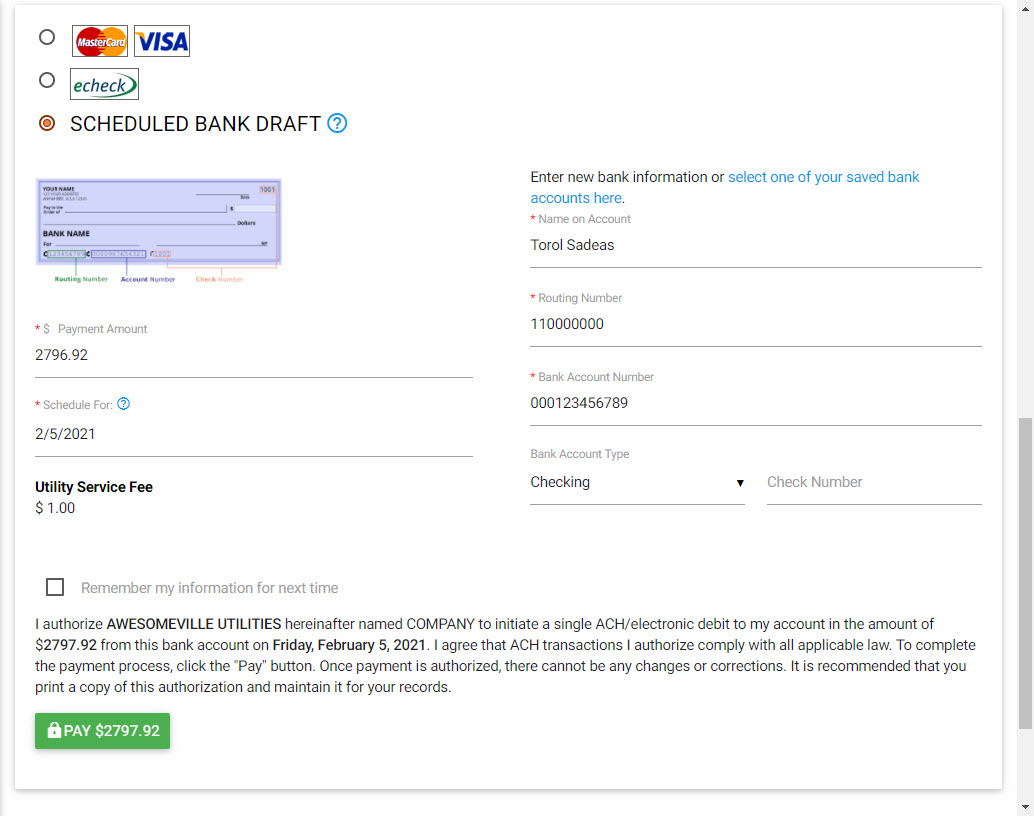
Customer payment entry on the payment portal for this payment method is the same as a check payment with the addition of the "Schedule For" date selection.
Users who have no bank accounts saved to their wallet will not see the Enter new bank information or select one of your saved banks here option. However, they may choose to save the payment method to their wallet for future use. Users having at least one saved bank account will be allowed to select one when clicking the link.
Doing that will change the payment form to reflect that a saved bank is being used.
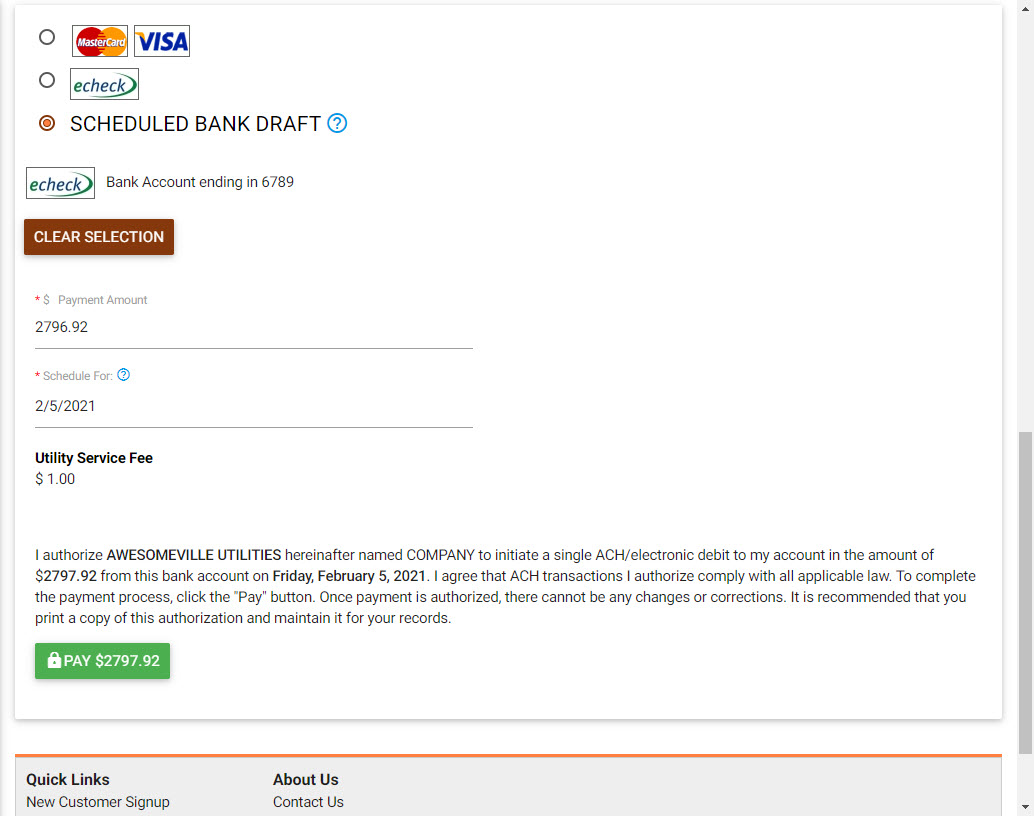
Users may clear the wallet selection at any time before submitting the payment and enter bank information manually.
Regardless of whether the payment method is saved or new, when the scheduled payment is submitted as saved successfully, the user will be redirected to a receipt page similar to that of a "normal" payment. The total scheduled amount including any configured service fee will be displayed along with the scheduled date, selected account numbers, and a "temporary invoice number", which can be treated as a payment confirmation number. Any enabled receipt options, such as email or text, will also be available on the receipt page.